 |
www.TK560.com
Vacuum Forming, Movie Prop, Sci-fi and GIjOE Forum
|

|


|
| View previous topic :: View next topic |
| Author |
Message |
drcrash
Guru

Joined: 04 Sep 2006
Posts: 705
Location: Austin, Texas
|
 Posted: Sun May 20, 2007 9:09 am Post subject: maskmaking pix (life- & buck casting w/alginate) Posted: Sun May 20, 2007 9:09 am Post subject: maskmaking pix (life- & buck casting w/alginate) |
 |
|
Our friend Manda saw Mykel's Bast mask ( http://www.tk560.com/phpBB2/viewtopic.php?t=567 ) and wanted us to help her make a cat mask. (What's with the cats lately? Beats me. Not our usual industrial style.)
First phase of face casting: alginate on face, with gauze pressed into the surface to help plaster mother mold (next step) adhere & stay registered:
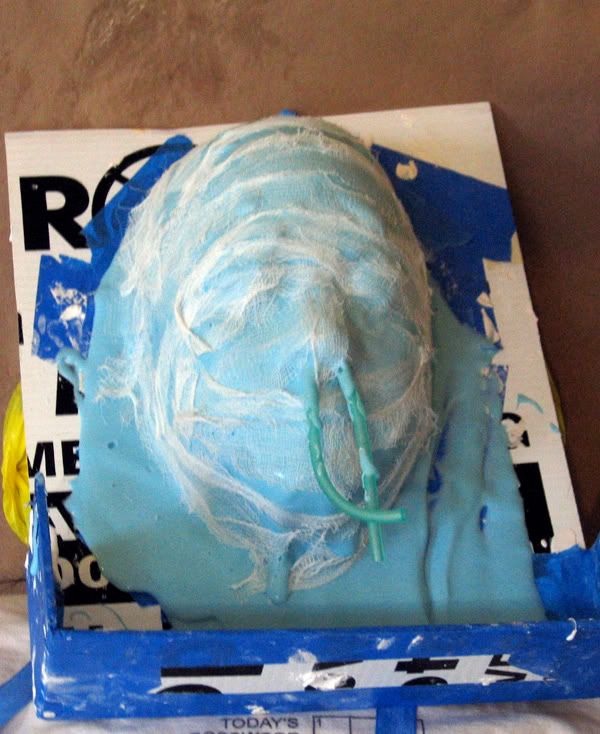
This phase takes about 10 minutes with slow-setting alginate. (With regular, you have to work FAST.) It starts out kind of runny (the way we mix it) so it slowly slides off and you have to keep scoop it up and deposit it on the victims's head again until it starts to set up. While it's runny, we focus on spreading it around smoothly. As it starts to set up and more or less stay where it's put, we shift to ensuring a reasonably even layer all over. (1/8" to 1/4"?)
We use usually use rubber tubing breathing nose tubes, not cut pieces of plastic straws---they're too thin and hard, and if you bump them, can hurt your victim and mess up their facial expression, as well as convincing them you're a clumsy idiot. (Ask me how I know.)
Because we like the alginate kind of runny at first, we put a corrugated plastic thing with a cutout around the victim's head. (It's made from a discarded sign.) We shim it to fit reasonably well with wide painter's tape. It doesn't have to fit perfectly, because the alginate isn't all that runny, and the victim has a rubber cap and/or or saran wrap over most of their hair.
(But if we want to cast hair over the forehead or facial hair, we leave it exposed, and pack it very well with cholesterol hair conditioner. That lets you cast the overall surface texture of the hair without the alginate flowing between the hairs and getting stuck... but if you do it that way, be careful to just let the alginate flow over the hair, and don't rub it in. Alginate won't really stick to things like hair, but it will encapsulate individual hairs and create a suction around them, and sometimes pull them out. Eyelashes and eyebrows are not usually a problem, because they're not long or bulky or tangly. We've sometimes put a little bit of cholesterol on them, but that leads to some clump & bubble flaws in the mold, so we probably won't put anything on them anymore, except maybe for particularly bushy eyebrows.)
The corrugated plastic thing has a gutter at the bottom made by cutting it halfway through and bending it, and taping it together. That way, you can just scoop the alginate up without having to be quick about it.
Lots of lifecasters use thicker alginate, and do not bother with the tubes or the alginate-catching thing, but this is how we do it. (One advantage to the board-around-the-head thing is that you end up with a bowl-like mold with a level rim, which makes it easy to pour a flat-backed cast that will sit flat on a vacuum-forming platen. Another is that runny alginate is cheaper than thick alginate, becuause you use a little more water and a little less alginate. It shrinks faster and is more fragile, though, so don't expect to get more than 2 or maybe 3 casts out of it.)
Second phase: plaster bandage & wet plaster mother mold over alginate:
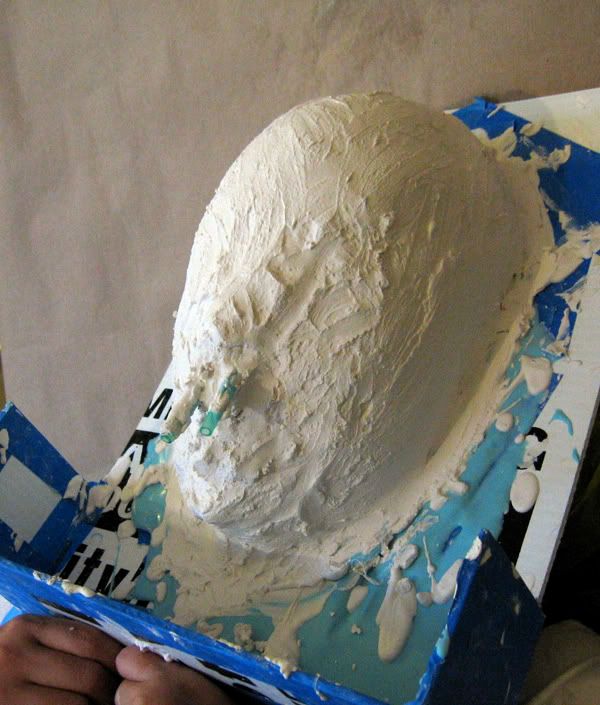
This phase takes about 15 minutes, plus a few more minutes of waiting to make sure the plaster is set well enough not to break taking the mold off.
We mix a batch of slightly thin plaster to dip the bandages in, becase the dry plaster on the bandages isn't really enough to make them creamy. After getting the plaster bandages on, we just smear the remaining plaster over it, which is why you don't see the bandages in the picture. At that point it gets a bit heavy, which is why Manda is supporting it with her hands at the very end.
Now we have our victim take off the cast, and we fix it up a bit to get cast-in vent holes:
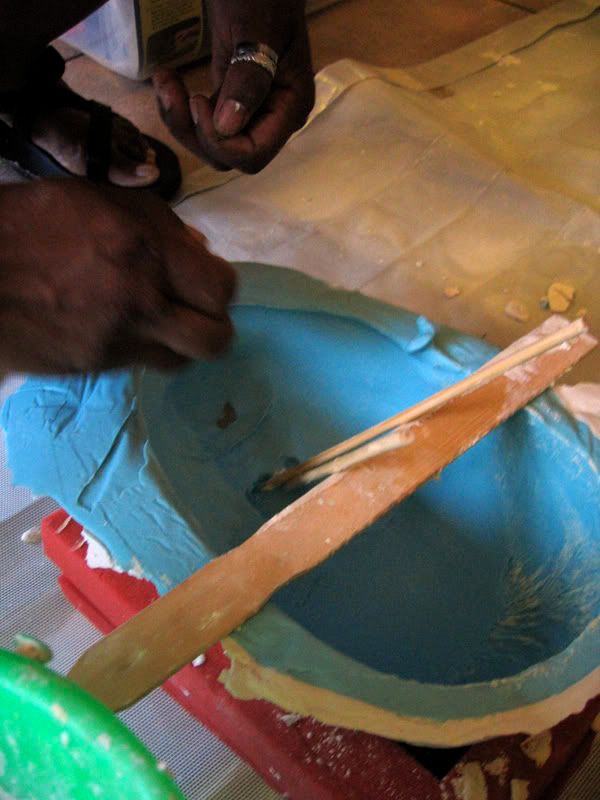
We've usually plugged the nostril holes with modeling clay, and stuck chopsticks or thin wooden skewers in them, but in this case, I think Mykel left the breathing tubes in, and just stuck the ends of greased chopsticks right in the tubes, plugging them & positioning the chopsticks dead center. Neat. You can also see a little piece of (gray) modeling clay under the lips, filling in & smoothing over a pit where we missed a bubble. Oops.
We cast plaster into the face mold in the usual way, and pulled out the chopsticks, then pulled the plaster face cast out of the alginate.
If we expected to use the face cast for much vacuum forming, directly, we'd have made it out of something tougher. (Water putty at least.)
Demolding this one was a bit difficult, because the mold went so far back over the top of the head. (We usually don't go back quite so far, positioning the board-around-the-head more vertically.) That's not a problem for a one-off if you get it right the first time---you can just break the mother mold---but we wanted two casts.
Continued next post...
_________________
Paul (a.k.a. Dr. Crash)
Tired of buying cheap plastic crap? Now you can make your own! www.VacuumFormerPlans.com
Last edited by drcrash on Mon May 21, 2007 10:39 am; edited 5 times in total |
|
| Back to top |
|
 |
drcrash
Guru
Joined: 04 Sep 2006
Posts: 705
Location: Austin, Texas
|
| Posted: Sun May 20, 2007 9:10 am Post subject: modeling clay mask sculpt |
|
|
Manda sculpted the cat face on the resulting plaster face cast...
And it came out like this:
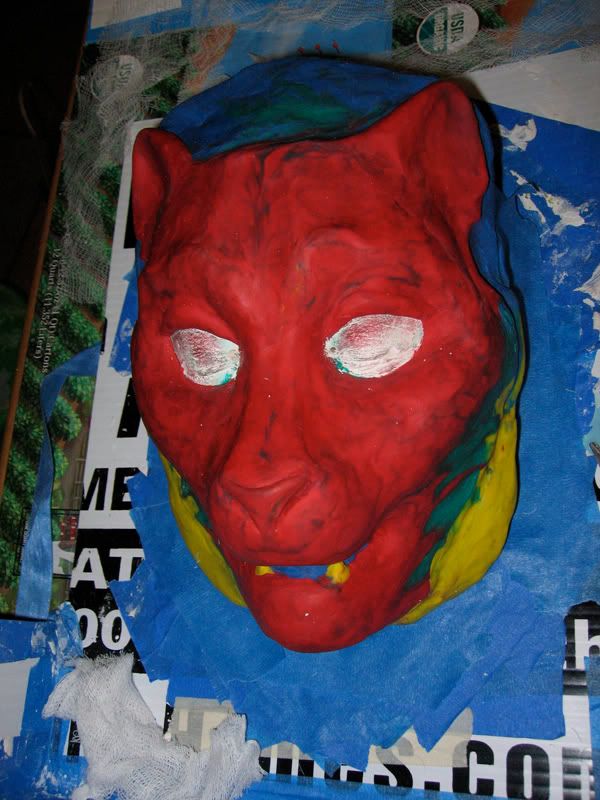
The modeling clay is just the cheapest we could find, which turned out to be $1 each for four-color four-stick packages at a nearby dollar store.
One of the nice things about alginate for molds is that it's not picky like silicone---you don't need sulfur-free clay---and it's not sticky like urethane. You can use it on almost anything that's modestly water resistant. (It only has to withstand damp clammy goo for 20 minutes or so.) It doesn't stick to anything that I know of. (Not even itself---fresh alginate will not stick to alginate that has already set, unless you treat the surface with something. They sell stuff for that, so you can make a mold more than one go, but there's some very cheap substitute for it. Unfortunately, I've forgotten what it is... maybe a baking soda solution.)
Previously-used modeling clay works fine. (In fact it works better than fresh clay, sculpting-wise.)
(Manda did the sculpt the righteous way, first building up a skullish shape, then adding the major muscles, then the superficial bits. She used different colors for those different things, which you can see vestiges of in the pictures.)
If you sculpt modeling clay the right way---a technique involving small hunks of clay gently spread and overlapped---it orients the clay platelets mostly parallel to the surface, and you can take the clay sculpt off the plaster cast intact.
Here's a picture from later, after casting the buck, when Manda took the sculp off the face cast and put it on her own face:
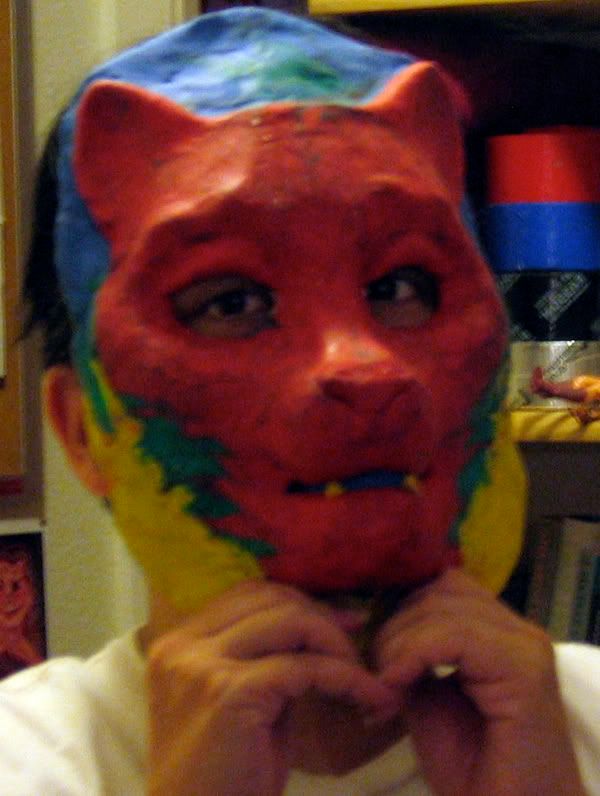
Naturally, it fit like a glove.
That might be useful for casting two-sided space-filling things that must fit well---you could easily make a pair of matching molds.
_________________
Paul (a.k.a. Dr. Crash)
Tired of buying cheap plastic crap? Now you can make your own! www.VacuumFormerPlans.com
Last edited by drcrash on Sun May 20, 2007 9:45 am; edited 3 times in total |
|
| Back to top |
|
|
drcrash
Guru
Joined: 04 Sep 2006
Posts: 705
Location: Austin, Texas
|
| Posted: Sun May 20, 2007 9:11 am Post subject: cast water putty buck w/cast-in vents, craft foam pulls |
|
|
We put alginate & a plaster mother mold over the clay sculpt, in much the same way we did Manda's face. We left the life cast with the alginate-catcher around it, so that it could catch alginate during that process too.
(I say "we" but it was all Mykel at this point... I'd gone to to bed.)
We cast that in plaster, with 4 greased skewers to make cast-in vent holes---for both nostrils and both eyes, so that the plastic would suck down well around the nose and the eye sockets. One of the skewers slipped, so we ended up with a vent hole in one cheek instead of that nostril, but the buck worked fine.
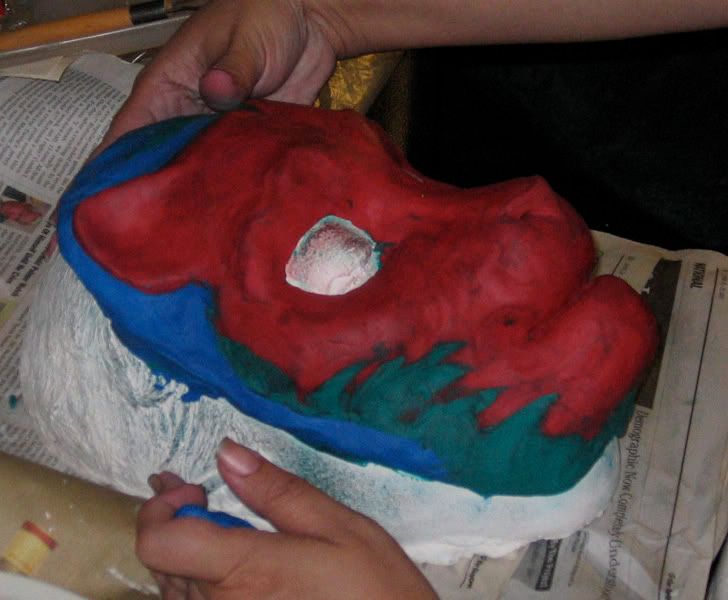
When the water putty was fresh and easy to carve, Manda carved it a little to sharpen up some features, resulting in this:
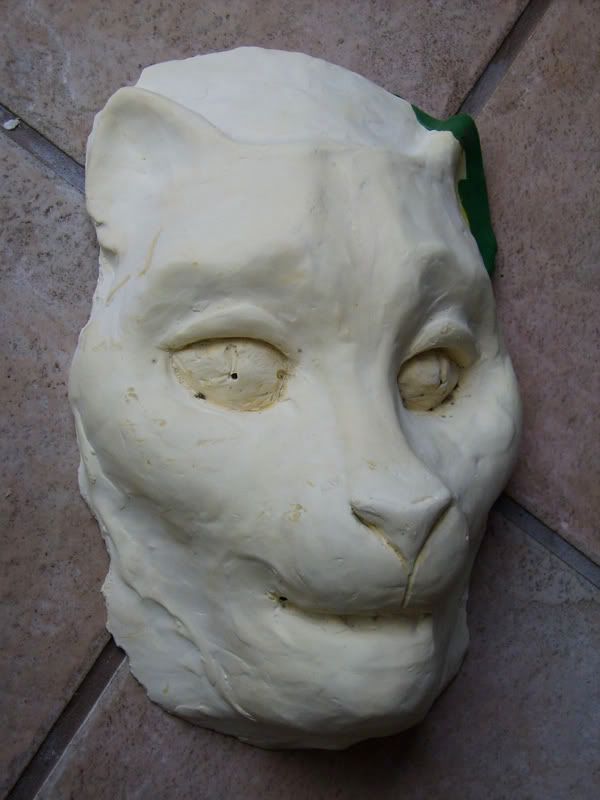
(The green over one ear in this picture is due to a handling accident, not during a pull, which broke off that ear; Manda temporarily patched it with yellow clay--visible in the next picture---and fixed it with green epoxy putty after the vacuum forming was done.)
She hadn't smoothed the clay like you would for something like stormtrooper armor, so you can still see the hand-sculpted texture. For the ultra-smooth mass-produced look, you'd want to smooth the clay with techniques like scraping it with a series of increasingly fine-toothed "rakes" and/or smoothing it with lighter fluid & scrub pads... you could also sand & fill the cast buck with more water putty... but that was not the goal here.
Here's the buck on the platen, ready to go:
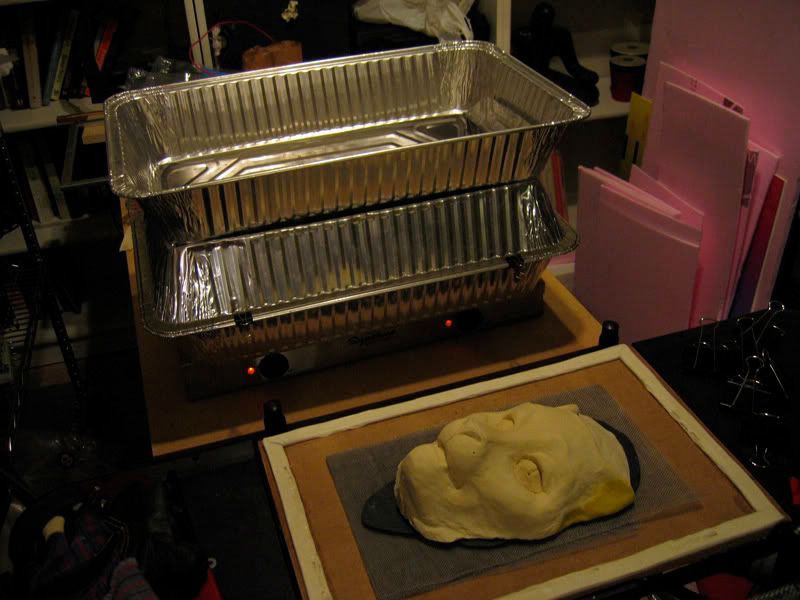
That's the two-burner-hot-plate oven behind the platen. With such a small platen, it's not awkward leaning over the platen to get the plastic onto the oven, or off the oven and down onto the platen.
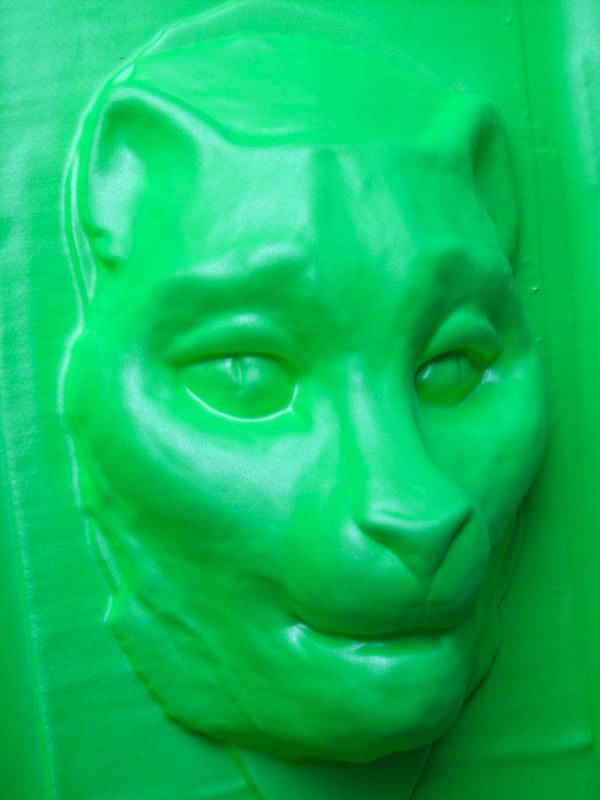
Here's a test pull in 2mm green craft foam. The actual surface is smooth, but not as shiny as this picture looks.
Here's my favorite pull, in 3mm black craft foam, slightly burned by cooking it too fast... I'd forgotten to tell Mykel to flip the oven on and off for thick foam before I went to sleep... but it came out very nicely:
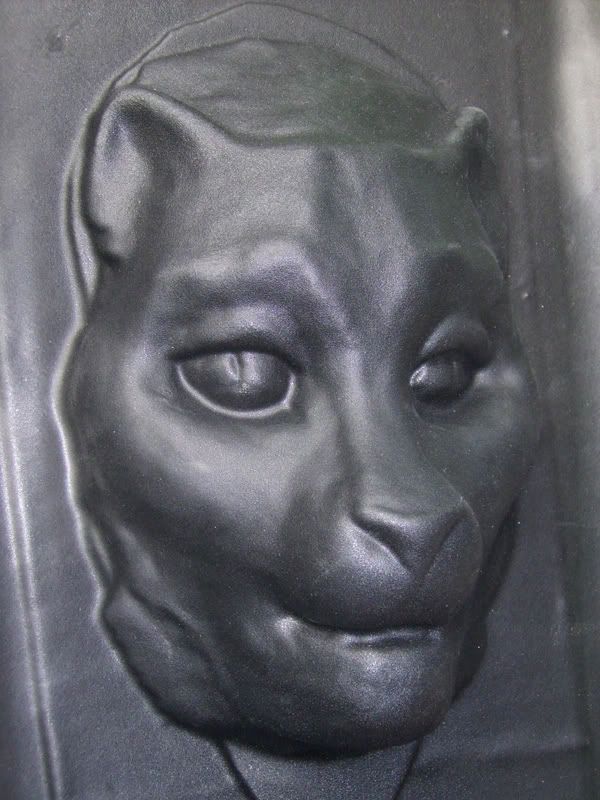
This picture doesn't quite do justice to the texture---it's not that gritty looking in reality. I like the texture so much that I intend to cook foam a little too fast on purpose sometimes. (But for when we don't want that, we'll have the rectifier heat controller.)
_________________
Paul (a.k.a. Dr. Crash)
Tired of buying cheap plastic crap? Now you can make your own! www.VacuumFormerPlans.com
Last edited by drcrash on Mon May 21, 2007 10:58 am; edited 2 times in total |
|
| Back to top |
|
|
cod
Master
Joined: 05 Nov 2006
Posts: 322
Location: San Francisco
|
| Posted: Sun May 20, 2007 11:04 pm Post subject: |
|
|
really nice stuff!
_________________
<.o'> |
|
| Back to top |
|
|
jegner
Site Admin

Joined: 30 May 2003
Posts: 2144
Location: Texas, USA
|
| Posted: Mon May 21, 2007 8:13 am Post subject: |
|
|
Thanks Dr. Crash for posting this info. Great stuff!
Jim |
|
| Back to top |
|
|
crashmann
Guru

Joined: 27 Sep 2005
Posts: 501
|
| Posted: Mon May 21, 2007 10:52 pm Post subject: |
|
|
Great tutorial!
I was thinking of using Arby's or McDonald's straws, since they seem to be the biggest around. But I had not considered how sharp the ends are, especially stuffed up the victims nose!
Excellent idea on the corrugated sign board as well. If you wanted to cast the back of the head, you could reuse the same sign (as long as it's positioned close to where the first casting was made).
Now I just need to find someone to slime up 
Charlie
TI-386 |
|
| Back to top |
|
|
mr2monster
Newbie
Joined: 05 May 2007
Posts: 22
|
| Posted: Mon May 28, 2007 1:00 pm Post subject: |
|
|
Are you just going to cut the eyes out so the person can see?
I was thinking that you could make a little clay wall that encapsulated the eyes on the female cat mold... cast just the eyes (maybe a little surround) in plaster to create a positive form and then vacuum form that in a clear plastic and epoxy it to the inside of the mask. At that point, you could even paint in an iris or something so long as you left the rest clear so someone could see.
I've gotta try this, this sounds really fun.
_________________
making stuff is cool. |
|
| Back to top |
|
|
vacman
Newbie
Joined: 04 May 2007
Posts: 13
|
| Posted: Tue May 29, 2007 2:58 pm Post subject: |
|
|
Dr. Crash,
Where did you buy your craft foam? The biggest sizes I can find online is 12"x18", do you know if it is available in larger sizes, perhaps 24"x24"?
Thanks. |
|
| Back to top |
|
|
drcrash
Guru
Joined: 04 Sep 2006
Posts: 705
Location: Austin, Texas
|
| Posted: Tue May 29, 2007 5:51 pm Post subject: |
|
|
| vacman wrote: | Dr. Crash,
Where did you buy your craft foam? The biggest sizes I can find online is 12"x18", do you know if it is available in larger sizes, perhaps 24"x24"?
Thanks. |
The only bigger sheets of "craft foam" I've found is rolls of 2mm Foamies, but they're only 2mm thick, and only in red, white, or black.
I have found EVA foam (the same basic foam as craft foam) in larger sheets. The older thread "fun with craft foam (EVA foam)" gives a few sources:
http://www.tk560.com/phpBB2/viewtopic.php?t=441&highlight=eva+foam
_________________
Paul (a.k.a. Dr. Crash)
Tired of buying cheap plastic crap? Now you can make your own! www.VacuumFormerPlans.com |
|
| Back to top |
|
|
radnd838
Newbie
Joined: 23 Feb 2011
Posts: 5
|
| Posted: Wed Feb 23, 2011 3:46 pm Post subject: |
|
|
This mask is great!! I can tell you are very talented!! I'm just starting to learn all of this stuff, so it's great to see pictures of accomplished pieces by seasoned people! Keep posting pics..I love looking at them! 
_________________
I love candy!
www.gumball-machine.com |
|
| Back to top |
|
|
|
|
You cannot post new topics in this forum
You cannot reply to topics in this forum
You cannot edit your posts in this forum
You cannot delete your posts in this forum
You cannot vote in polls in this forum
|
Powered by phpBB © 2001, 2005 phpBB Group
|

