 |
www.TK560.com
Vacuum Forming, Movie Prop, Sci-fi and GIjOE Forum
|

|


|
| View previous topic :: View next topic |
| Author |
Message |
tubachris85x
Master

Joined: 15 Jan 2007
Posts: 351
Location: Ft. Lauderdale, Florida
|
 Posted: Wed May 21, 2008 5:34 pm Post subject: Posted: Wed May 21, 2008 5:34 pm Post subject: |
 |
|
| crashmann wrote: | If your fiberglass is not hardening, then you might not be adding enough catalyst. You need the fiberglass to add structural strength to the surface. The resin by itself is not enough to hold the shape (unless you glop it on extra thick). The glass fibers, crystallized in the resin is what actually provides the strength in fiberglass.
Using lighter fiberglass cloth can help save weight, as well as not glopping on the resin too thick.
You are using a respirator and ventilation, right?!?
I've recently seen a few friends have to quit their hobby because of breathing problems, so be sure to use proper protection!
Charlie |
Actually, I think I added more catalyst then really needed, and I try to put just a bit more then needed in every batch.
As for ventilation, Im guilty of not using a mask, but I do fiberglass outside in the open air. I really need to get a professional respirator, ive been used to using the disposable kinds, but even that does nothing. Ive yet to get any in my eyes, nor have gotten any breathing issues. Im not saying that it wont happen, I just havent had anything happen..yet.
Thanks guys
_________________
 |
|
| Back to top |
|
 |
TK 109
Guru

Joined: 11 May 2007
Posts: 712
Location: Galena, Ohio
|
| Posted: Wed May 21, 2008 6:57 pm Post subject: |
|
|
well, i'm pretty sure you'll be just fine. just don't do it for a living, and don't sniff the fumes to get a high.  nudge nudge nudge nudge
point being, small doses, no problems. 
_________________
-Alex
-------------------------------------------------------
 |
|
| Back to top |
|
|
tubachris85x
Master
Joined: 15 Jan 2007
Posts: 351
Location: Ft. Lauderdale, Florida
|
| Posted: Thu May 22, 2008 1:22 pm Post subject: |
|
|
| TK 109 wrote: | well, i'm pretty sure you'll be just fine. just don't do it for a living, and don't sniff the fumes to get a high. nudge nudge
point being, small doses, no problems. |
Yea, I know lol I wont. Besides, I just finished FG'ing it today, and its already feeling more like a helmet instead of a paper bucket. So I just need to fill with foam sooner or later..
_________________
|
|
| Back to top |
|
|
tubachris85x
Master
Joined: 15 Jan 2007
Posts: 351
Location: Ft. Lauderdale, Florida
|
| Posted: Mon Jun 02, 2008 4:10 pm Post subject: |
|
|
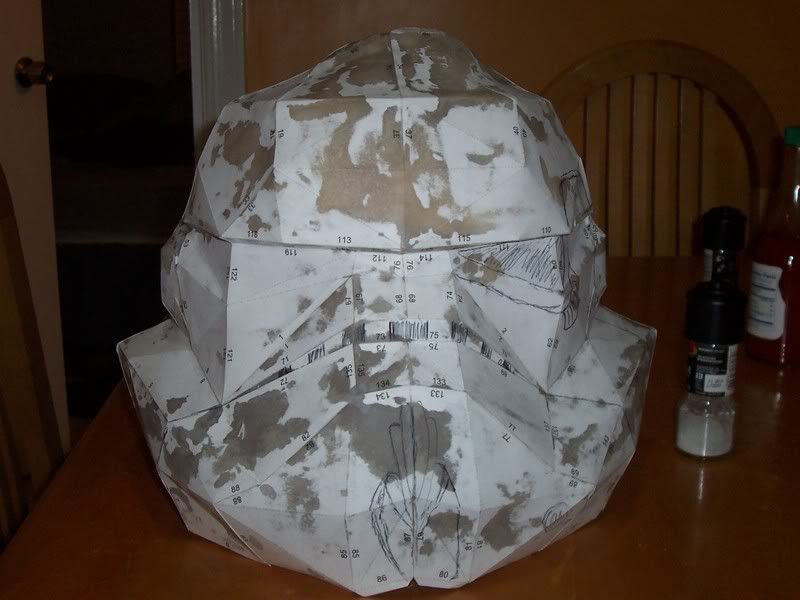
alrighty then. I got some done, but not as much as I wanted (because I have to wait)
For both the shoulder bell and bottom forearm piece, I had to "raise" it, by actually cutting some MDF scraps and gluing it to the top portion. The shoulder bell was just not tall enough to finish the peak of the curve, or it would have had an area on the top that was completly flat.
Same thing for the forearm piece. I had began sanding the forearm piece, and got most of it, but I realized that I didnt let the wood glue cure all the way, so Im going to wait till next time, same for the shoulder bell.
Now, for the FX-back piece. I cut off the greeblies that extend out (neatly though, so that I can keep and use them for whatever!) I then measured the inside of the box, which was 9"x 6 1/2", and cut a plywood rectangle and set it inside the box, and ran wood glue around the edges between the plastic and wood.
I know it sounds weird that im using the wood glue to hold this support plate in place, but I can say that it will hold. If you remember, I had actually glued that PVC pipe to that back piece helmet buck, and its still attached. I would say that buck is about 8-10lbs, roughly, and it was attached to a 3" diameter PVC, about 13" tall. I am able to hold that PVC pipe parallel to the ground with the buck on the other end, and it holds itself
_________________
|
|
| Back to top |
|
|
tubachris85x
Master
Joined: 15 Jan 2007
Posts: 351
Location: Ft. Lauderdale, Florida
|
| Posted: Tue Jun 03, 2008 9:35 am Post subject: |
|
|
Alright..well, I just made a desicion about how im going to complete this costume...I am no longer going to construct the entire suit on my own, but Im going to start gathering pieces to "frankenstien" it together...
I know others have wanted this in "kit" form, but I simply cannot stress over trying to build every last bit of it.
Now, I will of course build the custom pieces that I need, but everything else thats clone, I will try to get from makers.
I want to get this finished.
_________________
|
|
| Back to top |
|
|
DarthVader1
Expert

Joined: 04 Nov 2007
Posts: 193
Location: Phenix City, AL
|
| Posted: Tue Jun 03, 2008 5:45 pm Post subject: |
|
|
By any chance, once you're finished with it....will you continue to work with it the way you were doing it. without the stress and timeframe restrictions?
I just love the progress you've done (FROM SCRATCH, and in the most unusual ways), and made it happened most of it. Please, consider that in the future, and as future "source" of the only "DIFFERENT, 501st WORTHY" kind of armor I've ever seen. I could help as well with some items in the future after Dragon*Con. |
|
| Back to top |
|
|
tubachris85x
Master
Joined: 15 Jan 2007
Posts: 351
Location: Ft. Lauderdale, Florida
|
| Posted: Tue Jun 03, 2008 9:21 pm Post subject: |
|
|
Well, Ive thought about that. I honestly will consider it. When I first started this, I didnt really have any idea of how I wanted to do this, but until I was able to really analyze the armor, and determine what I could get pre-made, I wanted to "frankenstien" the suit. But, early on, I recieved a large number of PM's and emails, regarding wether or not I would be selling kits or not. In order for me to do that, I would obviously need to make every last piece, myself.
Im really flattered that anyone would even consider wanting to purchase something that I made, but please let me finish building it rofl. So it was more pressure on me to build everything myself, and thats really why I was going to consider that.
The thing about making the rest of the armor pieces after I make this first one, is that I dont know how good it will be in comparison to what I will be using. I mean, all the pieces that Im getting pre-made, is just the clone armor pieces. Everything else will just be made by me. So really, after I get these pieces, all that I really need to make is the shins, and the chest piece...oh and make new handplates
But I will consider it. I will definatly offer all the custom pieces after I can fabricate them. Just need to finish the vac-form bucks and that helmet. I might take you up on that offer for help after. Thanks!
_________________
|
|
| Back to top |
|
|
tubachris85x
Master
Joined: 15 Jan 2007
Posts: 351
Location: Ft. Lauderdale, Florida
|
| Posted: Wed Jun 04, 2008 2:41 pm Post subject: |
|
|
Alright, well I just spent a good 2 1/2 hours working on both the fore arm buck and the shoulder.
Im scrapping the shoulder buck, its just too inaccurate and beyond the point of no return for it's salvage. Im taking a different route with it in time.
The bottom forearm picece now looks as it should, with the proper curve, where it was once flat and looked wrong. All I need to do to finish that is just apply some bondo around the edges of where I had added the extra MDF scrap, so that it is completly smooth with the rest of it.
Thats all for today
_________________
|
|
| Back to top |
|
|
jegner
Site Admin

Joined: 30 May 2003
Posts: 2144
Location: Texas, USA
|
| Posted: Thu Jun 05, 2008 7:40 am Post subject: |
|
|
Sounds good. Any recent pics?
Jim |
|
| Back to top |
|
|
tubachris85x
Master
Joined: 15 Jan 2007
Posts: 351
Location: Ft. Lauderdale, Florida
|
| Posted: Thu Jun 05, 2008 12:38 pm Post subject: |
|
|
| jegner wrote: | Sounds good. Any recent pics?
Jim |
Well, as of right now, no I do not have any new pics. I will post one of the re-worked bottom half of the forearm buck.
Oh wait..there was a little accident with the expanding foam in the helmet...I guess I'll post that lol
Heres the inside with only one can of expanding foam...
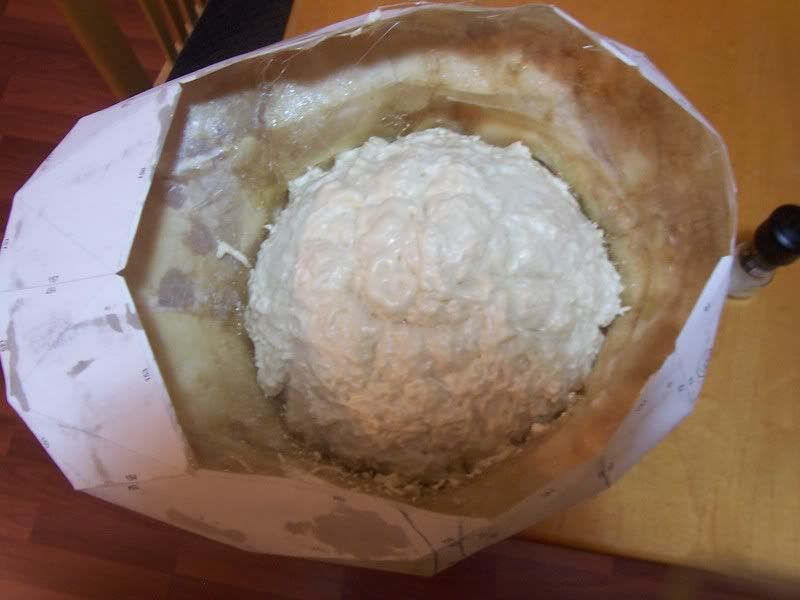
Now, this happend overnight, and this was totally random. Not that much of a big deal, just need to chop the lump off and sand it smooth. Its going to be covered by clay anyways.
I am currently a little pre-occupied now, considering I just recived one of your RFT helmet kits |
|
| Back to top |
|
|
tubachris85x
Master
Joined: 15 Jan 2007
Posts: 351
Location: Ft. Lauderdale, Florida
|
| Posted: Tue Aug 19, 2008 8:07 am Post subject: |
|
|
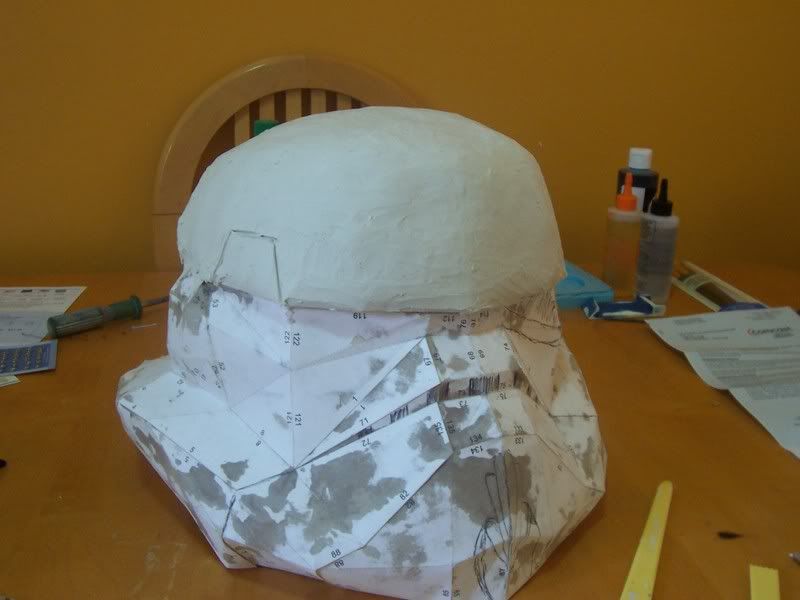
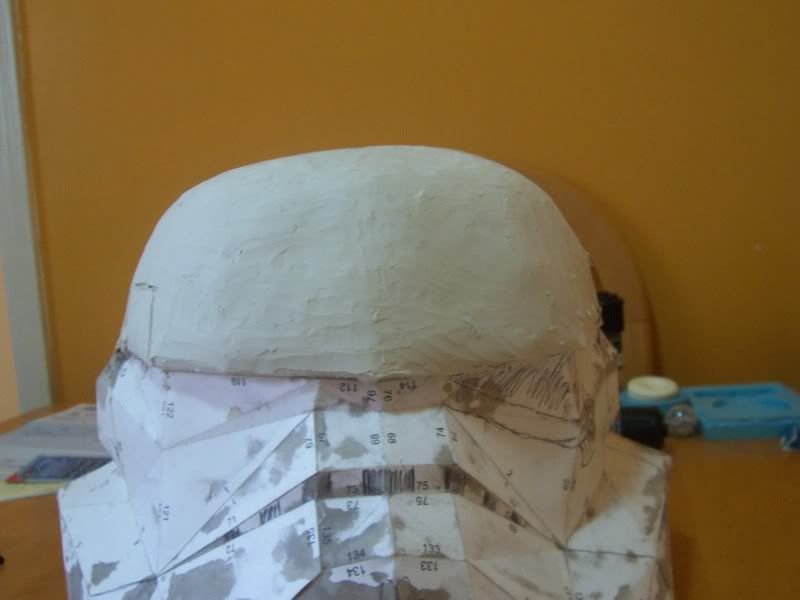
Well, with a little mix of insomnia and compulsive actions, I started clay work on the helmet. This is a brand thats meant for sculpting and also works with silicone molding, so I figure this should work out in the long run. This is really my first time using clay (except as a toddler now lol) so Im really learning as I go. I seem to get the general shape, but my biggest issue, is making it all really smooth, the way I need it. Also, certain spots, the clay will cling onto the tools and no matter how careful I am at tryin to smooth those areas, it will just come right off, leaving a "hole" in the clay.
Thats it really. I only had enough for the dome as of right now, even then, as you can see in the 2nd pic, that the left side is lower then the right. Thats caused by that "sinkhole" that was created by the expanding foam. I need to get more clay in order to fill it in a bit more.
-TC
_________________
|
|
| Back to top |
|
|
jegner
Site Admin
Joined: 30 May 2003
Posts: 2144
Location: Texas, USA
|
| Posted: Tue Aug 19, 2008 8:17 am Post subject: |
|
|
Looking good! Temperature has a lot to do with the clay's performance. Try setting it in the fridge for an hour, to harden it up, if you find it too soft to work with. Also, you can use a hair dryer to warm spots up if you need it softer. Also, I don't know the brand of clay you are using but some brands of wax based clays smooth up nicely with rubbing alcohol, or mineral spirits.
Jim |
|
| Back to top |
|
|
tubachris85x
Master
Joined: 15 Jan 2007
Posts: 351
Location: Ft. Lauderdale, Florida
|
| Posted: Tue Aug 19, 2008 8:21 am Post subject: |
|
|
| jegner wrote: | Looking good! Temperature has a lot to do with the clay's performance. Try setting it in the fridge for an hour, to harden it up, if you find it too soft to work with. Also, you can use a hair dryer to warm spots up if you need it softer. Also, I don't know the brand of clay you are using but some brands of wax based clays smooth up nicely with rubbing alcohol, or mineral spirits.
Jim |
Yikes, well this is a brand call "Van Aken" plastilin modeling clay. Says that it never hardens and is permantantly plyable as well. Someone just recommended me to try acetone and a brush to smooth it. Will see what happens lol
Thanks!
_________________
|
|
| Back to top |
|
|
TK 109
Guru
Joined: 11 May 2007
Posts: 712
Location: Galena, Ohio
|
| Posted: Tue Aug 19, 2008 11:12 am Post subject: |
|
|
looks good! 
_________________
-Alex
-------------------------------------------------------
|
|
| Back to top |
|
|
Indigogyre
Novice
Joined: 04 May 2006
Posts: 47
|
| Posted: Tue Aug 19, 2008 10:17 pm Post subject: Clays |
|
|
It looks like you are going to need a lot more clay. Depending on where you get your supplies from there is a good FX shop in Florida. You might be able to get some of your sculpting supplies from there.
FX Warehouse
I do like the geometric origami base that you put together also.
Dean |
|
| Back to top |
|
|
|
|
You cannot post new topics in this forum
You cannot reply to topics in this forum
You cannot edit your posts in this forum
You cannot delete your posts in this forum
You cannot vote in polls in this forum
|
Powered by phpBB © 2001, 2005 phpBB Group
|

