 |
www.TK560.com
Vacuum Forming, Movie Prop, Sci-fi and GIjOE Forum
|

|


|
| View previous topic :: View next topic |
| Author |
Message |
CrazyFool
Expert

Joined: 07 May 2008
Posts: 203
|
 Posted: Wed Sep 17, 2008 11:25 pm Post subject: Posted: Wed Sep 17, 2008 11:25 pm Post subject: |
 |
|
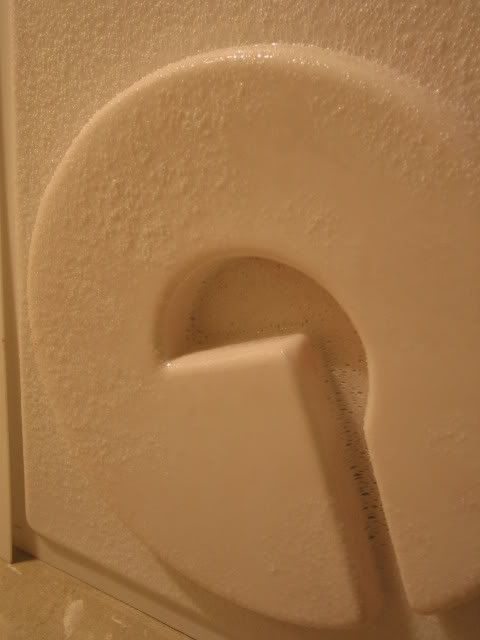
Two Very Bad Pulls Tonight 
I guess that's what I get for taking a month off. The thing is, I have very detailed notes and followed my procedures exactly. Hmm. Bottom line... I believe the plastic was simply allowed to heat for too long. This did not cause an unusually large amount of sag, but the plastic did begin to sag much faster than normal... so my timing was thrown way off. On the 2nd pull I went by sag alone (not by timing) but the platen and forms were still very hot from the previous pull and I think that may have screwed things up on the 2nd pull - overheating the plastic again but in a different way.
I'm not sure what changed between this month and last month. The only difference between tonight's bad pulls and last month's successful pulls is that the sheets of plastic I used tonight had been in my possession for over a month lying on a cold, concrete floor. I wonder if maybe that 'dried' them out or changed their properties in some way that caused the plastic to warm up much faster than it did last month.
Two Bad Pulls. Yuck! There Goes $60 Bucks.
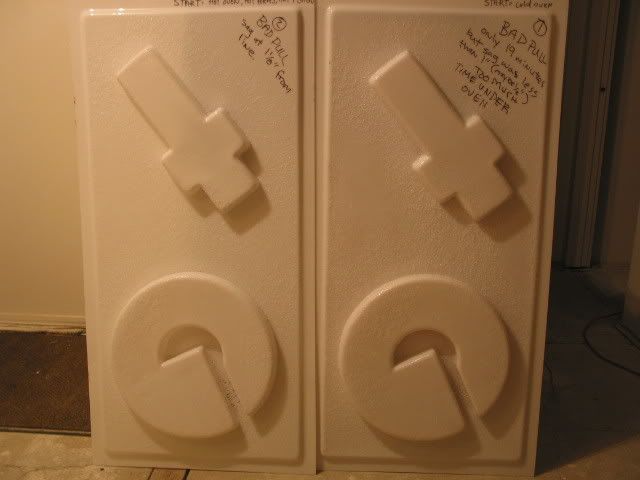
Bad Pull 1
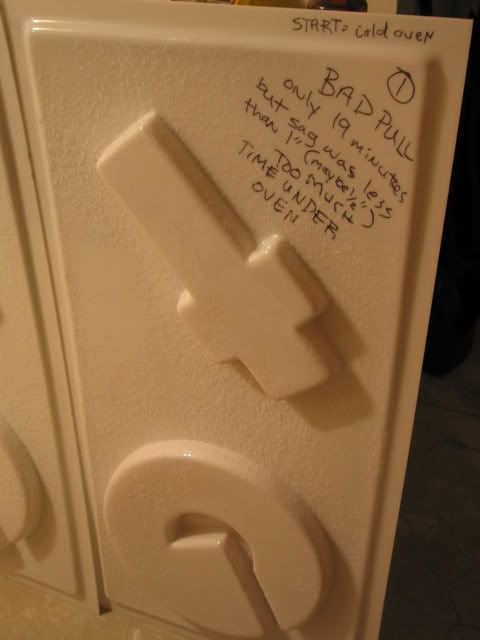
Bad Pull 1 Close Up
Bad Pull 2
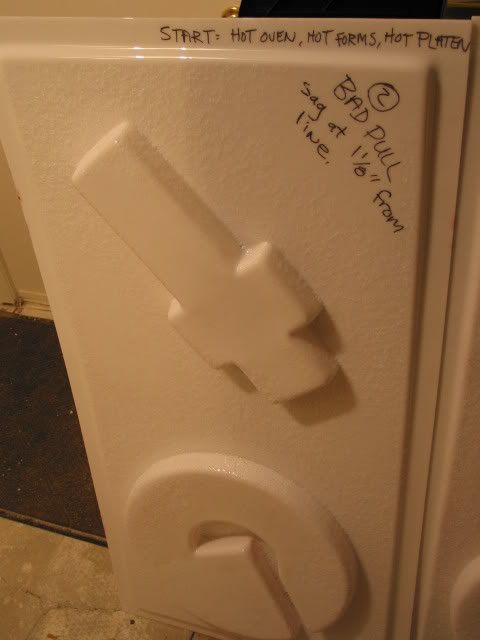
Bad Pull 2 Close Up
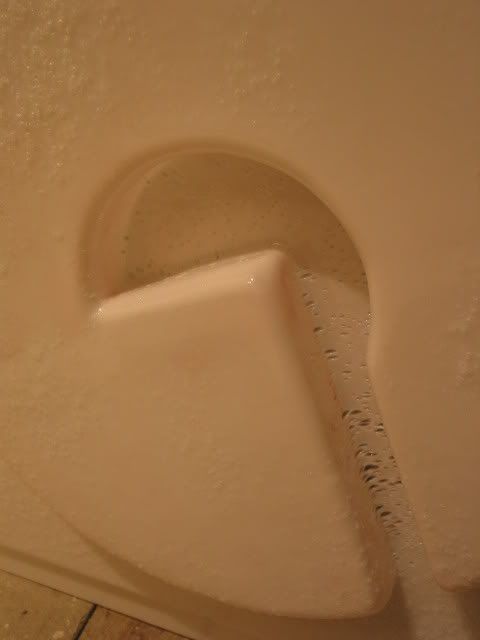
You might disregard the notes I scribbled on the plastic. 1 1/8" is not total sag, but sag from a point of reference line (on my machine) that I use.
CF |
|
| Back to top |
|
 |
crashmann
Guru

Joined: 27 Sep 2005
Posts: 501
|
| Posted: Thu Sep 18, 2008 7:37 am Post subject: |
|
|
| Quote: |
plastic I used tonight had been in my possession for over a month lying on a cold, concrete floor. |
Yup, that would certainly do it! The plastic has absorbed moisture by wicking it up through the concrete floor. When you heated the plastic, the moisture caused the bubbling in the plastic. I've seen this happen with ABS.
To dry it out, you'll need a pre-heating box. You may be able to just stand up the plastic sheets inside a large cardboard box (like a refrigerator box cut down to just 12" taller than the plastic) with a 100 watt bulb and let it bake all day (or night). The closed box will keep the heat from the lamp trapped inside, and encourage the moisture to work its way out of the plastic. Be sure to leave room around each sheet to allow for airflow.
Good luck!
Charlie |
|
| Back to top |
|
|
CrazyFool
Expert
Joined: 07 May 2008
Posts: 203
|
| Posted: Thu Sep 18, 2008 8:09 am Post subject: |
|
|
crashmann,
THANKS man! I will buy some new plastic today while I dry out the stuff I have. I'll have to be more careful in the future to store the plastic properly.
CF |
|
| Back to top |
|
|
CrazyFool
Expert
Joined: 07 May 2008
Posts: 203
|
| Posted: Sat Sep 20, 2008 6:41 pm Post subject: |
|
|
After burning through 2 days of labor and a couple hundred dollars in plastic I'm finally getting great pulls again. What went wrong? I'm still at a loss to explain it. Both brand new and older plastic (that was stored lying on a concrete floor) were experimented with. Oddly, they both behaved the same: bubbles and tears galore. 
Something happened in the last 6 weeks (since my last good pulls)... which basically forced me to cut down the heating time under the ovens by 1/2 to 1/3. Either the temperature in the room, or the humidity, or... I don't know. All I do know is that things are working now. I just don't have to heat the plastic as long. Weird.
Getting good pulls again
Notes help

Oh well, I'll take the good results no matter how I can get them. Stuff happens. 
CF |
|
| Back to top |
|
|
crashmann
Guru
Joined: 27 Sep 2005
Posts: 501
|
| Posted: Wed Sep 24, 2008 5:43 am Post subject: |
|
|
Well, just when you think you've got things figured out, something changes and throws you for a loop!
I like your detailed notes! Sometimes I forget the details of operating the table if I've been away from it too long. Your instruction sheet is a great way to ensure you don't goof up a sheet of plastic. I'll have to make one of those for my table. 
Charlie |
|
| Back to top |
|
|
jegner
Site Admin

Joined: 30 May 2003
Posts: 2144
Location: Texas, USA
|
| Posted: Wed Sep 24, 2008 9:07 am Post subject: |
|
|
The plastic looks like moisture. Humidity in the room, dampness with the plastic, etc. can cause this. I agree, that your plastic is blistered, and I have seen this happen to ABS a lot more than HIPS. Usually you will get this 'orange peel', on HIPS when you over heat the plastic.
There is a variable in play, and my guess is humidity or moisture. Try drying your plastic for a few hours under a box with a 100w light bulb. Not hot enough to warp the plastic, but warm enough to draw any moisture out of the plastic. Then, try to remove the humidity from the room. If the AC has been left on, it can get chilled and this will cause some issues, sort of a temp-shock effect condensing on the concrete.
Sounds like you have worked your way through it, though.
Jim |
|
| Back to top |
|
|
spektr
Master
Joined: 07 Jan 2008
Posts: 425
|
| Posted: Wed Sep 24, 2008 9:26 am Post subject: Plastic lots.... |
|
|
Howdy.
Lets looka t a few things here.
First, ALL hygroscopic material needs to be dryed prior to use
regardless of how long you have had it. You have no idea how long it has been sitting in the vendors warehouse, so assume and plan for the worst.
Crashman suggests standing the sheets up. I dont like that, I prefer flat to prevent curling of the sheet. I also place cardboard strips between the stuff to help airflow. My small drying oven when I started doing this was plywood lined with metal roof flashing. I had a gas heater induction blower (they dont melt) circulating air and an oven heating element run on warm off an oven thermostat. I got 160 degrees f at the lowest setting and could go up from there based on the material.
Second, You need to think about LOTS. This is a word for seperate batches of sheet made by the manufacturer. Think about how you are varying the forming process to allow for "sheet variables". The sheet extruders do the same thnig with their processes to allow for differences in their incoming feedstock.. I've always found slight differences lot to lot in my processing numbers. I have a setup number I use for the first part and see what I need to do from there. Not rocket science, just a pita. I suggest using a small scrap of material, a heat gun and an IR thermometer to see how hot you need to get it before it starts to sag. I use a 1 x 6 inch piece of plastic clamped in a clothespin holding the plastic flat and horizontal. Warm it with the heat gun and see how warm it needs to get to be formable. I've seen 25 degree differences lot to lot.
Thirdly, I saw a note that said you started with a cold oven. I try really hard to let things fully reach operating temp before I do anythng. If your process is to remain stable, you need a stable machine to process it. Machinery warming up isnt stable.
Lastly, think about the protective film applied to the material you use. There are basically 2 styles. Static cling film and stuff stuck down with clear acrylic glue. On thin parts, the acrylic glue can cause what you are seeing by sticking to the plastic unevenly. The longer it sits stuck to the sheet the worse it gets. It insulates the sheet locally and has been known to cause blistering when the "clean " parts of the sheet overheat. with thousands of glue dots stuck to the surface, you will have insufficient average sheet temp to form well, as indicated by the sag differences, and yet blister the sheet because of all the "too hot" spots.
A suggestion would be to clean the sheets with an appropriate solvent such as methanol or VPM naptha if glue on sheets are used. A simpler thng to do is to specify cling film masking when you order stuff.
Scott. |
|
| Back to top |
|
|
CrazyFool
Expert
Joined: 07 May 2008
Posts: 203
|
| Posted: Thu Sep 25, 2008 4:56 pm Post subject: |
|
|
crashmann,
Thanks. I would be completely lost without my notes! I'm a note taking freak.
jegner,
Thanks for the heads up. Looking forward to trying some different types (and thicknesses) of plastic down the road. So far I've only really dealt with 1/8" acrylic.
spektr,
I'm going to have to start some kind of database for all the tips you guys are giving me! Thanks!
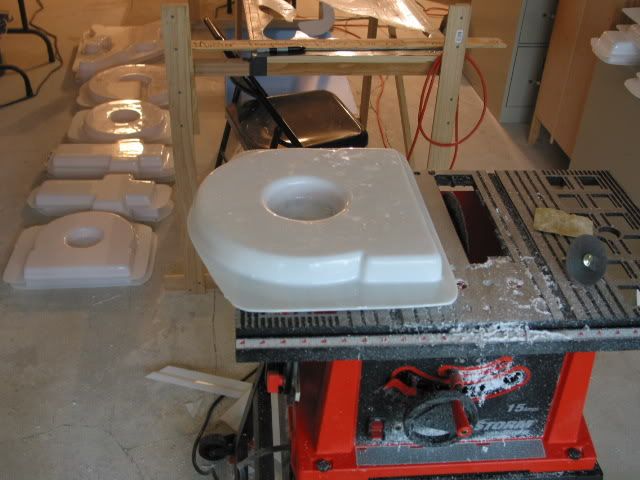
My favorite plastic cutting tools...
I meant to post a photo like the one above weeks ago but forgot. These are my favorite plastic cutting tools. #1 by far is the cutoff (grinding) wheel in the table saw. It cuts plastic like butter. I tried different kinds of blades but the cutoff wheel is the best in my opinion. Not only can you cut a piece of plastic in half with the edge of the wheel, you can also push a piece of plastic up against the flat side of the wheel to shape the plastic. It's great. #2 is a small cutoff wheel for my drill for touch ups in tight corners. #3 is fine sandpaper to clean things up.
More letters getting ready for stickers
I tend to dread the plastic cutting step because it's loud and messy, but once you get going and get in the groove it's actually kind of fun.
CF |
|
| Back to top |
|
|
CrazyFool
Expert
Joined: 07 May 2008
Posts: 203
|
| Posted: Mon Sep 29, 2008 11:45 am Post subject: |
|
|
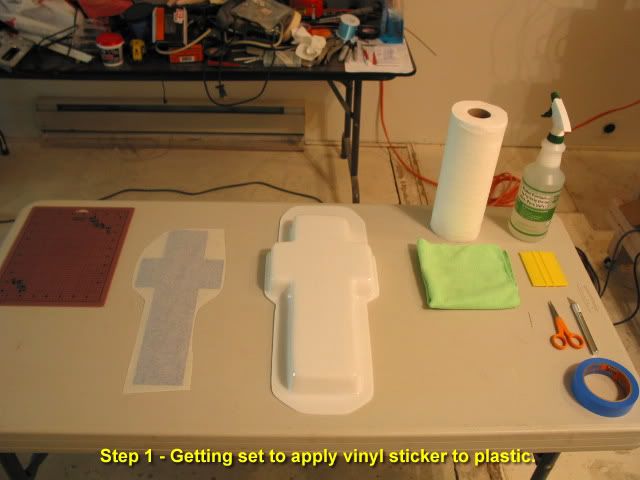
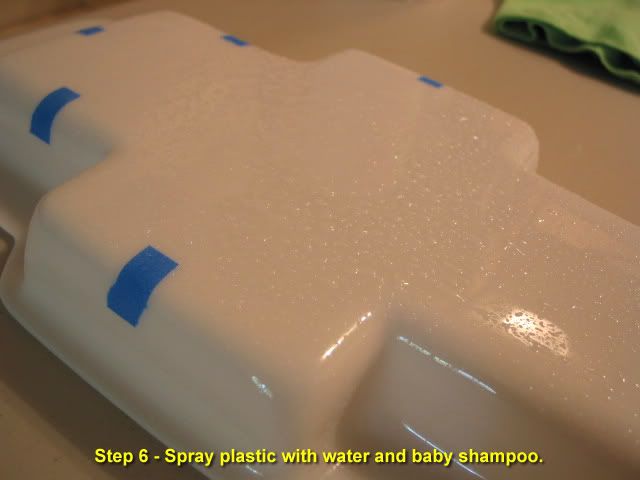
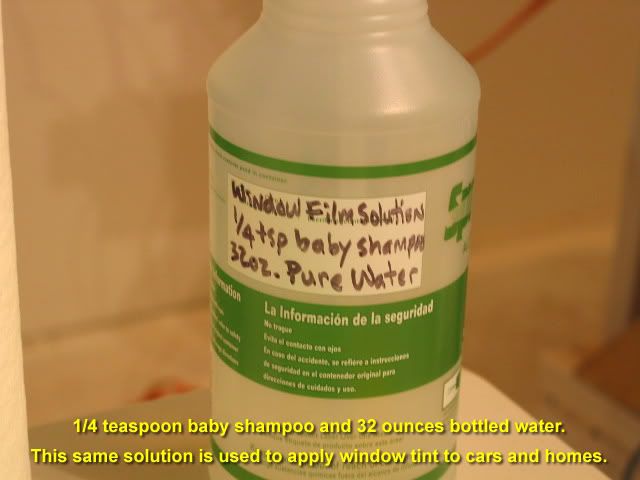
How to Apply Vinyl Stickers to Plastic
Vinyl stickers are a very nice way to color your plastic. When I began this project my plan was to paint the plastic signs. But I soon discovered that nearly everyone uses vinyl stickers these days. Modern vinyl stickers are tough, UV resistant, and will not peal off even in adverse weather.
Unfortunately, my first attempt to apply a vinyl sticker ended in disaster. I tried to use what is called 'The Dry Method' where you simply remove the protective covering from the sticker and apply the sticker. While this method is fine for small jobs like bumper stickers it absolutely will not work for large stickers. If you get a wrinkle or bubble you cannot peel back the sticker and try again. You only get one chance! For large stickers the only method is The Wet Method. The great thing about The Wet Method is that it allows you to slide the sticker around to position it just right. And if you are having trouble positioning the sticker you can quickly remove it, re-wet everything, and try again. The Wet Method gives you several chances to get things right.
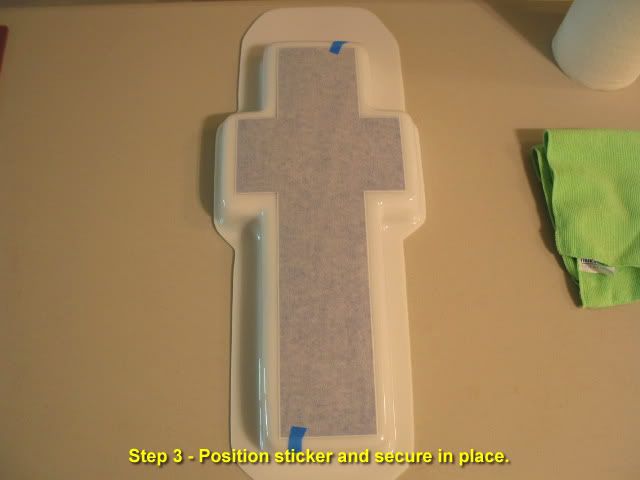
Below are the steps I follow to apply stickers using The Wet Method.
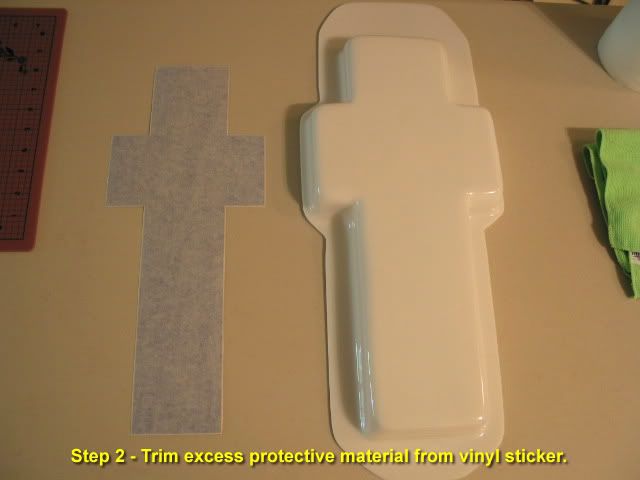
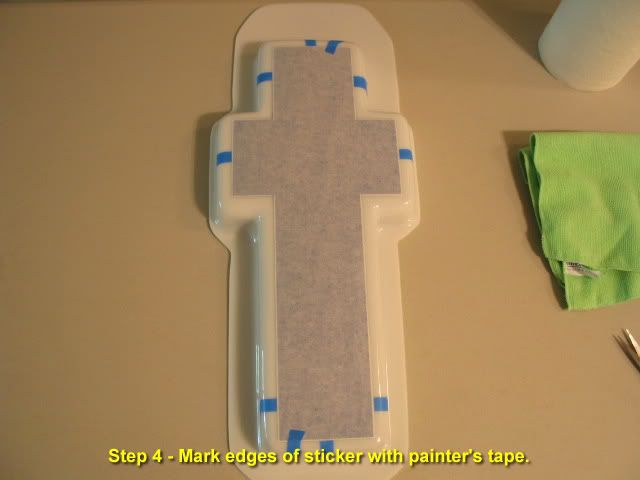
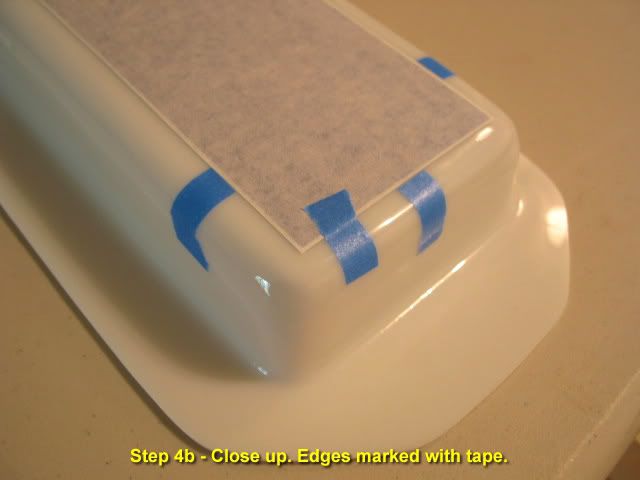

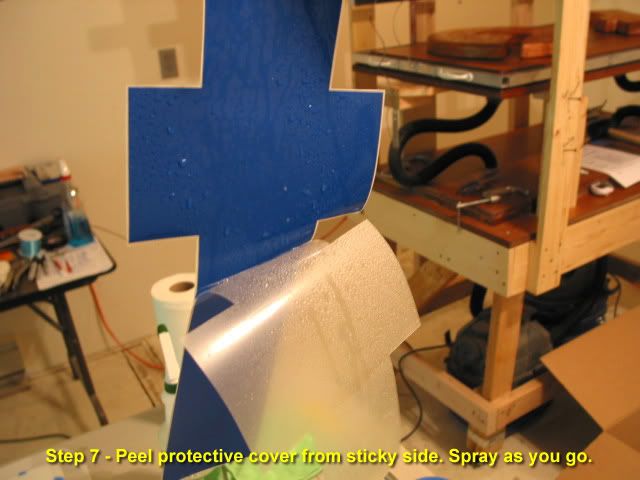
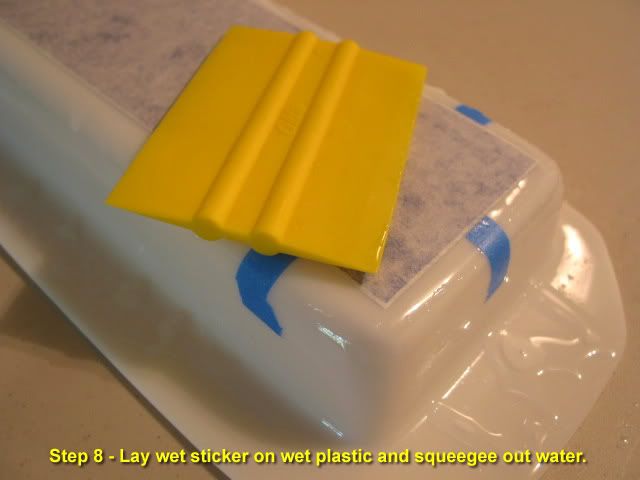
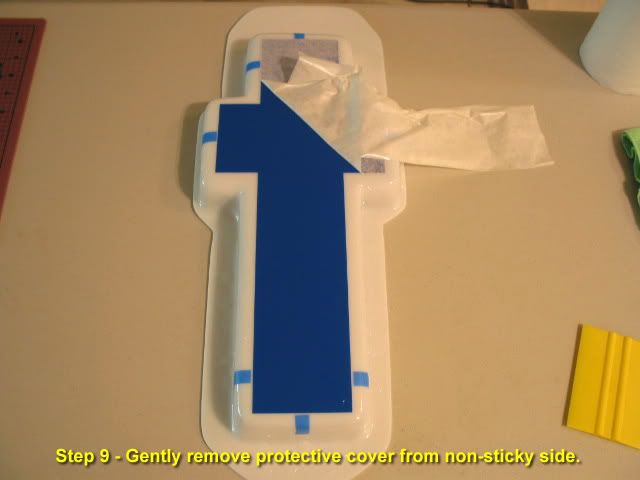
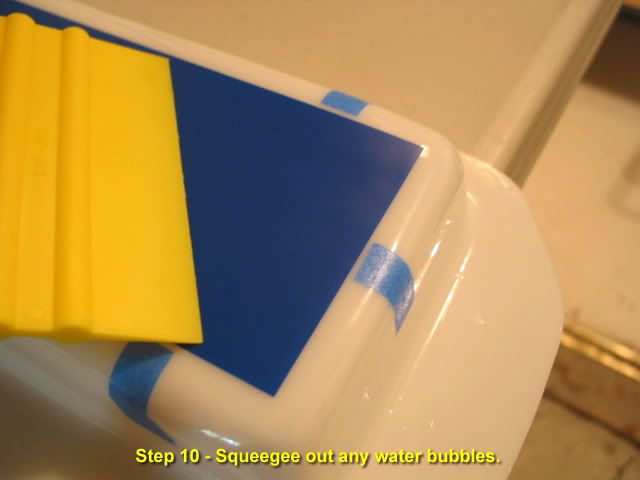
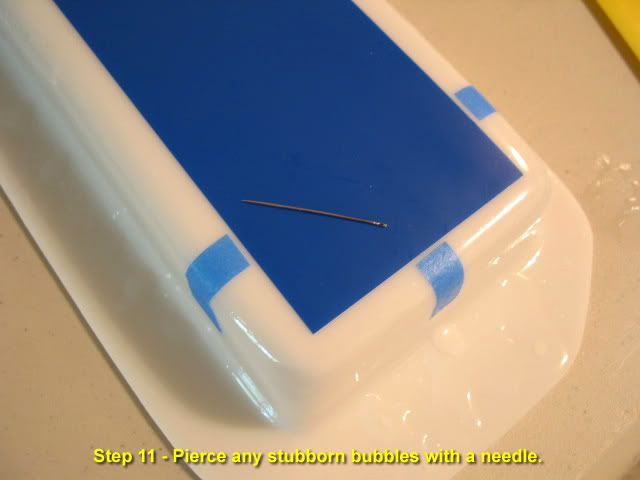
The vinyl stickers I've seen come with a protective layer on both sides of the sticker (the sticky side and the non-sticky side). Before you do anything peel back a corner and double check which side is the sticky side. Also, if you have a stubborn bubble of water that you cannot seem to squeegee out from under the sticker STOP! You risk wrinkling the sticker. Just poke the stubborn bubble with a small needle. Some of the really tiny bubbles you don't even have to worry about as they may evaporate over time, especially if the sticker will be out in the sun.
You can see why positioning becomes important and The Wet Method essential when trying to apply a large, complex sticker in a defined area. The sticker above was $72 US. You want to get that right the first time. 
CF |
|
| Back to top |
|
|
cod
Master
Joined: 05 Nov 2006
Posts: 322
Location: San Francisco
|
| Posted: Mon Sep 29, 2008 2:27 pm Post subject: |
|
|
neat. I had window film that works like this.
waht happens when it gets wet ? does it 'cure' eventually so that it wont loosen again ?
_________________
<.o'> |
|
| Back to top |
|
|
CrazyFool
Expert
Joined: 07 May 2008
Posts: 203
|
| Posted: Mon Sep 29, 2008 2:54 pm Post subject: |
|
|
The stickers are extremely sticky before you wet them.
The baby shampoo & water solution does not react with the adhesive and cause it to get sticky. The solution acts as a barrier to prevent the adhesive from sticking to anything. That's all the solution does. (It buys you time.) |
|
| Back to top |
|
|
CJanssen
Expert

Joined: 17 Feb 2007
Posts: 215
Location: Beaverton OR
|
| Posted: Mon Sep 29, 2008 4:41 pm Post subject: |
|
|
Great information CF, thanks.
Although with that sticker costing 72.00, maybe I should switch hobbies to making stickers
CJ
_________________
"What, you think your some kind of Jedi?" |
|
| Back to top |
|
|
CrazyFool
Expert
Joined: 07 May 2008
Posts: 203
|
| Posted: Mon Sep 29, 2008 5:42 pm Post subject: |
|
|
lol
The thought actually crossed my mind a few times as I spied two kids printing the stickers on a machine in the back room of the print shop. |
|
| Back to top |
|
|
CrazyFool
Expert
Joined: 07 May 2008
Posts: 203
|
| Posted: Tue Sep 30, 2008 12:36 pm Post subject: |
|
|
3 more signs done.
I think that makes 8 signs completed now. Not sure how many more they want. Maybe 2 or 3. Which means the project is almost over. (Wipes brow.) I'm tired. Lost track of how many hours that took. A lot. Think I'll go for a walk. It's sunny outside.
CF |
|
| Back to top |
|
|
ahillworks
Master

Joined: 18 Nov 2007
Posts: 308
Location: Orlando FL
|
| Posted: Tue Sep 30, 2008 1:37 pm Post subject: |
|
|
| Yeah so going to use the baby shampoo method when I start to tint again. So for got about that. But I like the detail how to method here crazy fool good job man. BookMarked lol. |
|
| Back to top |
|
|
|
|
You cannot post new topics in this forum
You cannot reply to topics in this forum
You cannot edit your posts in this forum
You cannot delete your posts in this forum
You cannot vote in polls in this forum
|
Powered by phpBB © 2001, 2005 phpBB Group
|

