| View previous topic :: View next topic |
| Author |
Message |
clonesix
Novice
Joined: 19 Jan 2007
Posts: 63
Location: california
|
 Posted: Sat Jun 27, 2009 9:47 pm Post subject: Posted: Sat Jun 27, 2009 9:47 pm Post subject: |
 |
|
| That looks real nice. What kind of channel stock and linear actuators are you using, as I wanted to do something like that, but lack the knowlwedge. |
|
| Back to top |
|
 |
speedofsound
Novice
Joined: 21 May 2009
Posts: 56
Location: Memphis, TN
|
| Posted: Sat Jun 27, 2009 10:15 pm Post subject: |
|
|
| clonesix wrote: | | That looks real nice. What kind of channel stock and linear actuators are you using, as I wanted to do something like that, but lack the knowlwedge. |
Thank you. 
The aluminum extrusion is from www.8020.net . The actuators came from www.firgelliauto.com .
I know very little about this stuff, but am pulling it off to at least my own satisfaction. I'm lucky to have some nice tools in my shop, and wanted something that was kind of cool, yet functional.
We'll see about the functional part, but I'm optimistic.
Let me know if you have any questions about the 80/20 or the actuators. I'd be happy to help if I can. |
|
| Back to top |
|
|
jdougn
Guru
Joined: 18 Mar 2009
Posts: 714
Location: Louisville KY area
|
| Posted: Sun Jun 28, 2009 2:07 pm Post subject: |
|
|
| speedofsound wrote: | | ...........Let me know if you have any questions about the 80/20 or the actuators. I'd be happy to help if I can. |
That 80/20 looks like great stuff. How much experience do you have with it? Have you built your plastic carrier frame to be adjustable? Would there be a concern that the 80/20 might warp when exposed to the high heat of the oven? I could see building almost an entire vac former from this product!
Doug
_________________
DougN - Just in case you're wondering, I got my "rating" legitimately... by posting aimless drivel, useless advice, and pointless questions. |
|
| Back to top |
|
|
speedofsound
Novice
Joined: 21 May 2009
Posts: 56
Location: Memphis, TN
|
| Posted: Sun Jun 28, 2009 9:51 pm Post subject: |
|
|
| jdougn wrote: |
That 80/20 looks like great stuff. How much experience do you have with it? Have you built your plastic carrier frame to be adjustable? Would there be a concern that the 80/20 might warp when exposed to the high heat of the oven? I could see building almost an entire vac former from this product!
Doug |
I've done a few projects with 80/20 now, so I"ve got a fair amount of experience. I know enough to save more than a few pennies on fasteners, due a GREAT tip from an 80/20 rep.
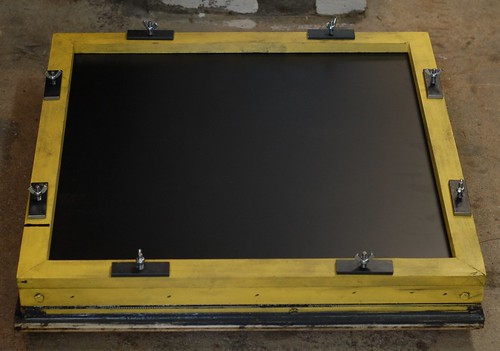
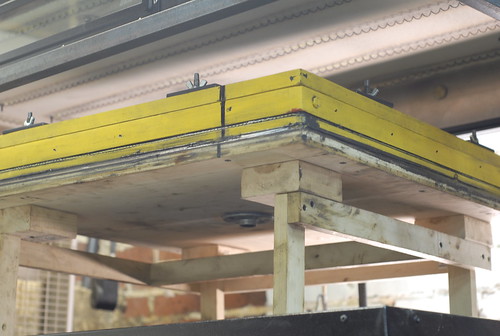
Right now, no, the frame is not adjustable. I chose a 16 x 20" stock size, and I'll keep my projects within this size. Small stuff may make more waste, but for R&D purposes (my company's products) this will be neglible.
I'm not too worried about the heat, but I'll monitor this and let you know what I observe.
An entire vacuum former built from this would be sexy! |
|
| Back to top |
|
|
vacunoob
Novice
Joined: 03 Apr 2009
Posts: 49
Location: Hickory, NC
|
|
| Back to top |
|
|
speedofsound
Novice
Joined: 21 May 2009
Posts: 56
Location: Memphis, TN
|
| Posted: Mon Jun 29, 2009 2:46 pm Post subject: |
|
|
| vacunoob wrote: | Funny, I was going to describe your machine as sexy too.
You've got the sexiest machine on the forum! |
LOL! Thanks. 
I shot some video this morning. I'm going to do a quick edit/upload to Youtube this evening and I'll post the link!
-Alan |
|
| Back to top |
|
|
speedofsound
Novice
Joined: 21 May 2009
Posts: 56
Location: Memphis, TN
|
| Posted: Mon Jun 29, 2009 5:30 pm Post subject: |
|
|
Allright! Things are going well, and I've now moved to finishing up the oven walls and I'll mount the elements/wiring as times allows in the shop.
As promised, I shot some video for those curious about the noise/speed/etc.
The first segment of the video was shot in the morning, when the shop was completely quiet. No other machinery was powered on at this time of morning. I run the frame through its full range of motion, just for fun.
The second segment shows the front/rear oven walls in place, and I run the frame from its "actual" positions. I count about 7 seconds from oven to table, maybe 8?
http://www.youtube.com/watch?v=Y-VaP0EI0JQ
Thanks for looking! |
|
| Back to top |
|
|
spektr
Master
Joined: 07 Jan 2008
Posts: 425
|
| Posted: Mon Jun 29, 2009 10:41 pm Post subject: Very Nice. |
|
|
I like them..
I saw a couple things to think about..
I've heard people mention slipping plastic sheets
coming out of their frames. You need teeth, little spikes
to grab the sheet. It might be a bit more important on 80-20
tubing that is so smooth......
Think like this.....
http://www.thermoformerparts.com/uploads/B2/index.html
look towards the page bottom and see the "bear claw"....
Second, I hope the unit moves fast enuf. I have doubts that you will get the plastic to the tool before it locks up, unless its pretty thick ABS or something similar..... Hope I'm wrong.... Also , I fear for the plastic bearings in the frame edges. they will need heat shields..
Scott. |
|
| Back to top |
|
|
speedofsound
Novice
Joined: 21 May 2009
Posts: 56
Location: Memphis, TN
|
| Posted: Mon Jun 29, 2009 11:11 pm Post subject: Re: Very Nice. |
|
|
| spektr wrote: | I like them..
I saw a couple things to think about..
I've heard people mention slipping plastic sheets
coming out of their frames. You need teeth, little spikes
to grab the sheet. It might be a bit more important on 80-20
tubing that is so smooth......
Think like this.....
http://www.thermoformerparts.com/uploads/B2/index.html
look towards the page bottom and see the "bear claw"....
Second, I hope the unit moves fast enuf. I have doubts that you will get the plastic to the tool before it locks up, unless its pretty thick ABS or something similar..... Hope I'm wrong.... Also , I fear for the plastic bearings in the frame edges. they will need heat shields..
Scott. |
Scott,
Thanks for the great tips!
I've been thinking about the plastic slipping, also. I wondered if a rough-grit surface similar to what you'd find on a skateboard deck would provide enough frictional assistance?
That Bear Claw product looks cool. I think I may be able to utilize the t-slots in the aluminum to make a similar clamping device if truly necessary in my applications.
I'm going to be forming (almost exclusively) .093" ABS. So far, I feel it gets to the surface as quickly as I did when testing manually. If the oven goes smoothly for me (and works!), we'll find out quickly.
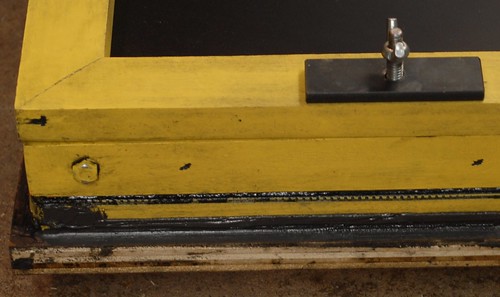
I'm with you on the heat sheilding for the actuator carrier. The upper bearing cover is encased in .6" of Alumilite. I do intend to insulate this area further, as best I can.
Thanks again for the feedback. Certainly some more food for thought!  |
|
| Back to top |
|
|
vacunoob
Novice
Joined: 03 Apr 2009
Posts: 49
Location: Hickory, NC
|
| Posted: Tue Jun 30, 2009 1:17 am Post subject: |
|
|
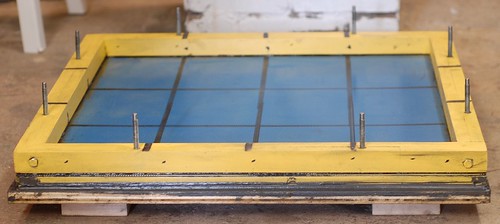
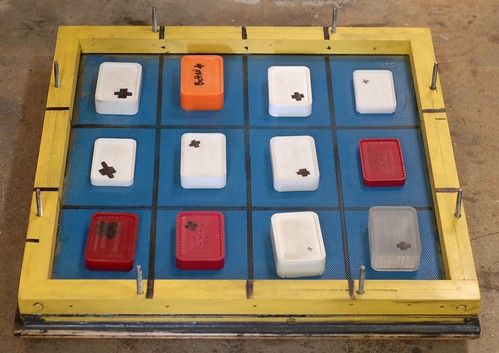
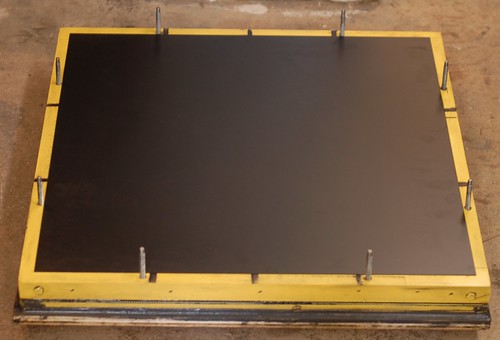
@ Scott- I would love to see a picture of your frame.  Any chance? Any chance?
Here are some pics of my second frame design. One of the objectives of this style frame was to increase the plastic thickness consistency. I've had some seal issues around the frame. argh.
Sorry don't mean to hijack your post Speedofsound.
_________________
Failure is only possible if you set a time limit.
Flickr: Vacuum Former Pics
Product I vacuum form- Laser Speed Grids |
|
| Back to top |
|
|
spektr
Master
Joined: 07 Jan 2008
Posts: 425
|
| Posted: Tue Jun 30, 2009 7:35 am Post subject: Noob, about the frame.. |
|
|
good stuff.
Lets work on a couple things.
Add teeth to the frame by drilling small holes in
the wood and screwing in drywall screws so the points
stick out a bit, my old wood frames did that for years.
I still use some of them now.
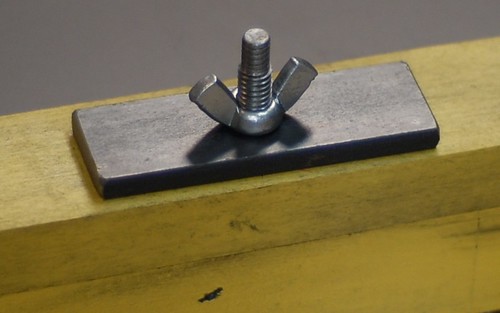
Second, drill bigger holes in the metal washers, 1/2 isnt too big
for a 1/4 bolt. use a fender washer welded to the wingnut, or
even better a flange nut. This covers the oversize hole and
makes "framing up" faster. the washers should be attached to the
frame with screws so you dont have to dick around every part.
these changes will make life better.....
Scott. |
|
| Back to top |
|
|
spektr
Master
Joined: 07 Jan 2008
Posts: 425
|
| Posted: Tue Jun 30, 2009 7:41 am Post subject: Go Speed Go...... |
|
|
Your 80-20 can be fixed just like mine.. Drill and tap one side of the frame for pointy set screws. a lot easier than slot mods....
For all you guys with thin aluminum angles that have the plastic pulling out..... Get a center punch and whack it every few inches while supporting it on a wood block. This makes "pointy bumps" on the angle and greatly increases sheet holding power....
This is also one of those rare times when you can say, in all truth, that if it doesnt work the first time, use a bigger hammer....
Oh Yeah Speed.... Whats your name?
Scott.. |
|
| Back to top |
|
|
vacunoob
Novice
Joined: 03 Apr 2009
Posts: 49
Location: Hickory, NC
|
|
| Back to top |
|
|
speedofsound
Novice
Joined: 21 May 2009
Posts: 56
Location: Memphis, TN
|
| Posted: Tue Jun 30, 2009 5:05 pm Post subject: Re: Go Speed Go...... |
|
|
| spektr wrote: | Your 80-20 can be fixed just like mine.. Drill and tap one side of the frame for pointy set screws. a lot easier than slot mods....
Oh Yeah Speed.... Whats your name?
Scott.. |
Interesting idea, thanks.
I'm now pushing towards finishing the oven, and then it'll be time to test the whole thing as one unit. Aside from the elements/wiring for the oven, I expect to have the machine complete before this weekend.
Installed the pump today and wired the switch to my control panel. My initial test will be tank-less, as I'm still searching for a suitable surge tank around town.
I'm Alan. Thanks again for the advice, Scott. |
|
| Back to top |
|
|
vacunoob
Novice
Joined: 03 Apr 2009
Posts: 49
Location: Hickory, NC
|
| Posted: Wed Jul 01, 2009 3:43 pm Post subject: teeth height |
|
|
@ Scott - What height on the teeth would you recommend? 1/8", 1/16"? Would you recommend installing teeth on the top and bottom of the frame?
Thanks, Nick
_________________
Failure is only possible if you set a time limit.
Flickr: Vacuum Former Pics
Product I vacuum form- Laser Speed Grids |
|
| Back to top |
|
|
|

