 |
www.TK560.com
Vacuum Forming, Movie Prop, Sci-fi and GIjOE Forum
|

|


|
| View previous topic :: View next topic |
| Author |
Message |
CrazyFool
Expert

Joined: 07 May 2008
Posts: 203
|
 Posted: Sat Sep 13, 2008 11:48 am Post subject: Posted: Sat Sep 13, 2008 11:48 am Post subject: |
 |
|
inventor,
I know what you mean about learning PhotoShop, etc.
www.Lynda.com is one of the best sites on the internet IMO.
CF |
|
| Back to top |
|
 |
inventer
Novice
Joined: 22 Apr 2008
Posts: 55
|
| Posted: Sat Sep 13, 2008 2:41 pm Post subject: A little confused ? |
|
|
 Ok, Need to know ? I made 2 mock up walls out of cardboard for my mold, one is from your measurments in your last post, pics, 4b, 5b, 6b, question ? because it's so big do I put a flat piece on the top to sit the mold on ? Second mock up is the same, just did it from the size of the my mold, pic's 1b, 2b, 3b. Neither have the slop you show on your pictures you drew up for me. Am I doing something wrong ? Or is it right ? just need to know which one to use ? I'll be going over to my buddy that has a wood working shop sunday morning to make the base, unless I need to do it all differently. Isn't it amazing how something that looks so simple to do can be so complacated, gotta give you guys credit, your genius's. Thanks again guys, Tony Ok, Need to know ? I made 2 mock up walls out of cardboard for my mold, one is from your measurments in your last post, pics, 4b, 5b, 6b, question ? because it's so big do I put a flat piece on the top to sit the mold on ? Second mock up is the same, just did it from the size of the my mold, pic's 1b, 2b, 3b. Neither have the slop you show on your pictures you drew up for me. Am I doing something wrong ? Or is it right ? just need to know which one to use ? I'll be going over to my buddy that has a wood working shop sunday morning to make the base, unless I need to do it all differently. Isn't it amazing how something that looks so simple to do can be so complacated, gotta give you guys credit, your genius's. Thanks again guys, Tony
http://smg.photobucket.com/albums/v81/vanner40/mock%20up%20base/ |
|
| Back to top |
|
|
ANH trooper
Master

Joined: 20 Oct 2005
Posts: 305
Location: UK
|
| Posted: Sat Sep 13, 2008 3:08 pm Post subject: |
|
|
OK, basically you need to raise the mould about 5" (maybe more) off the platen and make the tapered skirt go roughly 1/2" away from your holding frames. Looks to me like you are not tapering the skirt enough and it will still cause webbing. The idea of this tapered skirt is to attract the pre-stretched plastic and give it something to grip, rather than having nowhere to go and fold over itself. The bigger you can get it the better it will be, because of the extreme shape of your mould.
BTW, photoshop is easy if you know how  Took me about 5 minutes to do those two diagrams Took me about 5 minutes to do those two diagrams  |
|
| Back to top |
|
|
ahillworks
Master

Joined: 18 Nov 2007
Posts: 308
Location: Orlando FL
|
| Posted: Sat Sep 13, 2008 5:32 pm Post subject: |
|
|
In your case you have a big mold. So this will make it alittle differ than what I did but here is a tip.
I took a few peaces of mdf board and glued them together. I then drew the top size on the top of all the boards glued together. I took a band or skill saw and pitched it to be at 45 degree angel and then cut the corners at a 45 degree angel like it shows in the photo shop that trooper did.
I then sand every thing with a roto sander to make it all smooth.
So this is what You do if you want too.
Steps.
1) Take MDF board and stack them till there 5" tall with the outer dimension being 35x25 inches.
2) On the top board draw the dimensions of how it should look on top when its cut out.
3) Cut the wood at a angel meeting from the button out side to the line on the top inside. This should give you the angel needed and as well should look like the picture in this post.
4) Sand it so its smooth and then use it. Then tell us your results. |
|
| Back to top |
|
|
inventer
Novice
Joined: 22 Apr 2008
Posts: 55
|
| Posted: Mon Sep 15, 2008 2:25 am Post subject: better pulls |
|
|
Hi guys, yesterday was a long day, spent most of it at my friends wood shop trying to make the riser for my mold, finally did it, got home at 7 last night and did 2 pulls. Webbing is very minamul, took some pictures, but forgot and left the camera out in the garage, so I'll post pictures after work today. Questions again ? Should the base be air tight against the vac table ? All the tapered angle corners be air tight also ? I was so excited to try it out, I did'nt do any thing but set it up and pull. I had to heat the plastic a little longer to get it to stretch all the way down. Thinking I should unhook one of the vac's to pull slower. Another problem I've always been having is the lip around the mold, does'nt seem to pull the plastic down into it, that would be the lip that would go around the top of the paint pan. http://smg.photobucket.com/albums/v81/vanner40/mold%20lip/
Backing up a little, my first pull, I heated, pulled plastic down with vac on, did my pull. Second time I heated, pulled plastic down and than turned on vac, which did'nt make any difference, both times still got small amound of webbing. Thanks again guys, don't know how you's figure this stuff out, but boy I'm glad you guys do, thanks, Tony |
|
| Back to top |
|
|
ANH trooper
Master
Joined: 20 Oct 2005
Posts: 305
Location: UK
|
| Posted: Mon Sep 15, 2008 3:52 pm Post subject: |
|
|
I'm glad to hear that your pulls are getting better, but we want them to be perfect!
I think it is down to the speed of which the vacuum is applied that is still causing you problems. I get webbing on certain moulds if I just open the valve on my tank, but get perfect results if I open it slowly on the same moulds. I can only speak from my experience with ABS and HIPS as I have never used PETG, but if there is a way of plumbing a cheap valve to control the amount of air flow sucked out from under your hot plastic, I am sure it would help.
As for your mould, I would say have plenty of air holes drilled along the recess of the lip, and maybe just raise the mould off the platen 1/4" that should do it.
I hope you get it sorted soon! |
|
| Back to top |
|
|
crashmann
Guru

Joined: 27 Sep 2005
Posts: 501
|
| Posted: Mon Sep 15, 2008 8:26 pm Post subject: |
|
|
| ANH trooper wrote: | | if there is a way of plumbing a cheap valve to control the amount of air flow sucked out from under your hot plastic, I am sure it would help.! |
Go to your local hardware store and look for 2" (maybe 2 1/2") PVC ball valves. Find a way to mount this between your platen and the shop vacs, and you can use them to slow down the airflow.
Definitely drill tiny holes through your mold where the lip is supposed to be. That will encourage the plastic to draw in tighter.
Good luck!
Charlie |
|
| Back to top |
|
|
inventer
Novice
Joined: 22 Apr 2008
Posts: 55
|
| Posted: Tue Sep 16, 2008 1:23 am Post subject: webbing w/riser |
|
|
Here's the pictures I took sunday night after building the riser.
http://smg.photobucket.com/albums/v81/vanner40/webbing%20with%20riser/
Their small enough to flatten with my hand, but don't look very professional to sell. Theirs also a video of a pull useing the riser. You can see where I have routed out impressions in the mold for looks, I do have little holes drilled into those area's to pull plastic into them, and I have holes in the lip around the mold also, but it just won't pull plastic into it enough, I think the plastic cools to fast to be pulled into the lip.I have tryed useing the heat gun several times and that don't work either, just makes the lip plastic all rippley. Today, monday, after work I taped up all the edges and taped the riser to the vac table so no air got in and did some more pulls, it helped alot but still got webbing. I also unplugged one of the shop vacs to slow the pull, that did'nt work, not enough pull strength. I know you suggest useing a vacuum pump, but I have to much money spent on this so far and really can't afford one of those. I'm also thinking since the lip on the mold is a half inch deep, maybe by cutting the outer edge down to a quarter of an inch, it might be easyier to pull plastic into it, what do you think ? I'm so close, it's the details now that are getting so frustrating, worst part is I'm a perfectionist, I have to be in my line of work and it's driving my crazy. Hope you not getting tired of helping me, you guys make it look so easy, and I know it's not, thanks guys, you guys are the best, Tony |
|
| Back to top |
|
|
crashmann
Guru
Joined: 27 Sep 2005
Posts: 501
|
| Posted: Tue Sep 16, 2008 6:17 am Post subject: |
|
|
After looking at your pictures and watching the videos, I do think the best way to pull this part is to use a cavity mold, where the plastic is drawn down into the hole of the mold. The trick is changing your vac table and connecting the shop vac to the mold 
Here's my crazy idea - Remove the platen from the table. Build your cavity mold to match the size of the old platen. Drill holes through the mold in the corners and where you have surface detail. Build a box under the mold and connect the shop vac to the box.
Perhaps I could make a high definition ACSII image to illustrate my idea:
| Code: |
Top of vac table
==============================
| \ / |
| \ / |
| \ Mold / |
| \ / |
| ---------- |
| Plenum |
========================
| |
| |
VAC
|
This is all my theory (not patented, trademarked, or otherwise protected), so definitely let me know if it works 
Charlie |
|
| Back to top |
|
|
ANH trooper
Master
Joined: 20 Oct 2005
Posts: 305
Location: UK
|
| Posted: Tue Sep 16, 2008 9:04 am Post subject: |
|
|
Charlie might be right. The good news is that you can use the paint pan as the mould!
What I would do is build a box that is just slightly wider than your frames that can hold your paint pan approx 1" off the bottom. Put weather strip on the top of the box so your frames make an air tight seal, and also seal around the bottom of the box on your original platen. Drill small holes into the bottom edges of the paint pan so the plastic is drawn in tight, and also in any crevices where you want the plastic to be sucked into.
All you'd have to do is load up your plastic as usual then drop it onto the new mould box and the plastic will be sucked into the mould and you should have zero webbing with a cavity mould like this.
I'll knock up a drawing to show you what I mean soon. |
|
| Back to top |
|
|
inventer
Novice
Joined: 22 Apr 2008
Posts: 55
|
| Posted: Tue Sep 16, 2008 2:48 pm Post subject: great idea |
|
|
| Thats a really great idea. I've thought about trying to raise the mold up, but just could'nt figure it out. That idea sound alot better and might, (should) be easyier to do. As you guys know, I'm open to any and all ideas. We're going camping this weekend, so that'll give me time to think about this idea, thanks crashman, awsome idea, trooper, a good picture will be a real big help. I'm guessing the frame would have to go down over the side of the mold of paint pan for forming the lip, huh ? I'd like to sketch up a quick picture also to compare with what you guys are illustrating, it'll help me understand. I'm taking a break until next week, I'm frustrated. Thanks again guys, you's are so nice, Tony |
|
| Back to top |
|
|
ahillworks
Master
Joined: 18 Nov 2007
Posts: 308
Location: Orlando FL
|
| Posted: Wed Sep 17, 2008 11:06 am Post subject: |
|
|
Hey inventor just watched the video. Are you still sagging the plastic or no???? You don't need to do any sag with PETG it stretches. Make sure you let the oven get hot for about 5 10 minutes and then raise the plastic. Then touch under the plastic to see how soft it is. You can let it sag like very little like less than half an inch. If you get the sagging to stop you may not see any webbing at all.
I to also want to see negative draw which would work in your mold design. May have to make one of the covers to see what it does. |
|
| Back to top |
|
|
ANH trooper
Master
Joined: 20 Oct 2005
Posts: 305
Location: UK
|
| Posted: Wed Sep 17, 2008 11:46 am Post subject: |
|
|
You could try making your negative mould like this....
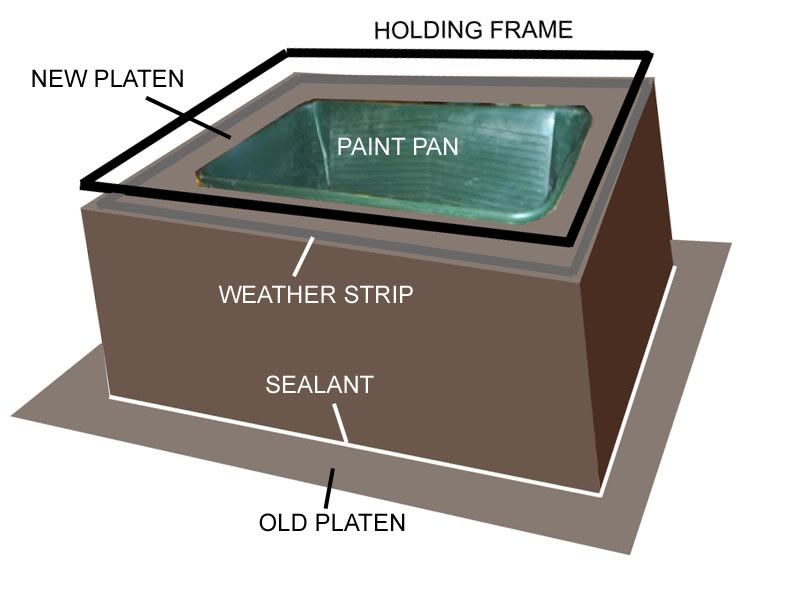
By making a wooden box that is about 1" taller than your paint pan and cutting out the top panel slightly smaller than the edge lip so the pan can sit in the box, you should get good results.
Put the weather strip on top as shown, and just use this as your new platen. It might be a bit tricky to load up your plastic though? Make sure to drill small holes on the bottom edges of the pan to draw the plastic down. |
|
| Back to top |
|
|
inventer
Novice
Joined: 22 Apr 2008
Posts: 55
|
| Posted: Wed Sep 17, 2008 1:28 pm Post subject: still sagging |
|
|
| ahill, yes I am still letting it sag, I have to useing the shop vac. Thanks trooper, I was thinking I'd have to lower my whole vac table, rebuilding it, your idea looks alot better than my idea. I'll start on this next week, guys and let you's know how it works, thanks again, you guys are so smart, Tony |
|
| Back to top |
|
|
ahillworks
Master
Joined: 18 Nov 2007
Posts: 308
Location: Orlando FL
|
| Posted: Sun Sep 21, 2008 10:11 am Post subject: Re: still sagging |
|
|
| inventer wrote: | | ahill, yes I am still letting it sag, I have to useing the shop vac. Thanks trooper, I was thinking I'd have to lower my whole vac table, rebuilding it, your idea looks alot better than my idea. I'll start on this next week, guys and let you's know how it works, thanks again, you guys are so smart, Tony |
So I am guessing you tried with just a little sag not much more than a centimeter and it did not work because there was not enough suction? If that is the case I would go out and buy a 4 or 5 cfm pump and save your self some headache. I have not tried a shop vac but I know I am only using half the amount of power needed to pull plastic and it works so easy. May want to think the possibility of getting a better vacuum source. I spent months cutting corners when i could have had it right the first time and not wasted the time. Just a thought is all if not try the other method of a reverse mold and see how that does. Make sure you seal it up good. |
|
| Back to top |
|
|
|
|
You cannot post new topics in this forum
You cannot reply to topics in this forum
You cannot edit your posts in this forum
You cannot delete your posts in this forum
You cannot vote in polls in this forum
|
Powered by phpBB © 2001, 2005 phpBB Group
|

