| View previous topic :: View next topic |
| Author |
Message |
br_esper
Newbie

Joined: 03 Dec 2008
Posts: 11
Location: Midland, TX
|
 Posted: Tue Dec 23, 2008 8:48 am Post subject: Question about making a positive mold Posted: Tue Dec 23, 2008 8:48 am Post subject: Question about making a positive mold |
 |
|
I am wanting to create a positive mold of a helmet that I am sculpting in Chavant clay. Similar to this one http://www.armorvenue.com/armorvenueimage.php?f=barbuta-helmet&s=1000
The mold would need to be in two parts, so that I will be able to vacform the 2 halves in styrene. From my research I have found a couple of options and was curious what others thought might be the best method.
1. Cast a 2 part negative mold with plaster, then use Fiberglass to create the 2 positive mold halves inside the plaster molds. (removing the fiberglass from the plaster molds while it is still flexible.)
2. Use Alginate (or silicone) on the sculpture, cover it with plaster in 2 sepearate sections (and fabric). Cut the alginate mold in two, along the seam of the mother mold. Then create the 2 positive halves using plaster in the alginate mold.
_________________
"My mother? Let me tell you about my mother" |
|
| Back to top |
|
 |
jegner
Site Admin

Joined: 30 May 2003
Posts: 2144
Location: Texas, USA
|
| Posted: Tue Dec 23, 2008 10:44 am Post subject: |
|
|
You have some options on the helmet you are wanting to vac form. If I were doing this as a project, I would make a temporary negative mold from plaster or UltraCal30. Then, remove the clay, and cast the forming mold material from Rockite or Hydrostone.
Your best bet is a two part mold, split right down the center.
The other option, and this depends on how close your helmet is to the sample you provided, and that is, the amount of undercuts. If it is slight, then you might be able to get away with a single mold, just remove the plastic while it is still slightly warm.
Jim |
|
| Back to top |
|
|
br_esper
Newbie
Joined: 03 Dec 2008
Posts: 11
Location: Midland, TX
|
| Posted: Tue Dec 23, 2008 1:19 pm Post subject: |
|
|
If I use Rockite or Hydrostone, will I need to use some form of release agent in the plaster mold? Would I need to remove them before completely setting up?
_________________
"My mother? Let me tell you about my mother" |
|
| Back to top |
|
|
jegner
Site Admin
Joined: 30 May 2003
Posts: 2144
Location: Texas, USA
|
| Posted: Tue Dec 23, 2008 1:46 pm Post subject: |
|
|
Yes, a good mold release will be needed. The old art school trick is to use the plaster as a temporary negative mold. Then, cast the part in a harder Rockite, or UltraCal30 material. If the plaster mold won't release easy, you can crack it off of the Rockite mold, knowing the Rockite won't break as easily. Pam cooling spray or Vasaline will do as a mold release.
Jim |
|
| Back to top |
|
|
br_esper
Newbie
Joined: 03 Dec 2008
Posts: 11
Location: Midland, TX
|
| Posted: Tue Dec 23, 2008 2:15 pm Post subject: |
|
|
Ok, great. I'll give it a try. Thanks for your help.
_________________
"My mother? Let me tell you about my mother" |
|
| Back to top |
|
|
clonesix
Novice
Joined: 19 Jan 2007
Posts: 63
Location: california
|
| Posted: Tue Dec 23, 2008 7:50 pm Post subject: |
|
|
Looking at your example:
[img]http://www.armorvenue.com/armorvenueimage.php?f=barbuta-helmet&s=1000[/img]
The right and left sides look pretty symetrical, and undercut free.
Here is my thought on the quickest way to vacu-form this: Put your parting line down the middle, and make a 2-part plaster mold. Remember: Plaster is very porous and you MUST use a release. Seal it with lacquer, give a light sanding and another coat of lacquer. Wax the interior with a paste wax, and a coat of Vaseline.
Before pouring anything into your new mold, add 1 inch of (water)clay around the perimeter of the mold opening. This is to raise the buck off the table when vacu-forming. Be sure to trowel the clay flush with the (vertical) mold walls.
EXTRA TIP: scribe a small line in the clay, where it meets the mold opening for trim line. This only needs to be 1/16" deep. it will show as a positive when the buck comes out.
Once more: Seal the wet clay with lacquer and a coat of Vaseline.
Now you can lay in fiberglass, or pour in ultracal. I like fiberglass because it doesn't chip.
good luck with your project. Please post pics as you go. And welcome to the forum. |
|
| Back to top |
|
|
br_esper
Newbie
Joined: 03 Dec 2008
Posts: 11
Location: Midland, TX
|
| Posted: Wed Apr 08, 2009 10:12 pm Post subject: |
|
|
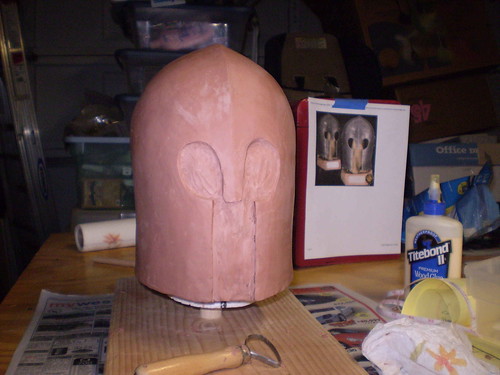
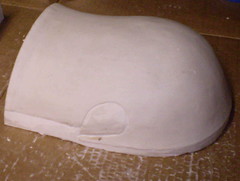
Here is my progress so far:
Sculpt of helmet
_________________
"My mother? Let me tell you about my mother" |
|
| Back to top |
|
|
br_esper
Newbie
Joined: 03 Dec 2008
Posts: 11
Location: Midland, TX
|
| Posted: Wed Apr 08, 2009 10:45 pm Post subject: |
|
|
Preparing for the plaster
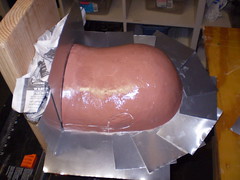
Finishing up the second side
Separated plaster mold from sculpt
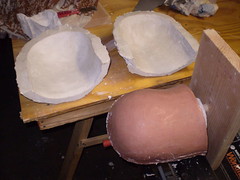
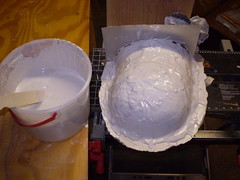
Pouring the positive mold. The mold surface was prepared with varnish and vaseline. I also added a 1 inch rise with clay as recommended by clonesix
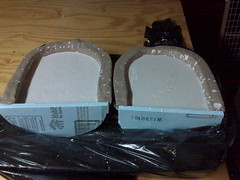
This is one of the two plaster molds. Since the mother mold was also plaster, I had a little difficulty removing this and worried about it for a few days while it cured. Eventually I drilled 2 holes in the bottom portion of the positive mold, inserted a dowel, and with the added leverage it popped out fairly easy.
_________________
"My mother? Let me tell you about my mother" |
|
| Back to top |
|
|
br_esper
Newbie
Joined: 03 Dec 2008
Posts: 11
Location: Midland, TX
|
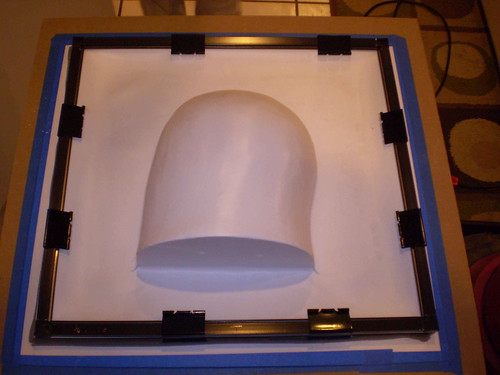
| Posted: Wed Apr 08, 2009 11:01 pm Post subject: |
|
|
Now to my first vac forming session. As you can see, I'm using the simple vac former as designed by drcrash.
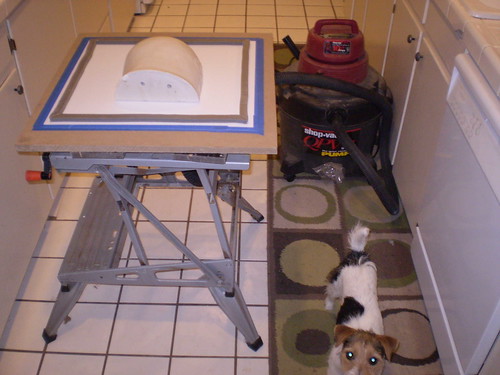
For this test, I used some thin, 1/32" styrene. My plan is to test with this stuff, and then use some thicker later.
After forming both sides, I did a rough cutout and tape job to see what it would look like.

Overall I'm pretty pleased with how it turned out. I will post more pictures as I complete the helmet(s).
A big thanks to everyone for their advice!
_________________
"My mother? Let me tell you about my mother" |
|
| Back to top |
|
|
jegner
Site Admin
Joined: 30 May 2003
Posts: 2144
Location: Texas, USA
|
| Posted: Thu Apr 09, 2009 6:11 am Post subject: |
|
|
| Well done! How do you plan to handle the seam? |
|
| Back to top |
|
|
br_esper
Newbie
Joined: 03 Dec 2008
Posts: 11
Location: Midland, TX
|
| Posted: Thu Apr 09, 2009 7:19 pm Post subject: |
|
|
I haven't decided yet, and still need to do some research. My initial thoughts are to use fiberglass on the inside seam, and then use bondo on the outside and sand smooth. Do you have any thoughts?
_________________
"My mother? Let me tell you about my mother" |
|
| Back to top |
|
|
jegner
Site Admin
Joined: 30 May 2003
Posts: 2144
Location: Texas, USA
|
| Posted: Tue Apr 14, 2009 7:40 am Post subject: |
|
|
| A support strip on the inside to act as a bridge. This is how I did it with the TOS Cylon helmet. You can then add some spot filler to fill in any gaps. Very little bondo would then be needed, and no stinky fiberglass on the inside of the helmet. |
|
| Back to top |
|
|
br_esper
Newbie
Joined: 03 Dec 2008
Posts: 11
Location: Midland, TX
|
| Posted: Wed Apr 22, 2009 8:15 pm Post subject: |
|
|
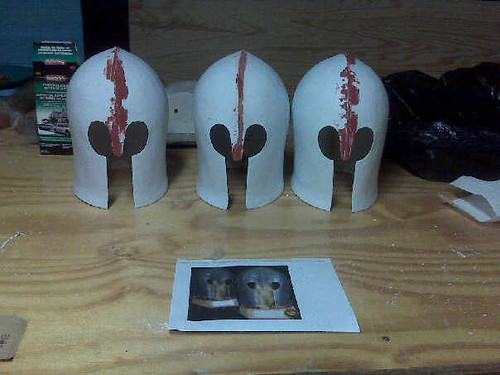
I've got 3 in the works. Ready to sand the bondo and then spray on some primer. I've completed a larger negative mold for my head and will create the positive mold for it this weekend.
_________________
"My mother? Let me tell you about my mother" |
|
| Back to top |
|
|
crashmann
Guru

Joined: 27 Sep 2005
Posts: 501
|
| Posted: Wed Apr 22, 2009 10:04 pm Post subject: |
|
|
Hah-hah! Very nice work!
Why do I keep hearing this "ni!" sound all around me?!?
Charlie |
|
| Back to top |
|
|
br_esper
Newbie
Joined: 03 Dec 2008
Posts: 11
Location: Midland, TX
|
| Posted: Thu Jun 04, 2009 8:31 pm Post subject: |
|
|
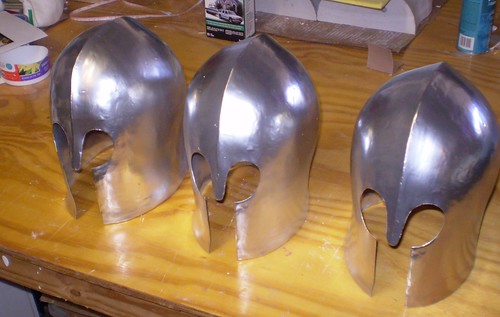
Finished Helms
_________________
"My mother? Let me tell you about my mother" |
|
| Back to top |
|
|
|

