| View previous topic :: View next topic |
| Author |
Message |
TD1035
Novice

Joined: 02 Aug 2006
Posts: 31
|
 Posted: Fri Jan 08, 2010 2:14 pm Post subject: Posted: Fri Jan 08, 2010 2:14 pm Post subject: |
 |
|
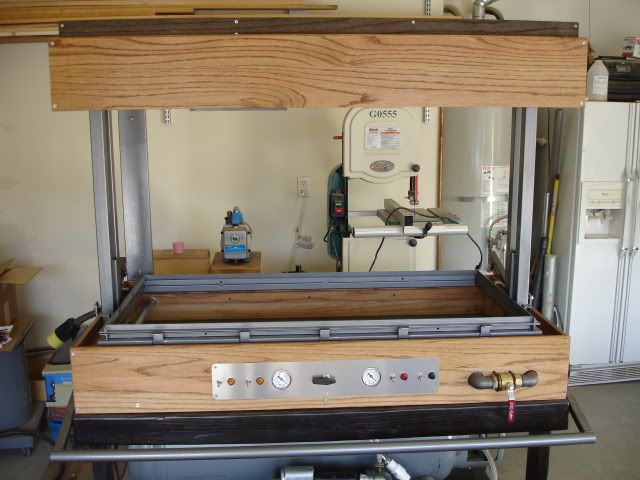
Alright...here are some new pics!!!!
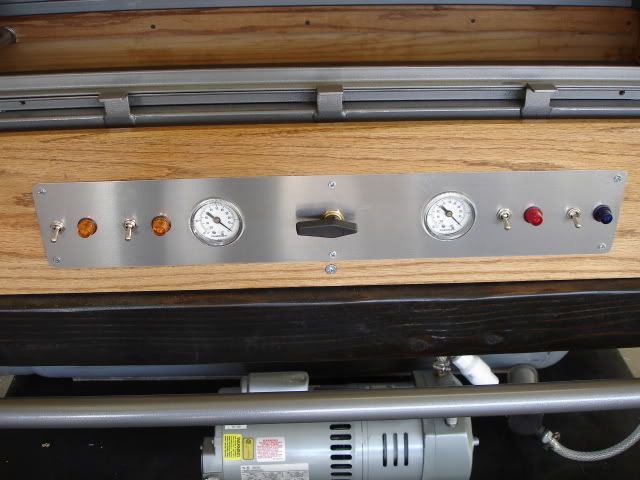
Here is the front panel detail. I still haven't decided about the labeling of everyting. I may take this over to my friend's shop and have him laser engrave the marking for all the switches.
The first two switches on the left with the amber lights controll the inner and outer oven zones. The switch with the red light controlls the vacuum pump, and the swithc with the blue light is the auxiliary switch which controls the recepticle on the back of the machine.
This is a two stage machine. The black selector knob in the center of the console delivers the vacuum pressure to either the tank or direcly to the platen. There are individual vacuum gauges for pressure at the platen or the tank depending on which one is selected.
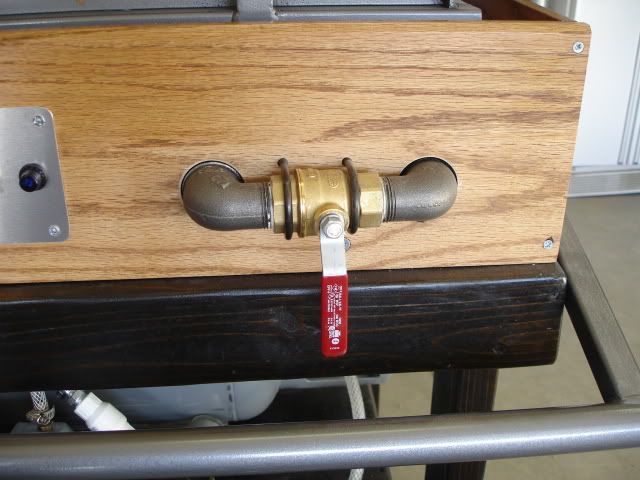
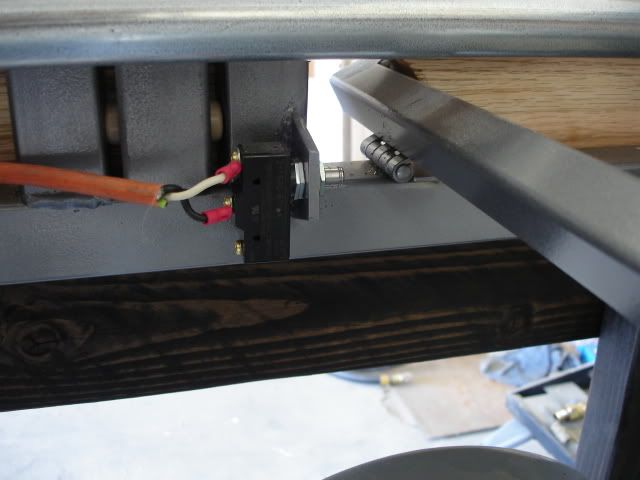
Instead of mounting the valve on a bracket below the frame, I decided to mount it through the frame so it is easier to reach.
On the back of the machine instead of just a 90 connector and an exterior box, I decided to go with a 5S utility box. This allowed me to not only mount the exterior utility recepticle but also allow me to move the power supply line from the box above the machine to below. I really liked this modification because it kept the power supply line away from the oven.
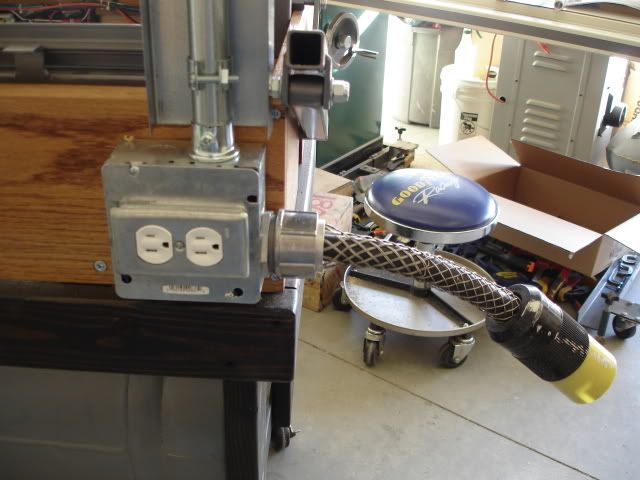
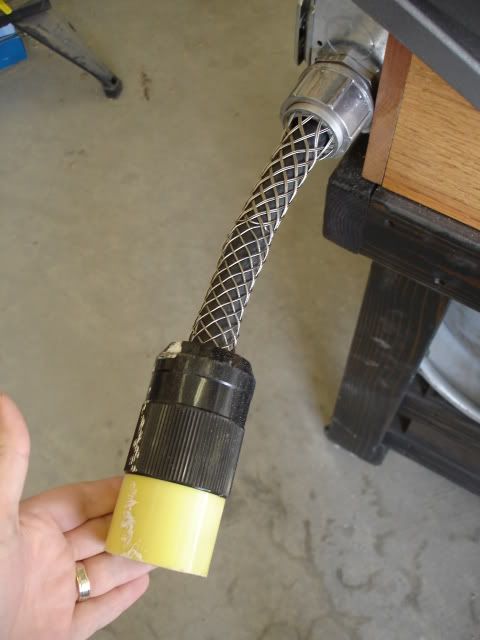
This is a 50 amp supply line with a quick disconnect.
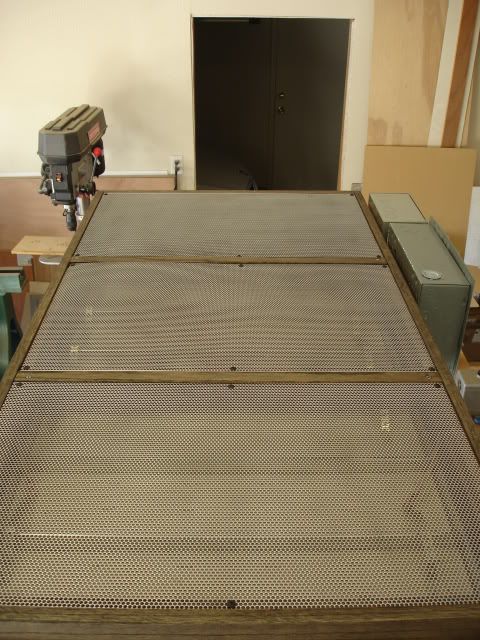
I modified the top oven cover a bit by using some 16 g perforated steel.
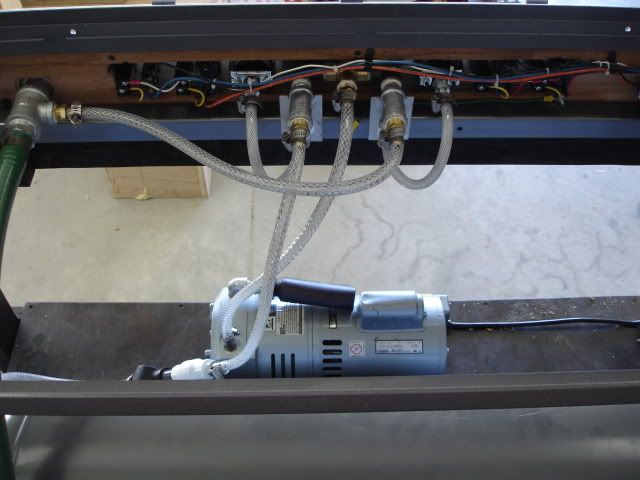
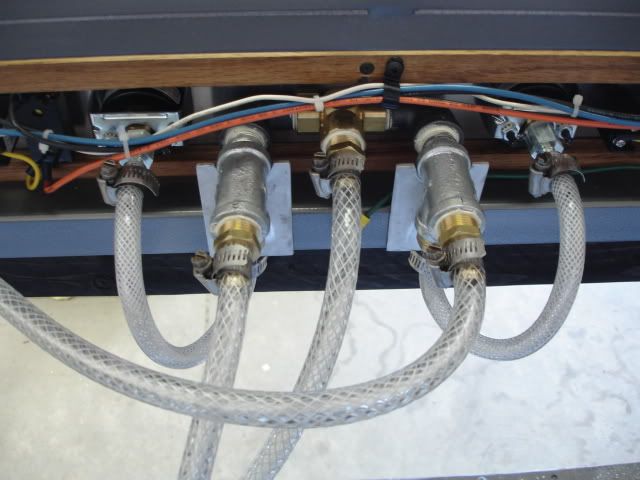
Plumbing of the air lines.
Micro switch in the open position.
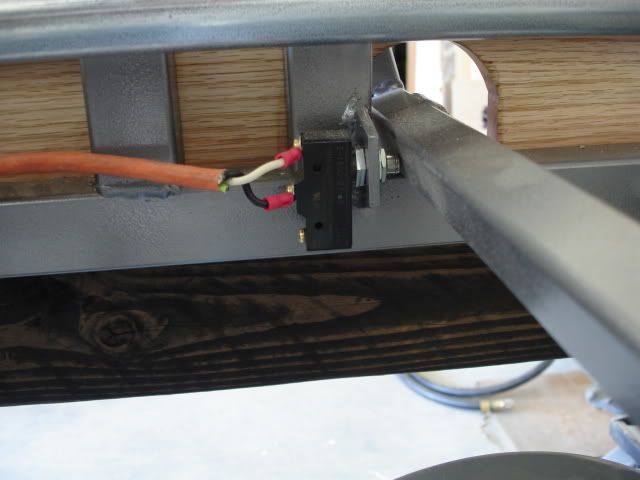
And in the closed position...OVENS ON!!!!
I'm going to get some plastic into this thing over the weekend...should have some more pics then.
Todd
_________________
"If you're not living on the edge, you're taking up too much space!" |
|
| Back to top |
|
 |
jdougn
Guru
Joined: 18 Mar 2009
Posts: 714
Location: Louisville KY area
|
| Posted: Fri Jan 08, 2010 3:04 pm Post subject: |
|
|
Todd, great picts and a great looking machine!! Looking forward to seeing picts of some pulls soon.
DougN
_________________
DougN - Just in case you're wondering, I got my "rating" legitimately... by posting aimless drivel, useless advice, and pointless questions. |
|
| Back to top |
|
|
spektr
Master
Joined: 07 Jan 2008
Posts: 425
|
| Posted: Sat Jan 09, 2010 12:05 pm Post subject: oven switches. |
|
|
you'll probably find it better to leave the oven on all the time.
the mass of the oven and the element backing evens out the
distribution of heat. preheated ovens form better. Running plastic to a cold oven, adding heat isnt as good as rolling the plastic up to a preheated oven and going from there.
you might experience different things, but thats not my experience..
Scott. |
|
| Back to top |
|
|
ahillworks
Master

Joined: 18 Nov 2007
Posts: 308
Location: Orlando FL
|
| Posted: Sun Jan 10, 2010 2:47 am Post subject: Re: oven switches. |
|
|
| spektr wrote: | you'll probably find it better to leave the oven on all the time.
the mass of the oven and the element backing evens out the
distribution of heat. preheated ovens form better. Running plastic to a cold oven, adding heat isnt as good as rolling the plastic up to a preheated oven and going from there.
you might experience different things, but thats not my experience..
Scott. |
I agree with this. Try it out and see. My suggestion is to have the oven on a switch so your in control not the machine. Like a on/off switch on the front you can flip when needed.
_________________
www.TruthFingerboards.com
www.ForFingerboarders.com
www.AHillAudio.com |
|
| Back to top |
|
|
ahillworks
Master
Joined: 18 Nov 2007
Posts: 308
Location: Orlando FL
|
|
| Back to top |
|
|
kayaker43
Expert
Joined: 13 Jun 2007
Posts: 175
|
| Posted: Sun Jan 10, 2010 12:19 pm Post subject: |
|
|
By all means warm it up for around 5 minutes before using, but it is less important here than with other machines. The proto-Form oven has unusually low thermal mass. The thin low density ceramic fiber board heats up faster and there's very little metal as well.
That's another downside to using high density hardibacker, notice how it feels cold to the touch like concrete. I cringe when a customer tells me he made his oven box out of 1/8 inch stainless or lined it with firebrick. I know that adding thermal mass will mean crazy long pre-heat times.
These ovens also have more wattage than the Thurston design and rely little on heated air or radiation from surfaces and much more on direct infra-red radiation at the right wavelength from the emitter. This reaches its peak within 30 seconds or so. You've heard the sales pitch for infra-red heating,.. "heats objects not air"
If you are forming successive parts. the microswitch kills the oven while you reload a new sheet. This works well to prevent your mold and even the workshop from getting uncomfortably hot, but retains enough heat for the next cycle. The machine has been tested for continuous use, I heated my house for a week with one. However, unleashing 10,000 watts in a small room all day may surprise you and most mold materials we deal with here will suffer as well. The plans show an outlet box on the back to be used for cooling fans to speed up forming cycles and manage mold temps. Continuous oven running is not needed or reccommended.
The micro switch and timer reccommended in the plans are also safety features. Car designers have to put in seatbelts wether you use them or not 
_________________
Doug Walsh
www.build-stuff.com
Hobby-Vac and Proto-Form machine plans
Also other plans books and videos for people who like to build things |
|
| Back to top |
|
|
ahillworks
Master
Joined: 18 Nov 2007
Posts: 308
Location: Orlando FL
|
| Posted: Sun Jan 10, 2010 1:01 pm Post subject: |
|
|
| kayaker43 wrote: | By all means warm it up for around 5 minutes before using, but it is less important here than with other machines. The proto-Form oven has unusually low thermal mass. The thin low density ceramic fiber board heats up faster and there's very little metal as well.
That's another downside to using high density hardibacker, notice how it feels cold to the touch like concrete. I cringe when a customer tells me he made his oven box out of 1/8 inch stainless or lined it with firebrick. I know that adding thermal mass will mean crazy long pre-heat times.
These ovens also have more wattage than the Thurston design and rely little on heated air or radiation from surfaces and much more on direct infra-red radiation at the right wavelength from the emitter. This reaches its peak within 30 seconds or so. You've heard the sales pitch for infra-red heating,.. "heats objects not air"
If you are forming successive parts. the microswitch kills the oven while you reload a new sheet. This works well to prevent your mold and even the workshop from getting uncomfortably hot, but retains enough heat for the next cycle. The machine has been tested for continuous use, I heated my house for a week with one. However, unleashing 10,000 watts in a small room all day may surprise you and most mold materials we deal with here will suffer as well. The plans show an outlet box on the back to be used for cooling fans to speed up forming cycles and manage mold temps. Continuous oven running is not needed or reccommended.
The micro switch and timer reccommended in the plans are also safety features. Car designers have to put in seatbelts wether you use them or not |
Oh well thats some good info =)
_________________
www.TruthFingerboards.com
www.ForFingerboarders.com
www.AHillAudio.com |
|
| Back to top |
|
|
TD1035
Novice
Joined: 02 Aug 2006
Posts: 31
|
| Posted: Tue Jan 12, 2010 6:46 pm Post subject: |
|
|
I have to agree with Doug on this one. His heating element kits are excellent! When you raise the platen and the oven kicks on, it only takes about 10 seconds and the elements are red hot. At 30 seconds you can REALLY feel the heat coming off those things...its really impressive.
With both the inside and outside zones on at the same time, this oven pulls about 43 amps!!!!! It is a monster!!! I don't think I would want this oven on all the time...the top of my head and my electric bill couldn't handle it! 
Todd
_________________
"If you're not living on the edge, you're taking up too much space!" |
|
| Back to top |
|
|
stormtrooperguy
Expert

Joined: 24 Sep 2009
Posts: 126
|
| Posted: Tue Jan 12, 2010 8:30 pm Post subject: |
|
|
| this thread is made of solid gold. i'm itching to start on mine, so to keep myself busy i just keep re-reading this! |
|
| Back to top |
|
|
Israel franco
Novice

Joined: 22 Sep 2005
Posts: 51
Location: mexico d.f.
|
| Posted: Sun Mar 21, 2010 6:26 pm Post subject: |
|
|
hi TD1035 you machine looks fantastic congratulations!!!
i have a cuestion about of the air lines
i see you used hoses to make the conections an i wondering what is the inside diameter of the hoses? because i want to plumbing the same way (using hoses) but i have read the best diameter for the plumbing are 1" and if its smaller the air flow are restricted to move enough air quickly enough
do you already make some test? |
|
| Back to top |
|
|
kayaker43
Expert
Joined: 13 Jun 2007
Posts: 175
|
| Posted: Sun Mar 21, 2010 10:11 pm Post subject: |
|
|
The small hoses you are seeing go between the vacuum pump and tank. you don't need large hoses here or for the vacuum gauges. You do need large hoses between the tank and platen
_________________
Doug Walsh
www.build-stuff.com
Hobby-Vac and Proto-Form machine plans
Also other plans books and videos for people who like to build things |
|
| Back to top |
|
|
93RMW
Novice

Joined: 26 Sep 2009
Posts: 57
Location: Tulare, CA
|
| Posted: Mon Mar 22, 2010 11:12 pm Post subject: One size doesn't fit all? |
|
|
[quote="kayaker43"]The small hoses you are seeing go between the vacuum pump and tank. you don't need large hoses here or for the vacuum gauges. You do need large hoses between the tank and platen[/quote]
I'm confused by this. Wouldn't the largest hose you could run be tied to the tank port. I could run a larger hose but any step down to the tank port would defeat the purpose while adding volume of air in my larger size tubing to evacuate.
I've seen a few builds here use a water heater, and that would seem to have the largest port of 1" but most builds seem to be using air tanks and propane tanks which are set up for 3/4" correct?
The analogy that comes to mind is a sewerpipe running into a straw.
I can see the step up from the gauges would be needed, but missing how the rest, even to the platen would make a difference.
I do have two ports to my particular tank, which means I guess I could run two lines from the platen for twice the volume but the port on my gast pump is 3/4", so that seems to be the size volume that works best for the 7-8 CFM it's expected to handle.
Am I misunderstanding anything here? |
|
| Back to top |
|
|
kayaker43
Expert
Joined: 13 Jun 2007
Posts: 175
|
| Posted: Tue Mar 23, 2010 7:42 am Post subject: |
|
|
Your assumptions are correct, you are just looking at the wrong hoses.
All the plumbing between the tank and platen does need to be large for high flow and that does include the tank port, hoses, dump valve etc. The point is to move air quickly. TD1035 has done this, scroll up and you will see the large dump valve attached to the right of the gauge panel and another view shows a glimpse of a larger green hose. Presumably these also go to a large port in the tank?
The small hoses you are seeing go from the pump to the tank. He's using a pretty small low flow pump that takes a few minutes to evacuate the tank so the hoses can be much smaller. Whereas the dump valve has to pull air from the platen in about one second so the hoses need to be larger.
_________________
Doug Walsh
www.build-stuff.com
Hobby-Vac and Proto-Form machine plans
Also other plans books and videos for people who like to build things |
|
| Back to top |
|
|
PARATECH1
Expert

Joined: 19 Mar 2008
Posts: 112
Location: ALABAMA
|
| Posted: Thu Aug 05, 2010 7:20 am Post subject: |
|
|
| Your machine looks really great. Is there a chance that you could post some close up pics of each of your various plumbing / electrical connections? |
|
| Back to top |
|
|
jdougn
Guru
Joined: 18 Mar 2009
Posts: 714
Location: Louisville KY area
|
| Posted: Wed Feb 02, 2011 1:11 pm Post subject: Best ProtoForm |
|
|
Hey Todd, any updates on how your vac former works and projects that you've done? This is the best ProtoForm build thread I've seen!!
DougN
_________________
DougN - Just in case you're wondering, I got my "rating" legitimately... by posting aimless drivel, useless advice, and pointless questions. |
|
| Back to top |
|
|
|

