| View previous topic :: View next topic |
| Author |
Message |
LaughingCheese
Expert

Joined: 24 Mar 2008
Posts: 138
|
 Posted: Wed Mar 10, 2010 1:28 am Post subject: My Goals for CNC Posted: Wed Mar 10, 2010 1:28 am Post subject: My Goals for CNC |
 |
|
I guess it would be helpful to outline my goals for my CNC machine.
Basically, it will be used to cut molds out of foam to be vacuum formed over.
Some stuff I would like to build:
Airsoft guns
RC airplanes/cars
Costumes
Are any of these realistic for a 2'x2' + 5" Z axis CNC machine?
I would only be building the bodies of these; electronics would be made separately or etched by the machine as well, and things like props or EDF's would be bought separately.
So, am I crazy, or is this duable? 
Thanks
LC |
|
| Back to top |
|
 |
coffeehedake
Novice

Joined: 10 Feb 2010
Posts: 66
Location: Burlington, CT
|
| Posted: Wed Mar 10, 2010 3:19 pm Post subject: |
|
|
Only thing I can say, is for some of the airsoft gun parts, you might want to do them on a lathe. (Or a lathe attachment 4th axis for your CNC)
Other than that... sounds extremely do-able.
_________________
 |
|
| Back to top |
|
|
LaughingCheese
Expert
Joined: 24 Mar 2008
Posts: 138
|
| Posted: Wed Mar 10, 2010 4:55 pm Post subject: |
|
|
| coffeehedake wrote: | | Only thing I can say, is for some of the airsoft gun parts, you might want to do them on a lathe. (Or a lathe attachment 4th axis for your CNC) |
For the airsoft guns, I would only be CNC'ing the body, then vac forming the body mold.
Internals, like gearbox, springs, and barrels, would be bought separately.
Obviously I have no intention of building a fully functional air soft gearbox from scratch, that's way beyond me. :p
| Quote: | | Other than that... sounds extremely do-able. |
Coolness.  |
|
| Back to top |
|
|
Culvan
Novice

Joined: 20 May 2008
Posts: 85
Location: Kansas City, MO
|
| Posted: Thu Mar 11, 2010 6:07 am Post subject: Re: My Goals for CNC |
|
|
| LaughingCheese wrote: | Basically, it will be used to cut molds out of foam to be vacuum formed over.
LC |
This bit may be a problem. All the foams I've tried to use for vacuum forming melt under the temperatures involved. They also tend to merge into the HIPS I'm using so that it doesn't want to come apart.
I was testing a bunch of stuff out, but I hadn't had too much luck. I believe that a coating of elmer's glue over the foam will provide some protection and ease release, but the foam will still melt and you probably won't get more than one pull from it. Of course if that one pull is good you could pour hydrostone into it. The other approach is to use a very thin sheet of plastic and leave it over the buck. It provides a barrier that would protect the original and plastic releases much easier from that than the foam.
I've seen someone coat the foam with resin (polyurethane?) It eats a little bit away before it hardens. The surface would need to be worked by hand a little, but if it's done right it could leave you with the same dimensions as the original foam. Epoxy resin won't eat your foam, and will withstand forming temperatures, but you lose some of your detail because you are building your surface up.
Andy |
|
| Back to top |
|
|
LaughingCheese
Expert
Joined: 24 Mar 2008
Posts: 138
|
| Posted: Thu Mar 11, 2010 1:20 pm Post subject: Re: My Goals for CNC |
|
|
| Culvan wrote: | | LaughingCheese wrote: | Basically, it will be used to cut molds out of foam to be vacuum formed over.
LC |
This bit may be a problem. All the foams I've tried to use for vacuum forming melt under the temperatures involved. They also tend to merge into the HIPS I'm using so that it doesn't want to come apart.
|
Interesting. Thanks for the reality check!
What other material could I use?
Would MDF be better as a mold material?
That's what I was originally going to use but I think I read somewhere that it would have trouble even cutting MDF.
| Quote: |
I was testing a bunch of stuff out, but I hadn't had too much luck. I believe that a coating of elmer's glue over the foam will provide some protection and ease release, but the foam will still melt and you probably won't get more than one pull from it. Of course if that one pull is good you could pour hydrostone into it. The other approach is to use a very thin sheet of plastic and leave it over the buck. It provides a barrier that would protect the original and plastic releases much easier from that than the foam.
|
Sounds like it could be messy...
I've seen someone coat the foam with resin (polyurethane?) It eats a little bit away before it hardens. The surface would need to be worked by hand a little, but if it's done right it could leave you with the same dimensions as the original foam. Epoxy resin won't eat your foam, and will withstand forming temperatures, but you lose some of your detail because you are building your surface up.
Andy[/quote]
Theoretically, couldn't I exaggerate the details on the foam to compensate for when I add the epoxy?
That would take a lot of trial and error it seems tho.
EDIT: Oh, you didn't comment about my plans in general.
Let's assume I can work out the mold issues.
Is that list doable?
Thanks
LC |
|
| Back to top |
|
|
spektr
Master
Joined: 07 Jan 2008
Posts: 425
|
| Posted: Thu Mar 11, 2010 2:34 pm Post subject: |
|
|
Do it the easy way...
Cut the foam pattern.
seal it with something like Aliphatic resin wood glue.
Spray a PVA release coat on it.
Mass cast a plaster of some type over it.
Demold.
PVA release the plaster.
Pour a filled epoxy into the cavity creating a tool.
Done.
You have a tool capable of making hundreds of parts....
Its simple and we have been doing this for years.....
Scott. |
|
| Back to top |
|
|
LaughingCheese
Expert
Joined: 24 Mar 2008
Posts: 138
|
| Posted: Thu Mar 11, 2010 3:05 pm Post subject: |
|
|
| spektr wrote: | Do it the easy way...
Cut the foam pattern.
seal it with something like Aliphatic resin wood glue.
Spray a PVA release coat on it.
Mass cast a plaster of some type over it.
Demold.
PVA release the plaster.
Pour a filled epoxy into the cavity creating a tool.
Done.
You have a tool capable of making hundreds of parts....
Its simple and we have been doing this for years.....
Scott. |
Arg. I'm trying to AVOID multi step processes. 
Although, having a mold that will last a while and make hundreds of parts sounds tempting.  |
|
| Back to top |
|
|
stormtrooperguy
Expert

Joined: 24 Sep 2009
Posts: 126
|
| Posted: Thu Mar 11, 2010 5:56 pm Post subject: |
|
|
I think that especially given your tight budget, you're probably going to have to accept some additional work.
One of the things that comes up frequently in the costuming world is that you have 3 factors in a build: time, talent and money. You need 2 of those to pull off the costume.
No talent but have the money to pay someone and the time to wait? Awesome!
No time? If you're good at making stuff and have enough cash you can pull it off.
Need a full Boba Fett costume next week, have never painted before and have $200 to spend? You're out of luck..
I wanted to avoid the sculpt / mold / cast process for my vac forming bucks too, so I used MDF. Not having access to any machining tools, I cut / shaped it all by hand, spanning a year of work. It's a hobby... efficiency isn't a concern really 
What about trying the "old fashioned way" of knives, files, saws, etc...? |
|
| Back to top |
|
|
LaughingCheese
Expert
Joined: 24 Mar 2008
Posts: 138
|
| Posted: Thu Mar 11, 2010 11:17 pm Post subject: |
|
|
| Quote: |
One of the things that comes up frequently in the costuming world is that you have 3 factors in a build: time, talent and money. You need 2 of those to pull off the costume.
No talent but have the money to pay someone and the time to wait? Awesome!
No time? If you're good at making stuff and have enough cash you can pull it off.
Need a full Boba Fett costume next week, have never painted before and have $200 to spend? You're out of luck..
|
Yep.
| Quote: |
I wanted to avoid the sculpt / mold / cast process for my vac forming bucks too, so I used MDF. Not having access to any machining tools, I cut / shaped it all by hand, spanning a year of work. It's a hobby... efficiency isn't a concern really
|
AH!
So you CAN use MDF!!!!!!!!!!!!!
| Quote: |
What about trying the "old fashioned way" of knives, files, saws, etc...? |
But then I would be a sculptor, and I have ZERO sculpting talent.
However I've been looking into alternative methods more and more.
I don't think airsoft guns and RC aircraft are doable with the by-hand method, especially by someone with my lack of skill.
Which is why I was going for CNC, its much easier to work digitally where you can fix things with a few clicks.
Remember, life has no Undo button.
(Or make Awesome/prop/costume/RC aircraft for that matter. XD) |
|
| Back to top |
|
|
stormtrooperguy
Expert
Joined: 24 Sep 2009
Posts: 126
|
| Posted: Fri Mar 12, 2010 11:52 am Post subject: |
|
|
There's no question that MDF works... I've been using it for the last year to make my clone armor. I occasionally get cracks at the seams between layers, but a quick hit of bondo smooths that right out.
I just don't think an inexpensive home mill is going to cut it effectively.
For shaping my molds, I used a combination of:
scroll saw
band saw
table saw
6" x 48" belt sander
3" x 18" belt sander
drum sander
dremel
I cut each piece of mdf to the basic shape, glued and clamped them together, then smoothed them with bondo.
Overall, for a set of full body armor, I probably used 3 sheets of 3/4" MDF (4' x 8' sheets) and about 4-5 gallons of Bondo. |
|
| Back to top |
|
|
LaughingCheese
Expert
Joined: 24 Mar 2008
Posts: 138
|
| Posted: Fri Mar 12, 2010 3:17 pm Post subject: |
|
|
| stormtrooperguy wrote: | | There's no question that MDF works... I've been using it for the last year to make my clone armor. I occasionally get cracks at the seams between layers, but a quick hit of bondo smooths that right out. |
Awesome!
| Quote: |
I just don't think an inexpensive home mill is going to cut it effectively.
|
| Quote: |
For shaping my molds, I used a combination of:
scroll saw
band saw
table saw
6" x 48" belt sander
3" x 18" belt sander
drum sander
dremel
I cut each piece of mdf to the basic shape, glued and clamped them together, then smoothed them with bondo.
Overall, for a set of full body armor, I probably used 3 sheets of 3/4" MDF (4' x 8' sheets) and about 4-5 gallons of Bondo. |
Interesting.
Can you elaborate more on your process?
How do you accurately cut the MDF?
Do you use a pattern?
Or are you a sculptor? 
Do you vac the MDF or is MDF what you use for your costumes? |
|
| Back to top |
|
|
stormtrooperguy
Expert
Joined: 24 Sep 2009
Posts: 126
|
| Posted: Fri Mar 12, 2010 3:25 pm Post subject: |
|
|
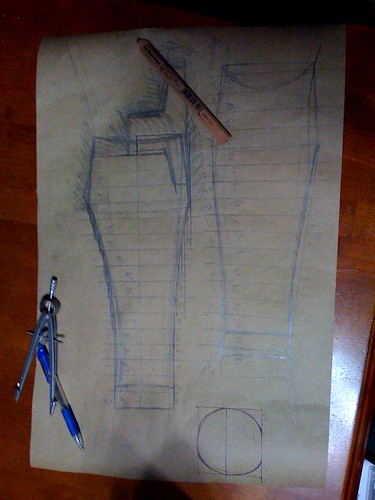
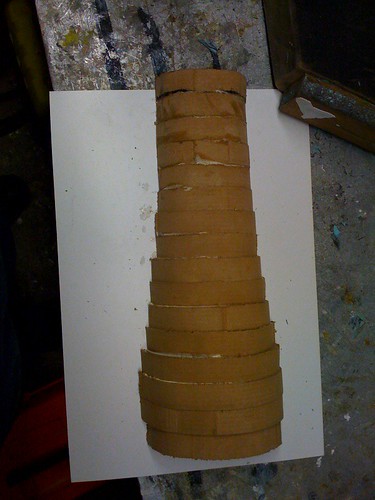
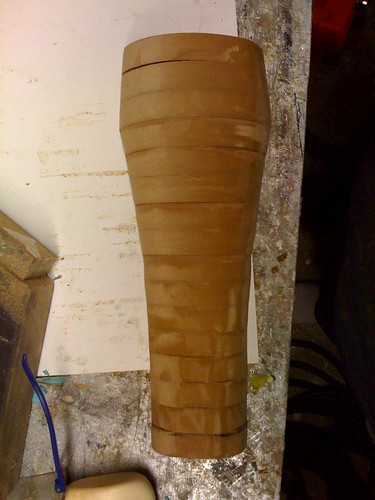
I just work by eye. The closest I come to patterns is what I draft myself in the process of making the stuff. But even that I only do somewhat sparsely. Mostly I just cut stuff and hope it works.
For example, for my clone armor, I started with the forearm.
I traced my own forearm on paper, then drew the armor around it how I wanted it to look. I then took measurements off of the drawings and cut the MDF to match.
Drawing:
Glued and clamped:
Sanded:
Bondo:
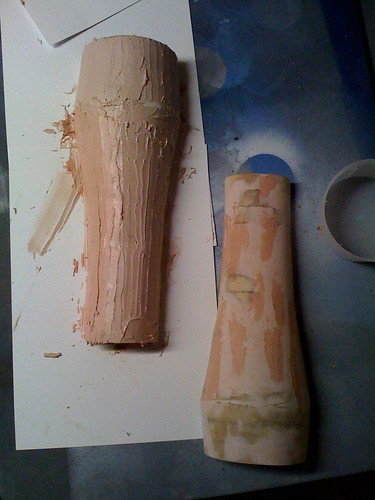
Then sand it smooth. Repeat as needed.
Then I vac it and assemble:
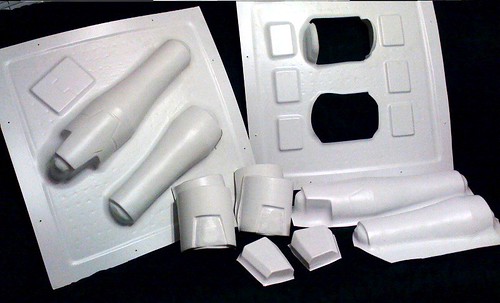 |
|
| Back to top |
|
|
LaughingCheese
Expert
Joined: 24 Mar 2008
Posts: 138
|
| Posted: Fri Mar 12, 2010 6:00 pm Post subject: |
|
|
| stormtrooperguy wrote: | I just work by eye. The closest I come to patterns is what I draft myself in the process of making the stuff. But even that I only do somewhat sparsely. Mostly I just cut stuff and hope it works.
For example, for my clone armor, I started with the forearm.
I traced my own forearm on paper, then drew the armor around it how I wanted it to look. I then took measurements off of the drawings and cut the MDF to match.
Drawing:
Glued and clamped:
Sanded:
Bondo:
Then sand it smooth. Repeat as needed.
Then I vac it and assemble:
|
See, so you ARE a sculptor!
Unfortunately not all of us have that talent.
Which is why I wanted to use a CNC machine as a sculptor.
Build the model first on the computer, where it can be refined and even tested in a game environment if need be.
I would like to use a pep-type approach with a paper pattern, but I think there could be issues with that.
Seems like just wrapping paper pattern around a block of MDF would have issues with depth and such. |
|
| Back to top |
|
|
|

