| View previous topic :: View next topic |
| Author |
Message |
Mattax
Expert
Joined: 09 Mar 2006
Posts: 160
Location: Virginia
|
 Posted: Sun Mar 11, 2007 4:17 pm Post subject: Posted: Sun Mar 11, 2007 4:17 pm Post subject: |
 |
|
Yes, lots of possibilities and I like it because the corners are perfect 90 degrees.
_________________
Mattax
TK487
Garrison Tyranus |
|
| Back to top |
|
 |
Mattax
Expert
Joined: 09 Mar 2006
Posts: 160
Location: Virginia
|
| Posted: Mon Mar 26, 2007 9:47 pm Post subject: |
|
|
You guys have asked for pics of what I do have finished. I will work on getting them edited and uploaded in the next two weeks. This computer lacks photoshop and infraview is still way too big for resizing without losing the resolution - I hate infraview. And please do not suggest anything else, this computer sucks - period, but it keeps me connected to the net until the prime computer is finished. I do not want to use the new computer until all of it is loaded as I am doing back up images of needed software only with no unecessary usage.
I will have pics posted of the mock plastic frame holder, stainless steel oven box, vac tank and vac pump and the platen and chamber. None of it is ready and all needs work. But thanks to a few key pieces of information from here and elsewhere, I am now moving forward on construction.
One question, what distance works for the gap between the plastic frame holder edge and the platen edge? What is the minimum and what is the maximum?
I have a 24 x 24 platen and as of now have a plastic frame holder inner edge 25-3/8 inch x 25-3/8 edge. I will be reducing this by a minimum of 1/4 inch so that the guides attached to the outer edge do not bind. Outer dimension is currently 27-3/8 x 27-3/8 inches and thus is also the distance between guides. The pics (when they are posted) of the frame inbetween the guides is tight! It needs to be free gliding and therefore the frame will be made smaller and shimmed with washers to connect it.
_________________
Mattax
TK487
Garrison Tyranus |
|
| Back to top |
|
|
Mattax
Expert
Joined: 09 Mar 2006
Posts: 160
Location: Virginia
|
| Posted: Fri Jul 13, 2007 9:33 pm Post subject: |
|
|
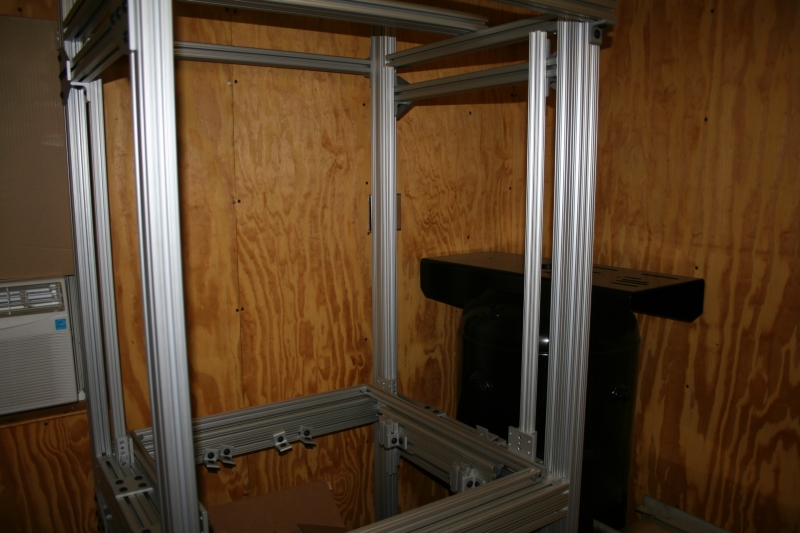
I cleaned out the shed that houses the vac table frame and took a few pics of the frame, tank, stainless steel oven box, platen and pump. I am in the process of uploading. Once they are up I will post here.
I feel good about getting back to completing the vac table.
I need a source for a good inlet filter.
I got my outlet filter a few weeks ago. Also I am using NW25 fittings for the lines. Although I will be using NPT fittings to get into the tank and then to the platen.
I am looking at using rodless air cylinders to raise and lower the plastic frame holder. It has a 36 inch stroke and is 1 in diameter. How big a compressor will I need to push/pull two rodless air cylinders? I have a huge compressor now, but it is overkill and I want to get a smaller one but big enough to do the job.
I plan on ordering the 8020 aluminum frame parts I need on Monday. Still need to figure out the oven wiring and plumbing/valves.
Look for pics later on.
_________________
Mattax
TK487
Garrison Tyranus |
|
| Back to top |
|
|
Mattax
Expert
Joined: 09 Mar 2006
Posts: 160
Location: Virginia
|
| Posted: Fri Jul 13, 2007 9:53 pm Post subject: |
|
|
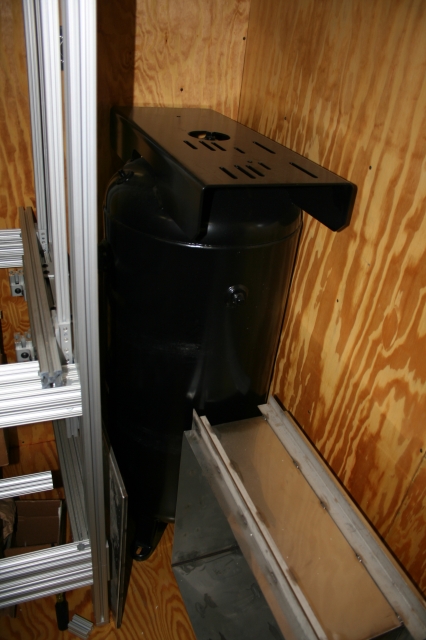
Here is the Epoxy lined 60 gallon vacuum tank. Sitting next to it is the stainless steel oven box.
The next photo is the platen top with 1/8 inch holes spaced 1 inch apart.
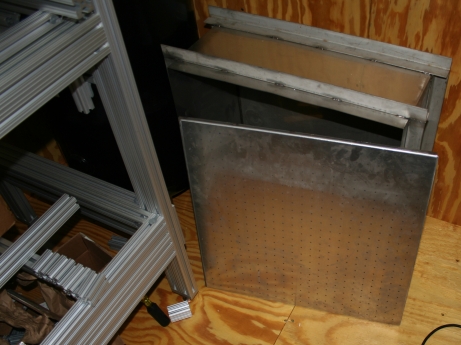

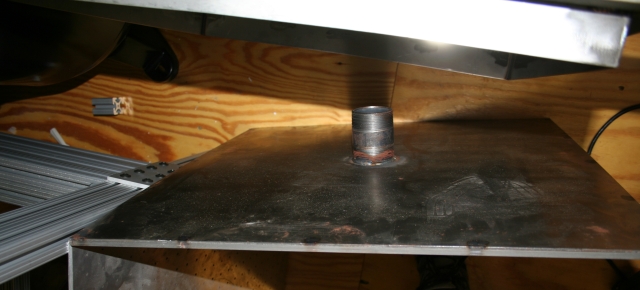
The next photo is the inside of the platen. Notice the 1/4 inch keystock welded to the edges. I need to grind it off and move inward 1/4 inch and reweld. The 1/4 gap is so that I can silicone the edges of the steel bottom half of the platen with the aluminum top half of the platen.
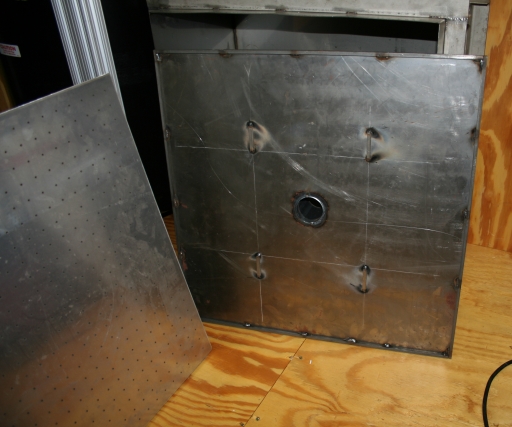
This is the 2 inch nipple welded on the bottom of the lower half of the platen. It will be reduced down to one inch for a one inch line.
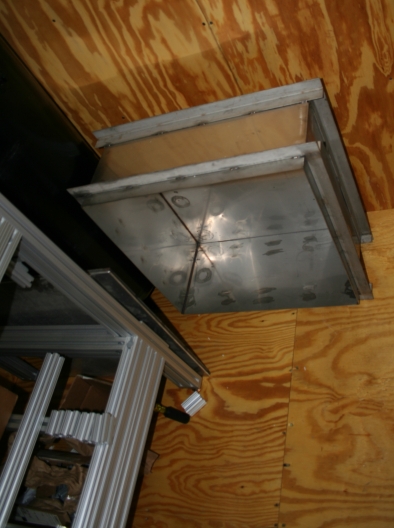
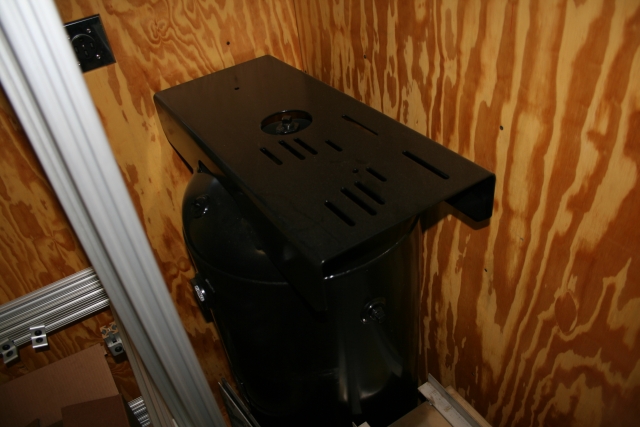
The next photo is the top plate on the vac tank. This is where the vac pump will be mounted.
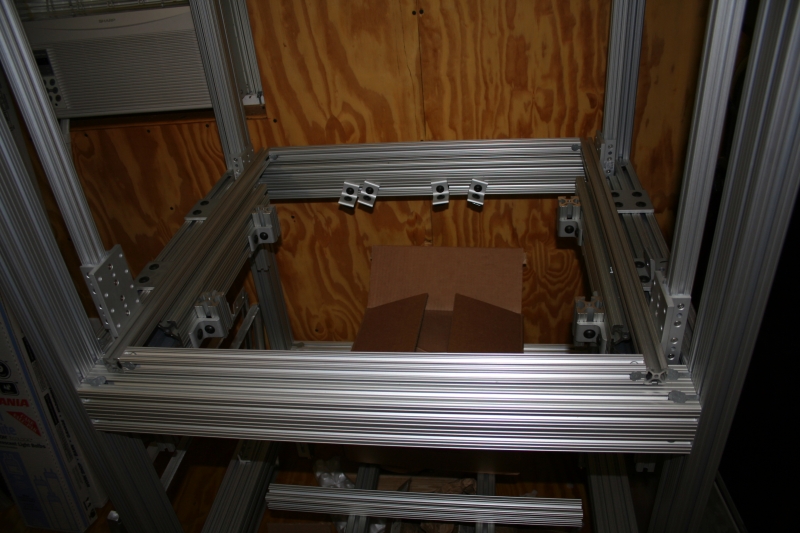
The next photo is where the platen will sit. Notice the four little "blocks" of aluminum - these are actually 1515 x 2.5 inches long. These will be replaced with 6 inch long pieces. They are adjustable up and down so that I can set the height of the platen for the frame holder to come down further if necessary.
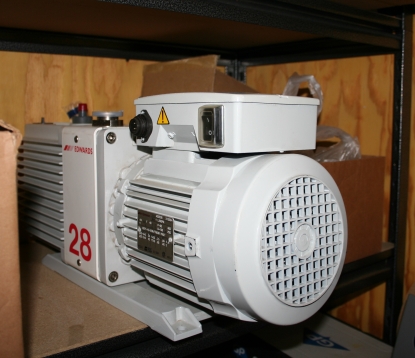
Next pic of the Edwards E2M28 Vacuum pump. I need to fix the motor end housing as it was smashed from the shipper. Also may need to do a rebuild - not sure since the oil was drained from the pump - so not sure on the pumps condition.
_________________
Mattax
TK487
Garrison Tyranus
Last edited by Mattax on Fri Jul 13, 2007 10:35 pm; edited 2 times in total |
|
| Back to top |
|
|
jegner
Site Admin

Joined: 30 May 2003
Posts: 2144
Location: Texas, USA
|
| Posted: Fri Jul 13, 2007 10:27 pm Post subject: |
|
|
Very cool!
I wish I had the metal fab you have! |
|
| Back to top |
|
|
Mattax
Expert
Joined: 09 Mar 2006
Posts: 160
Location: Virginia
|
| Posted: Fri Jul 13, 2007 10:43 pm Post subject: |
|
|
Thanks! Go to www.8020.net Also check them out on Ebay. They have a lot of stuff at reduced prices.
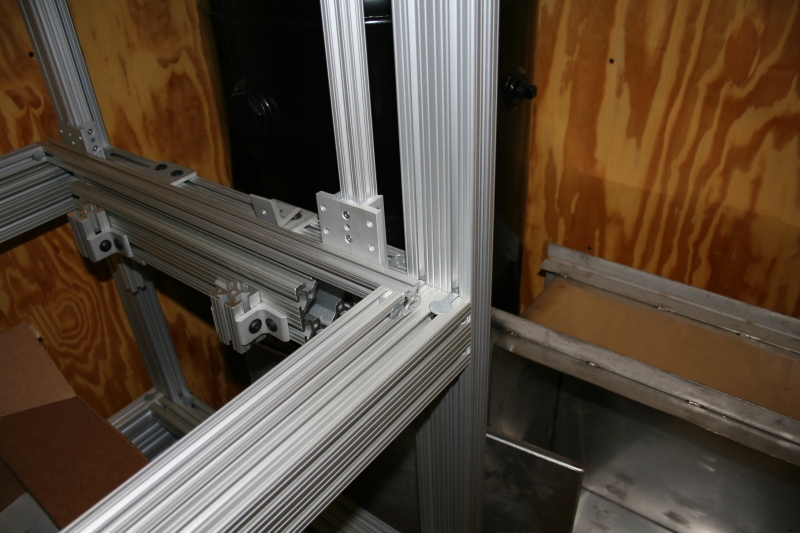
I have a few changes to make to the frame. The plastic frame holder is being changed to 1515 instead of the shown 1010. Actually the size is 1515 but will have a closed side on the top and bottom frame so that there is a smooth surface to put the plastic in between. If necessary I will add a grit paper to the surfaces to hold the plastic better. Any suggestions on grit paper?
If you notice the four small rails 1010 mounted vertically between the platen height and the oven height, these are the rails that the plastic frame holder will go up and down on. I need to change out the top cross members so the the rodless air cylinder mounts - from the cylinder to the plastic frame holder - will not hit them. I will simply put in a short piece on both sides. And then I will also need the framing for the cylinder to plastic frame holder.
I have the parts to mount the oven box to the upper frame. This will get mounted after I wire up the oven.
What was the link to order niachrome wire and mounts?
Has anyone done something neat with their oven over the last 4 months?
_________________
Mattax
TK487
Garrison Tyranus |
|
| Back to top |
|
|
Mattax
Expert
Joined: 09 Mar 2006
Posts: 160
Location: Virginia
|
| Posted: Sat Jul 14, 2007 4:34 pm Post subject: |
|
|
What grit type of surface to use for plastic frame holder?
Tubular heating elements for 24- 1/4 by 24 - 1/4 inch stainless steel oven box?
I looked around and have yet to find the style name of the tubular elements shown in Proto-forms' website. Basically, it is a U with a long middle and short ends.
_________________
Mattax
TK487
Garrison Tyranus |
|
| Back to top |
|
|
Mattax
Expert
Joined: 09 Mar 2006
Posts: 160
Location: Virginia
|
| Posted: Mon Jul 30, 2007 6:54 pm Post subject: |
|
|
Bump on tubular heating elements...
On another note, I contacted 8020 rep today and they are working up the changes I need for the frame. Once I get those parts finalised and installed I can get the rodless air cylinders and figure out what parts I need to mount them.
I will be going with a small pancake or small tank air compressor to drive the rodless air cylinders.
I guess I need to get the lower chamber of the the platen to the local fabricators to move the 1/4 keystock over a 1/4 inch.
_________________
Mattax
TK487
Garrison Tyranus |
|
| Back to top |
|
|
jegner
Site Admin
Joined: 30 May 2003
Posts: 2144
Location: Texas, USA
|
| Posted: Mon Jul 30, 2007 7:43 pm Post subject: |
|
|
| Mattax wrote: | What grit type of surface to use for plastic frame holder?
Tubular heating elements for 24- 1/4 by 24 - 1/4 inch stainless steel oven box?
I looked around and have yet to find the style name of the tubular elements shown in Proto-forms' website. Basically, it is a U with a long middle and short ends. |
I use play sand for my grit. Honestly. Mix up some JB Weld, and paint or smear it on the holding frames. Then sprinkle some playsand on the still curing JB Weld. Works great. I pour the sand on until I can't see the JB Weld. Then let the JB weld set. The excess will fall off once it is cured.
I know there are all sorts of applications for this stuff. From custom sanding sticks, to non-skid high-temp paint.
 |
|
| Back to top |
|
|
Mattax
Expert
Joined: 09 Mar 2006
Posts: 160
Location: Virginia
|
| Posted: Mon Aug 06, 2007 12:48 am Post subject: |
|
|
At this point, after reviewing the many sucessful niachrome wirings of ovens on here.  I will be going with the niachrome. I will be going with the niachrome.
Questions?
For my stainless steel oven box, what would be the best method to mount the niachrome standoffs without drilling 20-30 holes in the ceiling of the box.
I am thinking I could get away with 4-8 holes depending on wiring and mounting. Would a hardbacker board survive inside the stainless oven box if I mounted it to the ceiling? Is there a better material than hardbacker board to use to mount the standoffs?
I could mount the standoffs to the hardbacker (or better material) and then use four corner mounting points to hold the hardbacker to the ceiling.
_________________
Mattax
TK487
Garrison Tyranus |
|
| Back to top |
|
|
cod
Master
Joined: 05 Nov 2006
Posts: 322
Location: San Francisco
|
| Posted: Mon Aug 06, 2007 1:27 am Post subject: |
|
|
what style stand-offs do you have ?
if you are using the donut style standoffs, you could mount a piece of hardware cloth inside top, which will give you an evenly spaced grid to tie each donut to , with a short piece of wire
_________________
<.o'> |
|
| Back to top |
|
|
Mattax
Expert
Joined: 09 Mar 2006
Posts: 160
Location: Virginia
|
| Posted: Mon Aug 06, 2007 11:16 am Post subject: |
|
|
| cod wrote: | what style stand-offs do you have ?
if you are using the donut style standoffs, you could mount a piece of hardware cloth inside top, which will give you an evenly spaced grid to tie each donut to , with a short piece of wire |
What is hardware cloth? Picture? Example? Thanks for responding, sounds interesting. Also, I take it this cloth will withstand the heat?
_________________
Mattax
TK487
Garrison Tyranus |
|
| Back to top |
|
|
cod
Master
Joined: 05 Nov 2006
Posts: 322
Location: San Francisco
|
| Posted: Mon Aug 06, 2007 12:17 pm Post subject: |
|
|
| Mattax wrote: |
What is hardware cloth? Picture? Example? Thanks for responding, sounds interesting. Also, I take it this cloth will withstand the heat? |
something like this:
http://www.twpinc.com/twpinc/control/category/~category_id=TWPCAT_14
doesnt have to be stainless.. You can buy it cheap at most hardware stores
_________________
<.o'> |
|
| Back to top |
|
|
drcrash
Guru

Joined: 04 Sep 2006
Posts: 705
Location: Austin, Texas
|
| Posted: Mon Aug 06, 2007 12:41 pm Post subject: hardware cloth, stringing nichrome |
|
|
| Mattax wrote: | | cod wrote: | what style stand-offs do you have ?
if you are using the donut style standoffs, you could mount a piece of hardware cloth inside top, which will give you an evenly spaced grid to tie each donut to , with a short piece of wire |
What is hardware cloth? Picture? Example? Thanks for responding, sounds interesting. Also, I take it this cloth will withstand the heat? |
It's woven galvanized steel wire, usually with a 1/4" or 1/2" grid. You can get a roll of it at a home improvement store.
It should take the heat easily if you are using ceramic insulators. It could probably take the heat anyhow, but you need the electrical insulation so that you don't short across your coils. (The heat will vaporize the zinc coating and leave the plain steel the first time you heat up your oven; don't breathe the fumes. After you burn it off the first time, it won't do that any more.)
BTW, I finally got around to stringing the nichrome for my hardibacker-with-no-ceramic-insulators bottom heater. I was very pleased with the results---very even spacing of the turns of coil, nice straight and slightly spring runs of coil, etc.
I intend to write a detailed how-to on that at some point. (I don't recall seeing detailed instructions on getting it to come out right; Thurston James just says to string it with "even tension" without giving a hint how to do that.)
The basic trick I used is to
1) stretch each coil out to its full length, but not much further, so that when you let go of it, it springs back to a few inches shorter than the run length. Then stretch it out full length again, on the floor, and clamp it. (I just attached two C-clamps to the floor with painter's tape.) It'll be under slight tension.
2) lift it up an inch or so in the middle and let it go a couple of times to let it relieve any uneven tension.
3) mark the places along the (full-length but slightly tensioned) stretched coil where it's going to make a turn. (I wrapped little quarter-inch wide strips of tape around it and stuck them to themselves to make flags whose right edges marked the bend points.)
4) wire it to the corner attachment points with short pieces of steel wire, turning the board a quarter turn each time, so that the nichrome can just feed in from one direction and not get all twisted or tangly. (Attach it at the center first and work outward, so that you always have clear board around where you're working.) You'll have to stretch the wire just a little to get it to the next corner. That leaves it sprung and taut.
5) go back and wire the attachments between the corners---but before actually attaching them, lift the wire up a little and let it go to relieve any uneven tension between two corners.
It's a little tedious, and took hours, but it wasn't difficult and worked like a charm.
_________________
Paul (a.k.a. Dr. Crash)
Tired of buying cheap plastic crap? Now you can make your own! www.VacuumFormerPlans.com |
|
| Back to top |
|
|
Mattax
Expert
Joined: 09 Mar 2006
Posts: 160
Location: Virginia
|
| Posted: Mon Jul 30, 2012 10:50 pm Post subject: |
|
|
Bumping this thread as I am actually getting back to building the table.
Wow, it's been over 6 years since I started and I feel like I am only halfway there. 
I will have to have the stainless steel oven box remade to be bigger so the plastic holding frame goes into the oven.
So here is my current progress.
My second shed is all cleaned out and has space for the table frame and vac tank.
Need to open up the walls and install the electrical wires and outlets and tie it into the panel box.
The Edwards E2M28 and 30 (I have both in case one fails) is 220V single phase so I need to figure out the wire size and outlet to use (again - hey it's been 6 years!)
E2M28 specs: V: 230 Freq: 60HZ FLA: 5.0A SCA: 33A Maximum Fuse Rating: 15A
E2M30 specs: V 230 Freq: 60HZ FLA: 3.9A SCA: 22A Maximum Fuse Rating: 16A (not sure exactly which ratings for this one as I cant see the item number of the unit). The other specs would be FLA: 3.8A and SCA:22.8A
Am guessing 8 gauge wire. 1 - 220 20AMP breaker
An outlet for the oven power - 220V single phase 1 - 220 60AMP breaker
2 - 20AMP outlet for control power and future accessories. 2 - 20AMP single pole breakers.
Need to finish running air lines from the air compressor. I already ran a bit for the powder costing set up for the sandblast and glass bead cabinets and a drop for the powder costing table. Just have to redo one drop and add more line for the vac table and getting it to the air compressor.
Remount wall and set up the vac table frame and the vac tank position.
I am ordering leveling feet vibration dampers for the vac tank and vibration isolators for the vac pump.
Once the frame is set up, will figure out how to mount the rodless air cylinders and then how to run the air lines. Will definitely have to order additional parts for this.
Assemble new plastic holding frames. Figure out what additional parts are needed to mount including hinges and hold downs.
Figure out dimensions for new oven box.
Order niachrome wire and stand offs for oven.
Mount vac pump on vac tank and figure out additional vac fittings needed to get to platen on table frame.
Platen is in two parts. The aluminum top is 24x24 with holes one inch on center. The bottom is steel and has been redone from what you see in the pictures above. I had 1/4 keystock welded to the bottom offset in 1/4 inch in order to run a bead of silicone to seal the aluminum top to the bottom. I am thinking of having 4 countersunk head screws set up to hold the two sections together. These will have to be drilled and tapped. The out line is now a NW25 fitting welded into the center of the platen bottom.
Anyone have a better idea for securing the top to the bottom so it does not slide as silicone alone will not hold it.
I do not want to weld the top to the bottom in case I need to get inside the chamber and clean it out.
_________________
Mattax
TK487
Garrison Tyranus |
|
| Back to top |
|
|
|

