 |
www.TK560.com
Vacuum Forming, Movie Prop, Sci-fi and GIjOE Forum
|

|


|
| View previous topic :: View next topic |
| Author |
Message |
drcrash
Guru

Joined: 04 Sep 2006
Posts: 705
Location: Austin, Texas
|
 Posted: Tue May 01, 2007 11:40 pm Post subject: "rectifier" a.k.a. power diode heat control Posted: Tue May 01, 2007 11:40 pm Post subject: "rectifier" a.k.a. power diode heat control |
 |
|
I got a power diode rated at 600 v and 40 amps continuous from Fry's, and made a off/half/full-heat control out of it. I've only used it on my 1500-watt 12 x 18 bottom heater (the one made from a 2-burner hot plate and roasting pans) so far, but it seems to work like a charm, and one of those diodes is enough to cut the heat in half for a 2 x 2 ft. TJ oven. They cost about $12, which is way cheaper than a 1000-watt dimmer, much less a 2400-watt dimmer.
Being able to cut the heat in half is cool. For cooking 3mm EVA foam, I can just put it on high for a minute or so---not long enough to burn it---then switch it to low until it's done. (On full power, it can get too hot pretty fast---I have to flip it over to keep it from burning on one side before the heat soaks through to the other.)
I discovered that such things do dissipate a fair bit of heat---at the power level I'm running it at, I'd guess very roughly 40 watts. (Not nearly as much heat as using a big resistor to reduce the current.) That doesn't sound like a lot, but it does require a heat sink and will require a vented enclosure when I bother with that part. If you were to run a whole TJ 2 ft x 2 ft oven off of it, it'd dissipate more heat and might require a bigger heat sink. (Maybe... more on that in a second.)
Right now, the heat sink I'm using is just a scrap piece of 1/2" C channel made of 1/16" aluminum, about six inches long. I just drilled a hole in it and mounted the rectifier on it with a little heat sink compound (thermal paste) in between. (The heat sink compound is both thermally and electrically conductive, and helps conduct the heat from the rectifier casing to the aluminum channel; you can get it at Radio Shack among other places) The diode has a stud mount---basically a bit of bolt sticking out---so you just:
(1) put some heat sink compound on it
(2) put the stud through the hole in the heat sink,
(3) crimp a lug onto your wire and put it over the stud, and
(4) put a nut on the stud and tighten it to hold it all together.
I'm using a double-pole double-throw toggle switch I got for $1.50 at the Habitat for Humanity ReStore (what a deal), but you could get the same effect with two plain (single-pole, single throw) light switches---one used normally to open or close the circuit, and the other to bypass the diode for full power.
Using two (one diode, two-switch) heat controllers like that would let you have zoned heat control on a TJ oven---just wire the two inner segments on one controller, and the two outer segments on the other. You could run the outer zone full-up and the inner zone at half to give enough heat for most plastics, heat up the edges, and not burn the middle, if you're having a problem with cold corners or burned middles. If that's not quite right, say not quite enough heat in the middle, you could have them both full on for a minute or so, then turn the middle one down to half until it's done.
(dman told me he rigged a simple light switch to turn off the inner segments on his 2 x 4 oven, so he could preheat the frames and the oven without the inner zone getting too hot... having a half-heat setting would probably be better.)
As I've got it heat-sunk right now with the little piece of C channel, it gets up to about 160 degrees if I leave it running indefinitely. That's actually not too hot, or anywhere near it---the rectifier is supposed to work up to 284 degrees. It'll get hotter if I run a whole big oven off of it, and when it's in a vented enclosure rather than just sitting out in the open, but the little scrap aluminum heat sink might still be enough for a whole TJ oven.
(I'll probably come up with a better heat sink, just so that I don't have to worry about the enclosure getting hot enough that people think there's something wrong when there isn't; don't want people getting hinky about stuff "overheating.")
I'm still planning on doing the two-spiral thing for a 2 ft x 2 ft oven, so that I can just turn off every other row of coils to get half heat, and do it selectively to get inner and outer zones, plus having rectifiers so that I can turn them to half and get 3/4 heat (2 full-on segments and 2 off/half/full segments) but...
I'm thinking that might be overkill. Just putting half-heat controls on a standard TJ layout may be all you need to get heat control and zones that work fine. You could retrofit an existing TJ oven easily and pretty cheaply without restringing the nichrome.
_________________
Paul (a.k.a. Dr. Crash)
Tired of buying cheap plastic crap? Now you can make your own! www.VacuumFormerPlans.com |
|
| Back to top |
|
 |
jegner
Site Admin

Joined: 30 May 2003
Posts: 2144
Location: Texas, USA
|
| Posted: Wed May 02, 2007 6:38 am Post subject: |
|
|
Cool!
Dr. Crash, can you post a pic? I'd be interested in making one of those for my TJ machine!
Thanks for sharing, great info!
Jim |
|
| Back to top |
|
|
drcrash
Guru
Joined: 04 Sep 2006
Posts: 705
Location: Austin, Texas
|
| Posted: Wed May 02, 2007 8:59 am Post subject: |
|
|
| jegner wrote: | | Dr. Crash, can you post a pic? |
I'll try to take some pictures and post them soon.
_________________
Paul (a.k.a. Dr. Crash)
Tired of buying cheap plastic crap? Now you can make your own! www.VacuumFormerPlans.com |
|
| Back to top |
|
|
faithblinded
Newbie
Joined: 28 Apr 2007
Posts: 14
Location: Cleveland, Ohio
|
| Posted: Wed May 02, 2007 11:52 am Post subject: |
|
|
Good idea Paul(you seem to have those now and again)! I was thinking of using rectifiers for some control in my oven. You took the thought much further than I did.
Would this be similar to the type of rectifier you're using?
http://www.allelectronics.com/cgi-bin/item/1N1190AR/205100/40_AMP_600_VOLT_RECTIFIER_.html
The thing that worries me is whether or not the nichrome will still emit IR at half power. I've been looking all over for data about nichrome wire, and how much IR it emits given a certain amount of watts/per inch. I suppose in the end, when you're turning it down to do thinner plastics, the heat alone should suffice, even if the IR diminishes to next to nothing.
Good work, I too would like to see pics of your implementation! |
|
| Back to top |
|
|
drcrash
Guru
Joined: 04 Sep 2006
Posts: 705
Location: Austin, Texas
|
| Posted: Wed May 02, 2007 2:57 pm Post subject: |
|
|
Yes. What I'm using is an NTE 5994, which looks just like that.
(BTW, All Electronics has good prices on lots of electrical stuff.)
http://www.circuitspecialists.com/prod.itml/icOid/5583
I guess I coulda saved a few bucks if I'd shopped online; big honking power diodes can be cheaper than 600-watt dimmers.
I also got an NTE 5995 (I think) which is just like it except that the diode is put in the stud-mount case in the opposite direction. ("anode to case" vs. "cathode to case" is the term). That way I can have one zone using the forward half of the AC wave, and the other zone using the backward half, so that I don't present a huge lopsided load to the power system. (An electrician friend told me that it shouldn't make any difference, and the lopsided load shouldn't cause any problems, but I figured what the heck. And for a really big oven like a 2 x 4 or 4 x 4, I figure it's a good idea whether it's necessary or not.) The worst case that way is the lopsidedness of one circuit being at half power; if they're both set at half, they'll balance each other out.
| Quote: |
The thing that worries me is whether or not the nichrome will still emit IR at half power. |
It will. All resistance heaters are comparably efficient, and a nichrome wire is so small that the only way it can dump a lot of heat (even half-powered heat) is by radiating it away. If it's not radiating most of the heat away, it will heat up until it is mostly radiating it away. (Unless you have a whole lot of air blowing across it to cool it by convection.)
What WILL happen is that it will radiate a different frequency distribution of IR, with the hump centered at lower frequencies (longer wavelengths). That may or may not heat the plastic as "efficiently" as the full-power spectrum, depending on how the humps coincide or don't with the absorption peaks of the plastic. Most plastics have a peak around 1350 degrees, and another one lower down at around 800, IIRC. I suspect that if you're hitting the high one on full power, you'll pretty much hit the low one on half power. (There's some info about this somewhere on the infraredheaters.com site.)
I think heating plastic "efficiently" in that sense is rather overrated, at least if you have fairly reflective oven walls---IR that reflects off or passes through the plastic will typically bounce off the walls and go through the plastic again until its absorbed... but you might need an aluminum reflector under a top heater or over a bottom heater to reflect the IR back through.
(I use a large cookie sheet with my little over and under for that, but I mostly DON'T use it because at 1625 watts for a 12 x 18 oven, it runs plenty hot. I use the heat shield mostly to keep from overheating my buck or gaskets when cooking clear acrylic. That's one reason why I wanted to be able to just turn the heat down---with the reflector under it, it's too efficient and I can easily burn the plastic if I don't keep flipping it off and back on to reduce the heat.)
| Quote: |
I've been looking all over for data about nichrome wire, and how much IR it emits given a certain amount of watts/per inch. I suppose in the end, when you're turning it down to do thinner plastics, the heat alone should suffice, even if the IR diminishes to next to nothing.
|
As I said above, it'll still emit mostly IR, just at a lower average frequency. So if you just compute the watts per inch, you can expect that to be mostly IR, because the wire just doesn't have enough surface area for it to be convected away. If it gets converted to heat, that will mostly happen when the radiated IR is absorbed by the oven walls or the plastic.
There is some information on the infraredheaters.com site about the temperature that a straight nichrome wire stabilizes at for different wire diameters and amperages. (Or maybe watts per inch; you can compute one from the other). I suspect the coils in a TJ oven burn very slightly hotter than a straight wire, but not much.
_________________
Paul (a.k.a. Dr. Crash)
Tired of buying cheap plastic crap? Now you can make your own! www.VacuumFormerPlans.com |
|
| Back to top |
|
|
drcrash
Guru
Joined: 04 Sep 2006
Posts: 705
Location: Austin, Texas
|
| Posted: Thu May 17, 2007 9:47 pm Post subject: |
|
|
Here's a couple of pictures of a stud-mount power diode screwed to a heat sink made of scrap C-channel with a hole drilled in it. ("stud mount" means that one end of the diode has a big screw connection, so you can just bolt it to a heat sink with a nut over the end.)
To connect the contact on one side, which is a metal rod that's flat toward the end, I just stuck a 1/4" female quick disconnect thing over it. (Crimp-on connector crimped to a 14 gauge wire.) I'm not sure what kind of connector it's designed for (the flat part has a little hole in it) but the female quick-disconnect makes good contact and grips well.
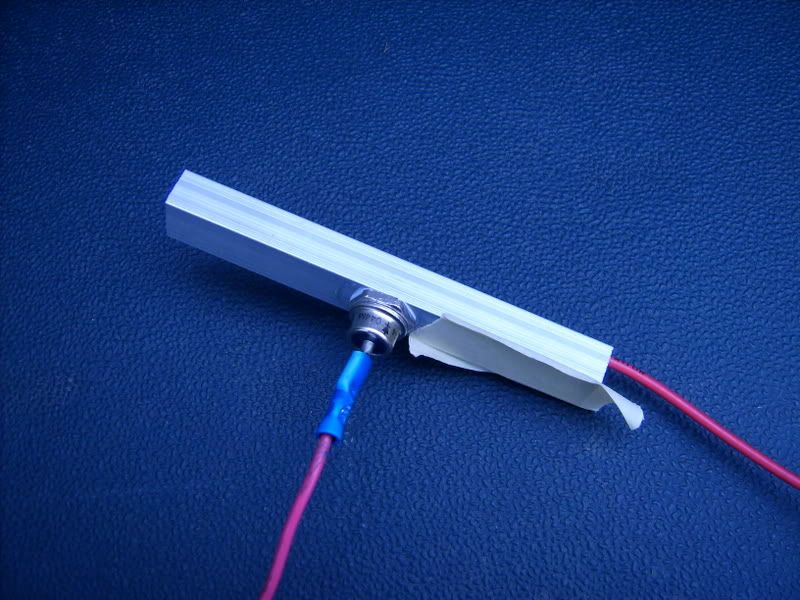
To connect the other side, where the case w/mounting stud is the contact, I used a crimp-on spade lug. This happens to be a gold-plated lug for hi fi audio, because I have those lying around, but a regular crimp-on lug would do fine. (You need a fairly big one with a big hole, about a #10 screw size.) It mostly contacts the heat sink, not the stud, but that's fine because the heat sink is electrically conductive and touching the diode case.
(The heat sink compound helps them connect electrically over a fairly big area, so even though aluminum isn't the most conductive metal, and heat sink compound isn't as conductive as aluminum, it's all okay. The resistance over that big a patch shouldn't be much.)
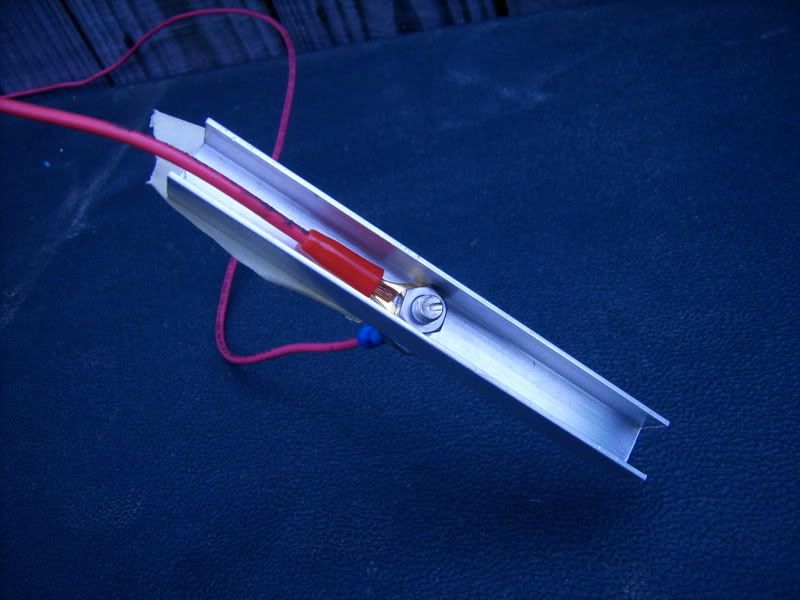
I'm using 14-gauge wiring because I don't expect to run more than 15 amps through the diode. It's rated for 40, so you could run a whole 2 x 2 TJ oven off of it, but you'd want to use heavier wires. (And the yellow crimp-ons, not the blue ones. The color codes the wire gauge they fit. Red is small, blue is medium, and yellow is large.).
The first picture shows a little white stuff around the diode at the heat sink. That's where the heat sink compound squeezed out when I tightened the nut.
Running 13 amps or so through it, the little scrap of aluminum works fine as a heat sink. It conducts enough heat away from the diode and convects it to the air that the temperature stabilizes around 160 F. (It's not much of a heat sink---small, and with only two "fins" to convect with---but it's got way more surface area than the diode itself.)
The tape on the heat sink is so that I can read its temperature with my infrared thermometer. (Reading directly off of aluminum doesn't work, because the IR reflected by the aluminum confuses the thermometer. Reading the temperature of masking tape works fine, because it doesn't act like a mirror to IR.)
Using the diode to control heat, you should put it on the hot wire, not the neutral/ground wire. If you put it on the neutral/ground side, it will interrupt the connection to ground for 1/120 sec out of every 1/60 sec, and screw up your grounding.
So it has to be hot electrically as well as thermally.
The downside of that is that the heat sink is electrically live and you have to make sure nobody can touch it---it must be in a vented enclosure, not hanging out in the breeze somewhere.
(In a lot of situations, heat sinks can be grounded, and bolted to a metal case. In some situations you can just use a metal case AS a heat sink, bolting hot devices directly to it, or put the heat sink on the outside of the case. Here, enclosing the heat sink is a must. And since it's a reasonably hot device, the case needs to be vented so that the heat doesn't build up too high inside the case.)
I got a couple of 120V indicator lights from Radio Shack (little amber ones, about $3.25 for a two-pack) and will wire them so that when the power's on half, one light comes on, and when it's on full, both lights come on.
I'll post pictures & a wiring diagram of the whole shebang when I get it in its final form.
_________________
Paul (a.k.a. Dr. Crash)
Tired of buying cheap plastic crap? Now you can make your own! www.VacuumFormerPlans.com |
|
| Back to top |
|
|
floridamary4
Joined: 23 Jun 2010
Posts: 3
|
| Posted: Wed Jun 23, 2010 8:12 pm Post subject: re: |
|
|
thanks for sharing 
_________________
Heating Repairs |
|
| Back to top |
|
|
fast_monte
Novice
Joined: 17 Aug 2005
Posts: 40
|
|
| Back to top |
|
|
panhandle_shovelheadrider
Novice
Joined: 06 Jul 2010
Posts: 59
|
| Posted: Sat Jul 17, 2010 8:13 am Post subject: Auber Instrumentshave controllers cheap |
|
|
| universal temperature controller can be used as PID temperature controller, On/of temperature controller, Limit temperature controller, or simply as a thermometer/pyrometer with bright LED display and alarm output. It offers great value for its price. It is accurate, smart, and reliable. It is one of the smallest 1/32 DIN PID controller on the market. It is the perfect unit for both hobbyists to upgrade their brewer, incubator, espresso machine or glass kiln and for professionals in industrial use. Newly developed artificial intelligence enhanced PID algorithm and auto-tune function will control the temperature to one degree accuracy without complicated PID parameter fine tuning. This controller contains all the primary functions of an industrial grade PID controller but is also made very simple for the amateur user. |
|
| Back to top |
|
|
jdougn
Guru
Joined: 18 Mar 2009
Posts: 714
Location: Louisville KY area
|
| Posted: Mon Aug 02, 2010 7:48 am Post subject: Re: Auber Instrumentshave controllers cheap |
|
|
| panhandle_shovelheadrider wrote: | | universal temperature controller can be used as PID temperature controller, On/of temperature controller, Limit temperature controller, or simply as a thermometer/pyrometer with bright LED display and alarm output. It offers great value for its price. It is accurate, smart, and reliable. It is one of the smallest 1/32 DIN PID controller on the market. It is the perfect unit for both hobbyists to upgrade their brewer, incubator, espresso machine or glass kiln and for professionals in industrial use. Newly developed artificial intelligence enhanced PID algorithm and auto-tune function will control the temperature to one degree accuracy without complicated PID parameter fine tuning. This controller contains all the primary functions of an industrial grade PID controller but is also made very simple for the amateur user. |
Can you post a link or a source?
_________________
DougN - Just in case you're wondering, I got my "rating" legitimately... by posting aimless drivel, useless advice, and pointless questions. |
|
| Back to top |
|
|
dbdraggin
Newbie
Joined: 18 Jul 2010
Posts: 8
|
|
| Back to top |
|
|
jdougn
Guru
Joined: 18 Mar 2009
Posts: 714
Location: Louisville KY area
|
| Posted: Fri Aug 06, 2010 9:12 am Post subject: |
|
|
Hey thanks, that looks like an interesting unit and the price isn't crazy. Although it looks like it'd require some addtional work to set it up for a particular application.
_________________
DougN - Just in case you're wondering, I got my "rating" legitimately... by posting aimless drivel, useless advice, and pointless questions. |
|
| Back to top |
|
|
radnd838
Newbie
Joined: 23 Feb 2011
Posts: 5
|
| Posted: Wed Feb 23, 2011 4:08 pm Post subject: |
|
|
Yes, I'm glad the price isn't too crazy. These hobbies can get quite expensive!! I definitely think this is an interesting unit here!
_________________
I love candy!
www.gumball-machine.com |
|
| Back to top |
|
|
|
|
You cannot post new topics in this forum
You cannot reply to topics in this forum
You cannot edit your posts in this forum
You cannot delete your posts in this forum
You cannot vote in polls in this forum
|
Powered by phpBB © 2001, 2005 phpBB Group
|

