|
www.TK560.com
Vacuum Forming, Movie Prop, Sci-fi and GIjOE Forum
|

|


|
| View previous topic :: View next topic |
| Author |
Message |
jegner
Site Admin

Joined: 30 May 2003
Posts: 2144
Location: Texas, USA
|
 Posted: Wed Apr 04, 2007 6:29 am Post subject: Vac-form Machine Gallery Posted: Wed Apr 04, 2007 6:29 am Post subject: Vac-form Machine Gallery |
 |
|
| Post pics or movies of your machines in action! |
|
| Back to top |
|
 |
jegner
Site Admin
Joined: 30 May 2003
Posts: 2144
Location: Texas, USA
|
|
| Back to top |
|
|
tubachris85x
Master

Joined: 15 Jan 2007
Posts: 351
Location: Ft. Lauderdale, Florida
|
| Posted: Wed Apr 04, 2007 11:18 am Post subject: |
|
|
Those videos you posted really do help out alot. I am going to go through with nichrome wire oven now, just need to find those ceramic posts...
-tubachris
_________________
 |
|
| Back to top |
|
|
cod
Master
Joined: 05 Nov 2006
Posts: 322
Location: San Francisco
|
| Posted: Wed Apr 04, 2007 2:52 pm Post subject: |
|
|
awesome
another invaluable resource.
_________________
<.o'> |
|
| Back to top |
|
|
crashmann
Guru

Joined: 27 Sep 2005
Posts: 501
|
| Posted: Mon Apr 16, 2007 9:52 pm Post subject: |
|
|
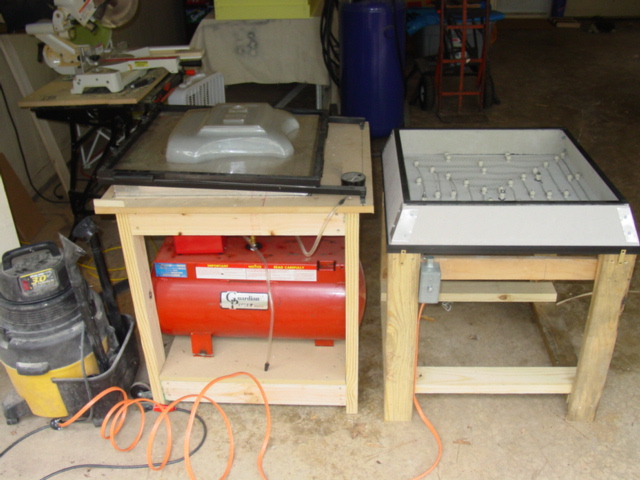
Here's my rig with a shop vac under the platen:

Pretty much the same setup as Jim's, except with 24" x 32" plastic holding frames.
A video of me pulling thermal detonator endcaps and the plug for the shop vac hose connection under the table (it's the tall cylinder in the middle of the table). The second pull is using the Gast 1065 vacuum pump to draw down .125 HIPS over a 10" tall clonetrooper chestplate
http://tk386.com/vacuum_chamber/vacuum_forming_small.avi
Here's a bunch of pictures of the plumbing for the vacuum pump underneath the forming platen, the Gast 1065 pump, and "ole' rusty" the water heater tank.
Note the black shop vac connector in the middle

White cap on the shop vac connector

The small line to the left leading to the white square is for the vacuum gauge mounted in the forming table

The vacuum gauge on the forming table

The Gast 1065 pulling 22" of mercury

Plumbing connections for the vac pump with quick connect coupler

Plastic holding frame clamps (much better than wingnuts!!!)

Ole' Rusty, the water heater vac chamber!

A video of pulling sandtrooper backpack boxes. .080 black HIPS over MDF molds with tapered sides. Note the gentle release technique  Trimming with a bandsaw, and components of the backpack. The definitive sandtrooper TK1536 strikes the "Br00tal" at the end! Trimming with a bandsaw, and components of the backpack. The definitive sandtrooper TK1536 strikes the "Br00tal" at the end!
http://www.tk386.com/backpack_boxes/Sandtrooper_Backpack_Boxes.mov
Update!!! 3/15/2008
I have upgraded to a single hole platen made from a 1/8" sheet of aluminum. I cut 1.5" notches in the corners, then clamped each edge between 2" x 4" boards and beat down the sides until it turned into a box.

I mounted the new platen to the table using 2" x 4" blocks (which are actually 1.5" tall)

Then I drilled a single hole in the middle of the platen and mounted a 3/4" floor flange.

This is then connected to a new control valve system. The valve on the right connects to the platen. The middle T connects to the vac pump. The valve on the left connects to the 50 gallon vacuum surge tank. The middle valve acts as a vacuum relief when using a dome for degassing silicone or liquid resin.

To operate the table, heat up the plastic over the oven. Close the valve to the platen. Open the valve to the surge tank and pump it down to 25" of mercury. When the plastic is ready to be formed, turn on the pump and open the surge tank valve. Flip the plastic over and open the valve to the platen. After a few seconds, close the valve to the surge tank which will make the pump pull directly from the platen resulting in 29" of mercury vacuum!!! Watch the huge video below to see this process in action.
352x240 (31.1MB)
http://tk386.com/video/Vacuum_Forming_Single_Hole_Platen_3_small.mpg
720x480 (125MB!!!)
http://tk386.com/video/Vacuum_Forming_Single_Hole_Platen_3.mpg
I use a combination of 1/4" wire mesh and window screen to provide air flow under multiple molds on the platen. Here's what happened when I only used the 1/4" mesh with 29" of vacuum

Here's a shorter video pulling clone armor parts with the new platen:
352x240 (5.39MB)
http://tk386.com/video/Vacuum_Forming_Clone_Armor.mpg
720x480 (19MB)
http://tk386.com/video/Vacuum_Forming_Clone_Armor_bigger.mpg
Go to this thread to read more about the single hole platen upgrade:
http://www.tk560.com/phpBB2/viewtopic.php?t=922&start=0
Charlie
TI-386
http://www.tk386.com <=== Lots more pictures here!!!
Last edited by crashmann on Sat Mar 15, 2008 11:00 pm; edited 1 time in total |
|
| Back to top |
|
|
cod
Master
Joined: 05 Nov 2006
Posts: 322
Location: San Francisco
|
| Posted: Mon Apr 16, 2007 11:10 pm Post subject: best instructional video everrrrrrrrrrrrr |
|
|
thanks heaps. That was like a semester of Vacuform 101.
_________________
<.o'> |
|
| Back to top |
|
|
jegner
Site Admin
Joined: 30 May 2003
Posts: 2144
Location: Texas, USA
|
| Posted: Tue Apr 17, 2007 7:11 am Post subject: |
|
|
I love watching Charlie's machine in action! I too have been working on the trooper back pack boxes, and just about have the molds finished. I don't seem to be having the same issues with them releasing though. Hmm.
Thanks for sharing. Nice hi-vac rig you have there, glad to see it still in operation. Can you tell us where you got those wing-nut replacements?
Jim |
|
| Back to top |
|
|
crashmann
Guru
Joined: 27 Sep 2005
Posts: 501
|
|
| Back to top |
|
|
crashmann
Guru
Joined: 27 Sep 2005
Posts: 501
|
| Posted: Fri Apr 20, 2007 11:50 am Post subject: Beer Keg Vac Table!!! |
|
|
Here's a vac table built by another person that uses a beer keg for the vacuum chamber. Initially, he was going to use an MDF box for the vac chamber, but even after painting the oustide and sloshing lots of paint inside, it was still leaking air.

Here's the plastic clamping frame with rubber handgrips. Also note the huge vacuum gauge and ball valve on the sides of the vacuum chamber box.

The overhead heating box

Since the MDF was not able to hold vacuum, he upgraded to using an empty beer keg. Not as pretty as the original box, but certainly more functional!

This table is a lot of fun in the preparation stage as you "empty" the beer keg  The whole photo gallery with construction plans can be found here: The whole photo gallery with construction plans can be found here:
http://www.tk386.com/beerkegvactable/
Charlie
TI-386 |
|
| Back to top |
|
|
drcrash
Guru

Joined: 04 Sep 2006
Posts: 705
Location: Austin, Texas
|
| Posted: Mon Apr 23, 2007 11:12 am Post subject: |
|
|
That's an interesting machine, but for those people who missed long wrangles about vacuum tanks a while back,
DON'T USE A BEER KEG. Some beer kegs will implode under vacuum, and do it in a nasty way, suddenly ripping and end dome loose. (This is true of some European beer kegs, anyway, and until you find out otherwise about American beer kegs, they're best avoided.)
Also, MDF is a poor material for making vacuum tanks. If you don't know how to design a vacuum vessel properly, don't roll your own.
_________________
Paul (a.k.a. Dr. Crash)
Tired of buying cheap plastic crap? Now you can make your own! www.VacuumFormerPlans.com |
|
| Back to top |
|
|
jegner
Site Admin
Joined: 30 May 2003
Posts: 2144
Location: Texas, USA
|
| Posted: Mon Apr 23, 2007 1:35 pm Post subject: |
|
|
Charlie's hot water tank is the way to go for vacuum storage, IMHO.
Jim |
|
| Back to top |
|
|
drcrash
Guru
Joined: 04 Sep 2006
Posts: 705
Location: Austin, Texas
|
| Posted: Sun May 06, 2007 10:25 am Post subject: |
|
|
This one's not mine, but it's worth watching:
http://www.engelads.com/publicfiles/Boddaker/Video/vacuform.wmv
That's a video of vacuum forming a cartoon-scale chubbified Boeing 737-shaped computer case. (The award-winning, magazine-article-featured "UAL 737" by Brian "Boddaker" Carter.)

The up, over, and down mechanism for getting the plastic to the oven is a pretty cool alternative to a flip frame for a side-by-side configuration. It brings the plastic down much straighter, closer to what an over-and-under does.
It's discussed in this other thread, which has a link to a thread over on gruntville.com:
http://www.tk560.com/phpBB2/viewtopic.php?t=439&highlight=gruntville+drcrash
_________________
Paul (a.k.a. Dr. Crash)
Tired of buying cheap plastic crap? Now you can make your own! www.VacuumFormerPlans.com |
|
| Back to top |
|
|
gobler
Novice
Joined: 23 Mar 2007
Posts: 30
Location: So Cal
|
| Posted: Mon May 07, 2007 10:35 am Post subject: |
|
|
 Hey Charile, what is the size of you vac table? 24x48?? Thats one hell of a nice set up. Hey Charile, what is the size of you vac table? 24x48?? Thats one hell of a nice set up.
Cheers,
Jeff
_________________
Hey, how hot does this plastic get?.....Holly JEEEZZ it burns!!!! |
|
| Back to top |
|
|
falcondesigns
Joined: 28 Apr 2007
Posts: 4
|
| Posted: Mon May 07, 2007 6:59 pm Post subject: |
|
|
 I feel so ....................small.Alexander[/img] I feel so ....................small.Alexander[/img] |
|
| Back to top |
|
|
jegner
Site Admin
Joined: 30 May 2003
Posts: 2144
Location: Texas, USA
|
| Posted: Mon May 07, 2007 8:27 pm Post subject: |
|
|
| falcondesigns wrote: | | I feel so ....................small.Alexander[/img] |
LOL
Size matters not.
 |
|
| Back to top |
|
|
|
|
You cannot post new topics in this forum
You cannot reply to topics in this forum
You cannot edit your posts in this forum
You cannot delete your posts in this forum
You cannot vote in polls in this forum
|
Powered by phpBB © 2001, 2005 phpBB Group
|