 |
www.TK560.com
Vacuum Forming, Movie Prop, Sci-fi and GIjOE Forum
|

|


|
| View previous topic :: View next topic |
| Author |
Message |
drcrash
Guru

Joined: 04 Sep 2006
Posts: 705
Location: Austin, Texas
|
 Posted: Sat Sep 01, 2007 10:39 pm Post subject: Posted: Sat Sep 01, 2007 10:39 pm Post subject: |
 |
|
I'm a bit worried about the MDF under the hardibacker getting really hot, especially if it's sitting on a flat surface that insulates it more. (No air flow under it.)
I'd also be afraid the Hardibacker would break if you lug it around.
(BTW, the way the Vacugenic 24 folds up is pretty cool.)
_________________
Paul (a.k.a. Dr. Crash)
Tired of buying cheap plastic crap? Now you can make your own! www.VacuumFormerPlans.com |
|
| Back to top |
|
 |
jemartin144
Joined: 11 Aug 2007
Posts: 3
Location: Chicago, IL, US
|
| Posted: Sun Sep 02, 2007 12:59 am Post subject: |
|
|
first, thank you for the feedback.
ok...
First, the oven is one "piece" held together with pieces of aluminum and screws. I put a couple wooden spacers (just pieces of mdf cut to the right height) between the oven floor and the mdf of the box and then i attached the oven to the box by using 8 screws instead of bolts through cermanic spacers in the oven.
Second, the top of the forming surface is level with the tops of the edges of the box, so its not really sunken and theres about 5 inches all around between the forming surface and the edges of the box. So, I'm hoping its enough room. I havent made a pull yet, but Ive played with it and I think it should be enough room.
Third, I did get a bit worried about heating up the box too much, so I ran the oven for like 40 minutes and the walls of the oven got really really hot, but the mdf only got a little warm. So, I dont think it should be too bad. I am a little worried about the cement board being a little fragile, but Ive been trying to be gentle with it. I thought about maybe changing it to the square walls instead of the angled walls cause i thought maybe it would be a bit stronger. Or maybe i could just double up the walls. I think if I forsaw me using it on a more regular basis Id be a bit more worried about it.
I tend to talk on, sorry about that. I hope that my responses werent to wordy.
Last edited by jemartin144 on Mon Sep 03, 2007 6:33 pm; edited 1 time in total |
|
| Back to top |
|
|
TK 109
Guru

Joined: 11 May 2007
Posts: 712
Location: Galena, Ohio
|
| Posted: Sun Sep 02, 2007 7:52 pm Post subject: |
|
|
it's ok! 
well, for a project like armor, or a really prolonged project (?), i would thingk you're oven would be runnig for a little longer thatn 40 mins. it just depends. what are you making with it?
_________________
-Alex
-------------------------------------------------------
 |
|
| Back to top |
|
|
knightshade
Expert
Joined: 19 Jun 2005
Posts: 123
Location: Rochester NY
|
| Posted: Sat Sep 15, 2007 3:58 pm Post subject: |
|
|
| Nice thread - good to see all of the variations that there are between machines. I'll have to get some pics of my machine put online next week after I install the second vac tank. |
|
| Back to top |
|
|
TK 109
Guru
Joined: 11 May 2007
Posts: 712
Location: Galena, Ohio
|
| Posted: Mon Sep 17, 2007 12:06 pm Post subject: |
|
|
OK........
i'm finished with my vacuforming video, and am now trying to find a way to post it on this forum! the video is about 14 mins long, so photobucket is out, they only do videos 5 mins long!
HOW CAN I POST THIS VIDEO?? 
thanks....
_________________
-Alex
-------------------------------------------------------
|
|
| Back to top |
|
|
jegner
Site Admin

Joined: 30 May 2003
Posts: 2144
Location: Texas, USA
|
| Posted: Tue Sep 18, 2007 6:05 am Post subject: |
|
|
Youtube? Split it into 2 parts, and it should fit under the 10min. max.
Jim |
|
| Back to top |
|
|
drcrash
Guru
Joined: 04 Sep 2006
Posts: 705
Location: Austin, Texas
|
| Posted: Tue Sep 18, 2007 7:48 am Post subject: two-stage plumbing |
|
|
Here's another picture of the new two-stage plumbing on one of my little machines:
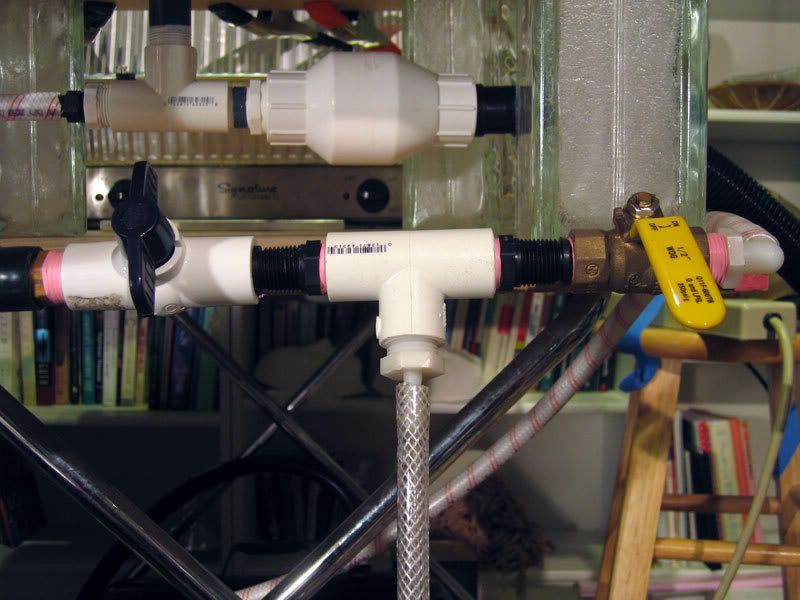
I'm putting up this picture because it's easier to see which parts correspond to things in the diagrams in this CNCzone posting on two-stage plumbing:
http://www.cnczone.com/forums/showthread.php?t=38493
This is set up to let you use a vacuum cleaner for the first stage, then the tank, then shut off of the tank and use just the vacuum pump. If the vacuum pump can't keep up with leakage around the edge of the platen, it falls back to using the vacuum cleaner, automagically.
The vacuum pump pulls through the hose going down from the tee in the middle.
The brass valve (about $5 at Harbor Freight) is the main valve that you open for the hard suck using the tank and vacuum pump.
The white valve ($3 or so at Lowe's) on the left is the tank shutoff valve.
(This is reversed left-to-right from the diagrams, just because I wanted the main valve on the right; I'm right-handed, and that's the one you want to be able to reach quickly and open at the right time.)
To evacuate the tank, you close the right valve and open the left one. That lets the vacuum pump suck from the tank (and not the platen).
The tee at the platen (upper left) allows either the high-vacuum system or the low vacuum system to suck from the platen. (The big black hose at the upper right is the vacuum cleaner hose.)
The white PVC plumbing check valve (upper middle) between the vacuum cleaner and the tee closes automatically when you engage the high vacuum system. (To keep from just sucking air backwards through the vacuum cleaner instead of from the platen.) It costs about $10.
If you have a pump that can keep up with the leakage around the edge of the platen, you don't need the vacuum cleaner, or the tee and check valve at the platen. You can just use the tank for the first stage, and shut off the tank to let the vacuum pump do the long hard pull. If you do that, though, you need some way of holding the plastic down with one hand while you open the main valve with the other---a flip frame or lift levers or something. (Or you need a helper.)
The setup with the vacuum cleaner doesn't require that, so it works well for simple setups where move the plastic with both hands (and guide rails, if you want).
Some of the hoses in this little setup are pretty small. The 1/4" hose to the vacuum pump should be bigger (3/8" or 1/2") for a decent-sized vacuum pump. (It's fine for a low-CFM pump like a FoodSaver or bike pump.) The 1/2" hose to the platen tee is too small for using the tank for the first stage. (Or would be for a 2 x 2 foot platen.) It's fine for using the vacuum cleaner as the first stage, though, because most of the air has already been sucked out, and you don't need a lot of flow for the second stage. (The ultimate vacuum level is the same for a small hose as a big one.)
_________________
Paul (a.k.a. Dr. Crash)
Tired of buying cheap plastic crap? Now you can make your own! www.VacuumFormerPlans.com
Last edited by drcrash on Tue Sep 18, 2007 9:40 am; edited 1 time in total |
|
| Back to top |
|
|
jegner
Site Admin
Joined: 30 May 2003
Posts: 2144
Location: Texas, USA
|
| Posted: Tue Sep 18, 2007 9:03 am Post subject: |
|
|
Great info Doctor! Thanks for posting. I really like the check valve heading to the shop vac, and the hi-vac plumbed into the other end of the 'T'. I'll have to try that if I can't find a suitable large tank for my hi-vac only needs. A two-stage is my other option. And I have a 15 gal tank ready to test with!
Jim |
|
| Back to top |
|
|
drcrash
Guru
Joined: 04 Sep 2006
Posts: 705
Location: Austin, Texas
|
| Posted: Thu Oct 04, 2007 10:00 am Post subject: two-stage setups, simplifications |
|
|
| jegner wrote: | Great info Doctor! Thanks for posting. I really like the check valve heading to the shop vac, and the hi-vac plumbed into the other end of the 'T'. I'll have to try that if I can't find a suitable large tank for my hi-vac only needs. A two-stage is my other option. And I have a 15 gal tank ready to test with!
|
Based on some experiments with the setup shown and a well-sealed 12 x 16 inch platen and a 7-gallon tank, I think the 15-gallon tank is all you're going to need for a 2 x 2 foot machine. You won't need a water heater tank. As long as you have a pump that can do several CFM, you just need to seal your platen and make sure your direct edge seal is working well.
(My pump is a 4.5 CFM pump, but I think it's choked down to about 3 CFM by some undersized hose barbs. Oops.)
My 12 x 16 is sealed with epoxy all over (no metal covering) with rounded epoxy-coated upper edges, and it's just amazing how little leakage I'm getting.
The two-stage thing is working perfectly. After the initial pulldown with the vacuum cleaner, I open the main valve, and the vacuum level only drops 3 in. Hg. or so. Then when I close the tank shutoff valve, the vacuum level rises again, over the next couple of seconds. That means the pump is keeping up with the very slight leakage very, very well, and can hold almost its maximum vacuum level *indefinitely*. (Within about 2 in. Hg.) The vacuum level just doesn't fade at all; it goes back *up* and stays there. Sweet. ABS should not be a problem; I can hold the vacuum however long it takes, without needing a big tank.
I expect it to work about as well for the 2 x 2 foot platen, which has less than twice the perimeter of the 12 x 16. As long as the vacuum cleaner sucks the plastic most of the way down, and the tank can suck up most of the air in the platen & molds, the vacuum pump should be able to keep up with the leakage and get pretty much full vacuum within a few seconds, and hold it indefinitely.
One implication of that is that for most purposes, having both a vacuum cleaner and a tank is probably overkill. If your pump is fast enough to suck most of the air out of the platen and molds within a few seconds, and you use a vacuum cleaner to pull the plastic down, you don't need a tank at all, and you don't have to fuss with manual valves or waiting for the tank to draw down.
(I think you you can just set it up with a tee and the big check valve between the tee and the vacuum cleaner, set both pumps going, and pull the plastic. You don't need the manual ball valves at all. Basically you just need the two-stage setup in Doug's book, but you don't need to hack a sump pump valve with a barb and a rubber band.)
Conversely, if you have a medium-small tank, you don't need the vacuum cleaner, the tee at the platen, or the big check valve. You just need the tank for the initial pulldown and to pull most of the air out of the platen and molds, and then shut off the tank so that the vacuum pump alone can do the rest. You do need the tank shutoff valve, tee, and main valve. (Like Jr. Branham's Proto Form setup.) It is a bit more complicated to operate, but not difficult.
I'll probably keep all the features of my "overly complicated" plumbing for special situations, but not use half of them most of the time.
(One special situation is using a really small pump, which just can't keep up with minor leakage. Another is forming textured plastic wrong-side-down, where the texture interferes with platen edge sealing. For that it's good to have a high-volume pump to get it to suck down at all, and a tank to get high vacuum for a short while, and fall back to the low vac when the tank fills up.)
The bottom line is that for most people with a reasonable-speed vacuum pump, doing normal stuff with relatively thin plastic, you'll probably do just fine with a simpler setup than mine. Just make sure that your platen is sealed on the bottom and sides, and your edge seal is working well.
_________________
Paul (a.k.a. Dr. Crash)
Tired of buying cheap plastic crap? Now you can make your own! www.VacuumFormerPlans.com |
|
| Back to top |
|
|
cod
Master
Joined: 05 Nov 2006
Posts: 322
Location: San Francisco
|
| Posted: Thu Oct 04, 2007 12:57 pm Post subject: Re: two-stage setups, simplifications |
|
|
| drcrash wrote: |
Based on some experiments with the setup shown and a well-sealed 12 x 16 inch platen and a 7-gallon tank, I think the 15-gallon tank is all you're going to need for a 2 x 2 foot machine. You won't need a water heater tank. |
nice work, Doc.
FWIW, my 50 gal water tank is proving to be about 2x what i need for a pull of thin ABS, with no secondary. I'm just not looking forward to have to find storage space for it this week, if and when I get evicted.
I'm adding up your figures from above- isn't a 2x2 platen about 350- 400% the size of a 12x16 ? I would think that would add up to around a 30 gal tank for 2x2.
_________________
<.o'> |
|
| Back to top |
|
|
drcrash
Guru
Joined: 04 Sep 2006
Posts: 705
Location: Austin, Texas
|
| Posted: Thu Oct 04, 2007 3:12 pm Post subject: Re: two-stage setups, simplifications |
|
|
| cod wrote: |
I'm adding up your figures from above- isn't a 2x2 platen about 350- 400% the size of a 12x16 ? I would think that would add up to around a 30 gal tank for 2x2. |
Hmmm... good question...
how to do the math depends on what configuration we're talking about, how much air space you have in your molds and platen, and how fast your pump is.
We should probably start another thread for the nitty-gritty stuff like that, rather than clogging up the gallery thread; I'll try to do that soon.
For the moment just notice that to *hold* a high vacuum indefinitely, you need a pump fast enough to keep up with leakage around the perimeter. (Times several, because air is leaking in at full atmospheric pressure, and only being pumped out at a fraction of that pressure, in the steady state.)
All other things being equal, i.e., with similarly good sealing all around, the required CFM is directly proportional to the difference in linear scale (the ratio of perimeters), not to the platen area. If I can do it for my 12 x 16" (really 9.5 x 13.5") platen, with about 3 free air CFM, it should only take about 5 or 6 free air CFM to do it for a 24" square (really 21.5" square) platen, which has 1.87 times the perimeter length.
On the other hand, you also need your tank to be big enough to suck most of the air out of the mold(s) and platen quickly, and your pump to be fast enough to pull most of the rest out within a few seconds. A small tank will leave more air in, and require a faster pump to get most of the rest out within a few seconds; conversely, a fast pump doesn't require as big a tank, because it can pull a bigger fraction of that volume within a few seconds. (As well as holding the final vacuum level indefinitely.)
I'm not exactly sure what all that works out to; I need to do some more experimenting and figuring.
_________________
Paul (a.k.a. Dr. Crash)
Tired of buying cheap plastic crap? Now you can make your own! www.VacuumFormerPlans.com |
|
| Back to top |
|
|
TK 109
Guru
Joined: 11 May 2007
Posts: 712
Location: Galena, Ohio
|
| Posted: Sun Oct 07, 2007 2:58 pm Post subject: |
|
|
here's a video for you guys, just to keep you occupied while i figure out my other video  . .
enjoy... i guess...
_________________
-Alex
-------------------------------------------------------
|
|
| Back to top |
|
|
cod
Master
Joined: 05 Nov 2006
Posts: 322
Location: San Francisco
|
| Posted: Wed Oct 10, 2007 6:01 pm Post subject: |
|
|
| TK 109 wrote: | here's a video for you guys, just to keep you occupied while i figure out my other video .
enjoy... i guess...
|
I love the smell of melting plastic .... it smells like ......."victory"!
_________________
<.o'> |
|
| Back to top |
|
|
jegner
Site Admin
Joined: 30 May 2003
Posts: 2144
Location: Texas, USA
|
| Posted: Wed Oct 10, 2007 6:06 pm Post subject: |
|
|
| TK 109 wrote: | here's a video for you guys, just to keep you occupied while i figure out my other video .
enjoy... i guess...
|
Attach some bungi straps to the vacuum side of your machine, and you can hook the holding frame down, and this will let you get that lid back on the machine, keeping the warm air in, and reducing your reheat cycle time.
When I am working on some pulls, and I don't have a helper, the bungi straps really help lend an extra hand.
Jim |
|
| Back to top |
|
|
Fredo
Master
Joined: 21 Mar 2007
Posts: 251
Location: Kingdom of Nye Area 51
|
| Posted: Wed Oct 10, 2007 8:33 pm Post subject: |
|
|
www.rockler.com sells a catch called an elbow catch. I've ordered 2 and plan on using them as frame latch down catchs. No bungi or holding down the frame till the plastic cools. As soon as you close the frame it should it should lock down until you release the latches. At least I hope it works that way..........Fredo
Last edited by Fredo on Wed Oct 10, 2007 8:38 pm; edited 1 time in total |
|
| Back to top |
|
|
|
|
You cannot post new topics in this forum
You cannot reply to topics in this forum
You cannot edit your posts in this forum
You cannot delete your posts in this forum
You cannot vote in polls in this forum
|
Powered by phpBB © 2001, 2005 phpBB Group
|

