| View previous topic :: View next topic |
| Author |
Message |
ANH trooper
Master

Joined: 20 Oct 2005
Posts: 305
Location: UK
|
 Posted: Wed Jan 23, 2008 5:33 pm Post subject: Posted: Wed Jan 23, 2008 5:33 pm Post subject: |
 |
|
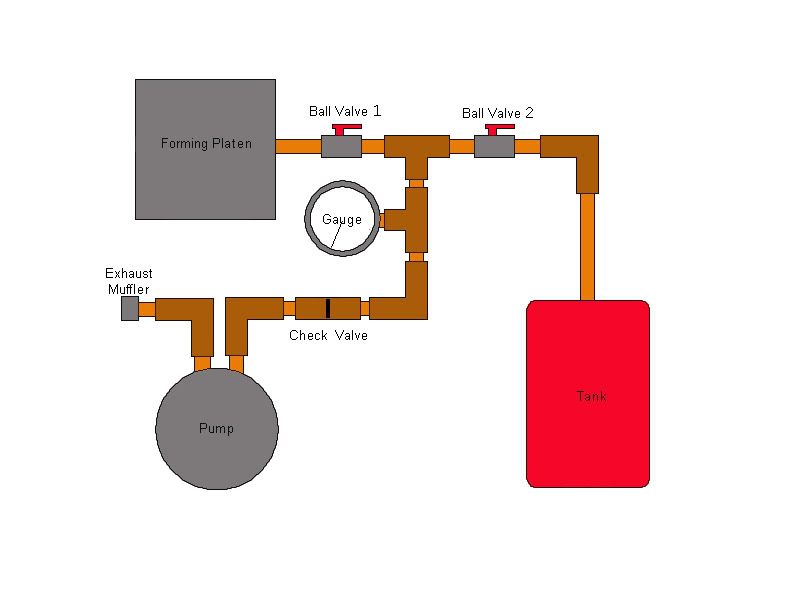
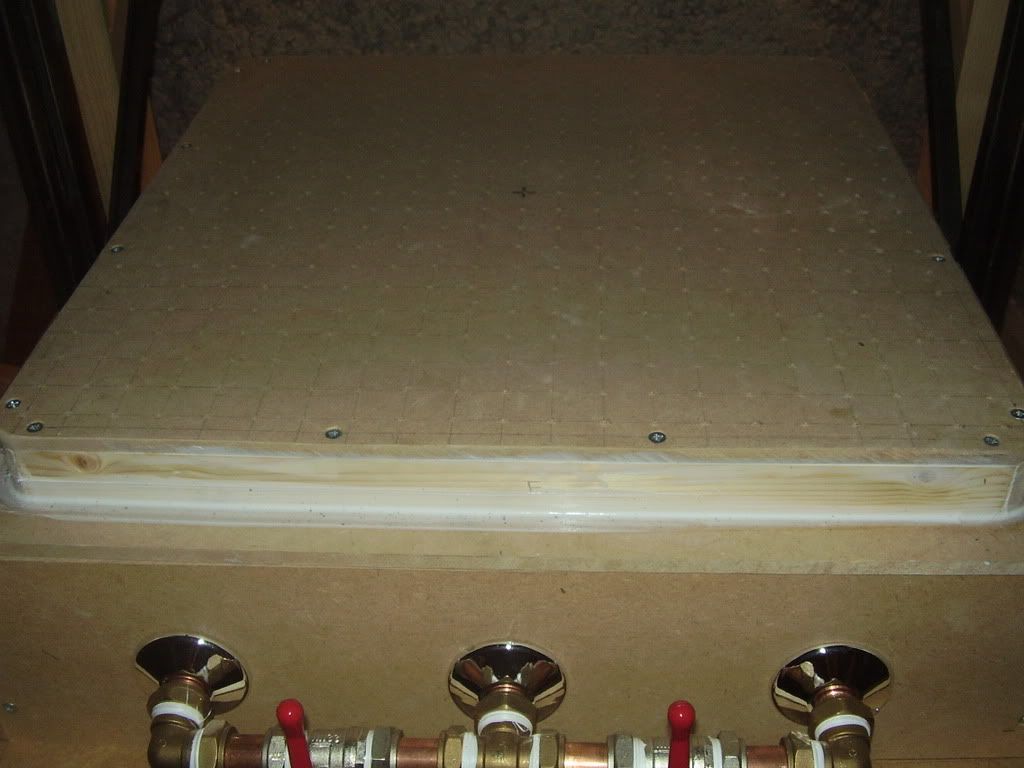
The first pipe on the left (as you look at it) goes to the platen. The middle pipe goes down to the vacuum pump and the right hand pipe goes to the tank.
The left hand valve will be kept shut when the vauum is being pulled from the tank, and then the right hand valve shut off to hold the vacuum. Once the hot plastic hits the platen, the right hand valve is opened to pull the plastic down over the mould. Then it's shut off and the left hand valve is opened for the long hard pull from the pump.
I think it might be necesary to have the pump pulling in stand by mode just before I am ready to pull the plastic and open up the tank. This way, as soon as the air has filled the tank, it's a quick flick to shut the tank valve and open the pump valve which will already be pulling.
I have installed a check vavle too just before the pump. I still need to swap the fitting from the filter as it's a 3/4" barb and not 22mm coupling.
I just hope it all works  |
|
| Back to top |
|
 |
ANH trooper
Master
Joined: 20 Oct 2005
Posts: 305
Location: UK
|
| Posted: Fri Jan 25, 2008 3:17 am Post subject: |
|
|
OK, I am having second thoughts about this plumbing
With valve-1 closed and valve-2 open, the air is pulled from the tanks and then closed when vacuum is reached. Valve-1 is then opened and when the plastic is ready to be pulled, valve-2 is now opened to allow the tank to fill up.
The problem as I see it is....when vavle-2 is closed to change over from the tank to the pump, I will have to bend down and switch on the pump losing valuable time.
Now in this set-up....
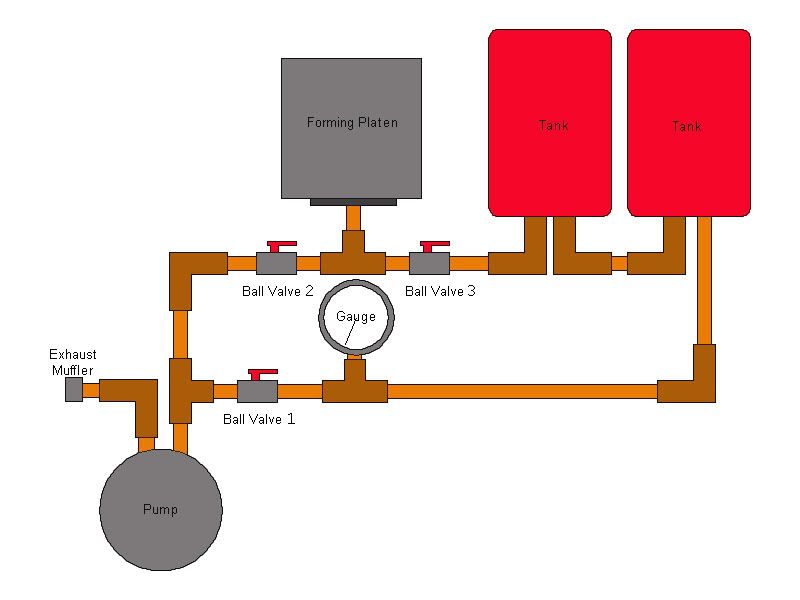
....it seems much more easier to just close valves 2+3 and pull the vacuum through valve-1. When the vacuum is reached, valve-1 is closed and not used again. It would be down under the platen and only valves 2+3 up where they are now on my machine. The pump is turned on and and is in stand-by mode. Valve-3 is opened when the hot plastic is on the platen and once pulled, valve-3 is closed and valve-2 is opened where the pump is already pulling.
This would be almost the same as the set-up in the first pic, but have the extra valve which would only be used to hold the vacuum seperately and not interfere with the system. I cannot see how I could do this without having 3 valves.
Any thoughts? |
|
| Back to top |
|
|
Stomper
Master

Joined: 01 Oct 2005
Posts: 473
Location: Woodburn, Oregon USA
|
| Posted: Fri Jan 25, 2008 8:47 am Post subject: |
|
|
Simple... you leave the pump running constantly during your whole production time process.
1.
Pump left running with valve 1 closed and valve 2 open, pulling a vacuum in the tanks while your plastic gets up to temperature.
2.
Pump still left running when you place the plastic over your molds/platen then open valve 1 (valve 2 still open), plastic is sucked down by primary vacuum in the tanks.
3.
Pump still left running with valve 1 still open, then close valve two and the vac-pump continues the vacuum (actually increasing the vacuum force against the platen)
4.
Pump is still running, the plastic has cooled enough to retain the mold's shape, close valve 1 and open valve 2 so pump can pull a vacuum in the tanks (takes at least a couple minutes to get the proper vacuum levels) while you swap out the plastic and get the new sheet up to temperature.
Then repeat steps 1-4. The pump would only be shut off when you are not actually using your machine.
Hope that helps! 
_________________
Tony Krewson
FEAR... is not my god!! |
|
| Back to top |
|
|
ANH trooper
Master
Joined: 20 Oct 2005
Posts: 305
Location: UK
|
| Posted: Fri Jan 25, 2008 1:02 pm Post subject: |
|
|
Thanks Tony, that makes perfect sense  As I haven't used the pump yet, I was getting a bit worried about the whole plumbing. As I haven't used the pump yet, I was getting a bit worried about the whole plumbing.
Next question about the oven.
We use 240v here in the UK. My breaker reads 80A 30mA and I'd like to ask for anyone's opinion on the best way to wire it up. I've looked at the oven calculator and read up on several threads, but I'm still not 100% sure as most are for 110v.
My last oven was made up of 16 halogen elements ripped from some rotating heaters which were rated at 1200W. Each heater had 3 elements, so does that make my old oven out to be 6400W....is that right? I never had any issues with the oven, and I am only making this new one because the old one wasn't suitable to mounted upside down.
I had it plugged into my upstairs seperate circuit and there was never anything plugged in when the oven was in use.
For the coils, I have a picture of an oven that has 3 outer coils close together and 7 inner coils spaced twice the distance of the outer coils. I think this might be a good design and give more heat to the outer edges of the plastic.
As always, any info/help very much appreciated |
|
| Back to top |
|
|
ANH trooper
Master
Joined: 20 Oct 2005
Posts: 305
Location: UK
|
| Posted: Fri Jan 25, 2008 2:46 pm Post subject: |
|
|
Just been doing some web searching and found my consumer unit. It turns out that each socket circuit is on a 32Amp breaker and running 230Volts.
Now I just have to get my coils stretched out and take some readings.
I found a post by 'cod' half way down page 2 of http://www.tk560.com/phpBB2/viewtopic.php?t=740&start=15&postdays=0&postorder=asc&highlight=
very helpful and made it easy for me to understand how the whole thing works....thanks cod |
|
| Back to top |
|
|
ANH trooper
Master
Joined: 20 Oct 2005
Posts: 305
Location: UK
|
| Posted: Sun Feb 10, 2008 4:27 pm Post subject: |
|
|
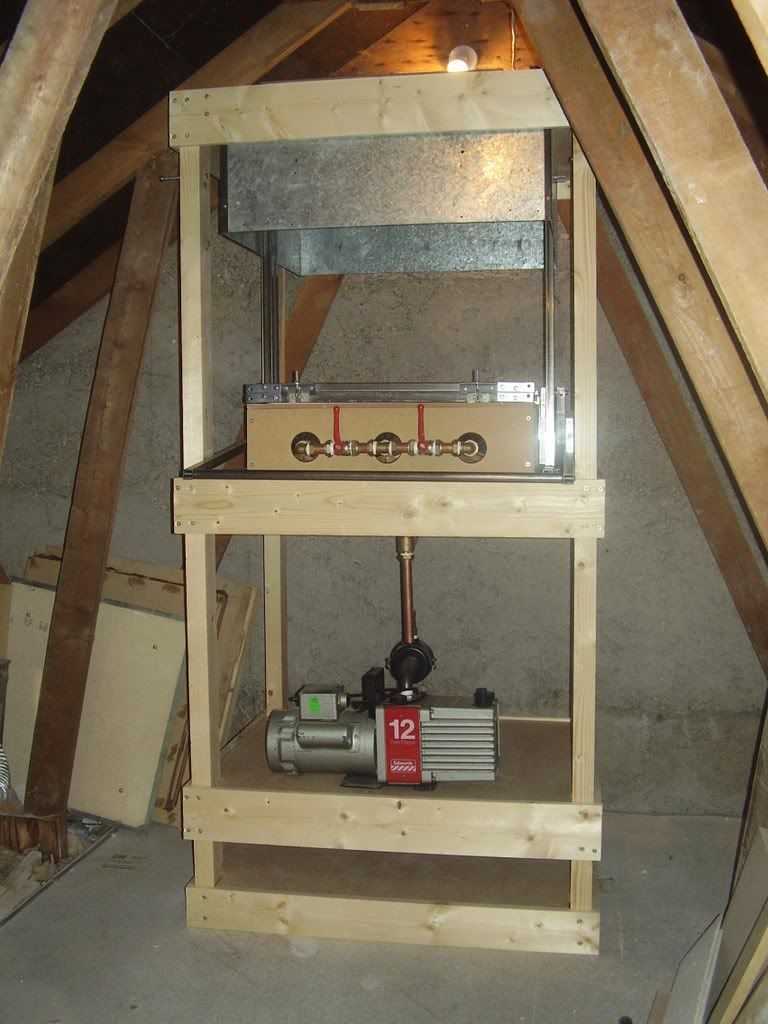
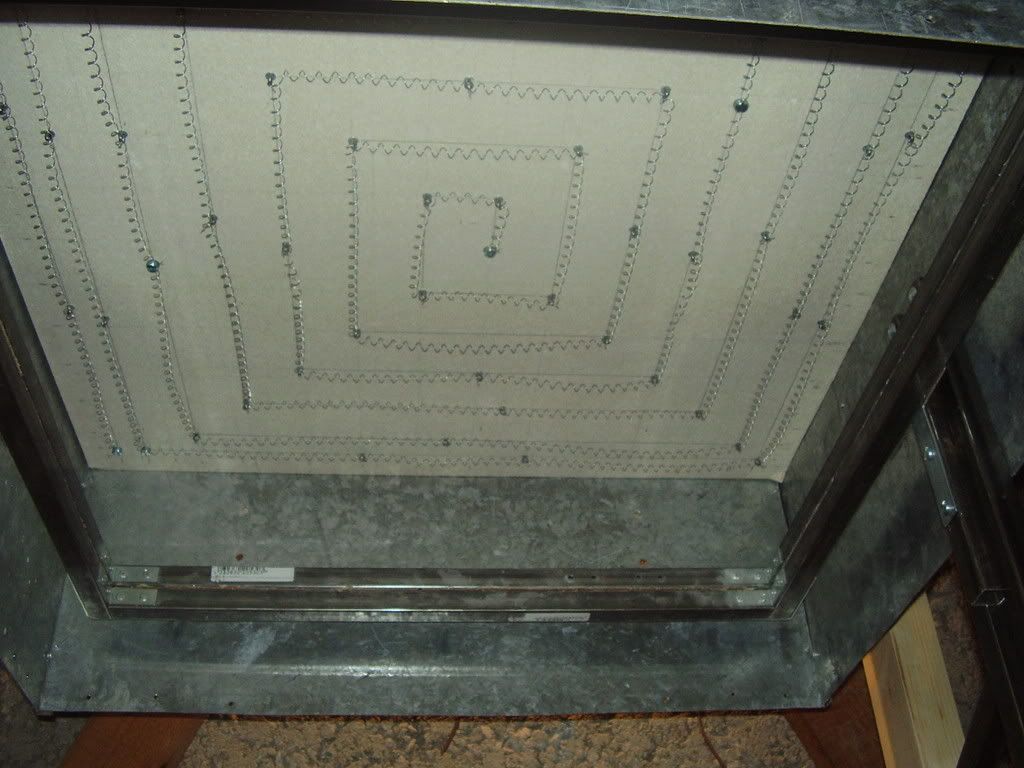
Made some progress this weekend.
I remade the oven walls so they go straight down instead of tapering, after reading harley guys' thread on his over-under machine. The holding frames go nicely inside the oven and should help heating the plastic better. I had to do some modifications to the lifting mechanism, but everything is working fine again
I got the oven strung out as described in the TJ book. I managed to over stretch the coils slightly and getting 19.2 Ohms per segment rather than 20 Ohms. From what I can gather, it should run slightly hotter?
After stringing the oven, I taped it out for four segments but I am now going to use two segments as I have got 230V. I've yet to spark the oven to life yet so I hope everything goes well.
The gas tanks should be ready on Thursday. I am having some 20mm connections welded into them so I can hook them up to the plumbing. Once I get them I should be able to do some test pulls
Here's the pics.....
 |
|
| Back to top |
|
|
jegner
Site Admin

Joined: 30 May 2003
Posts: 2144
Location: Texas, USA
|
| Posted: Sun Feb 10, 2008 5:30 pm Post subject: |
|
|
WOW! Looking great!
Jim |
|
| Back to top |
|
|
ahillworks
Master

Joined: 18 Nov 2007
Posts: 308
Location: Orlando FL
|
| Posted: Sun Feb 10, 2008 10:03 pm Post subject: |
|
|
| Yeah thats looking really good. Sorry guys I have been slacking still have not tested my machine lol. Been really busy. I like the lift on this machine I really should change mine to this. Its looking really good though keep up the good work. |
|
| Back to top |
|
|
ANH trooper
Master
Joined: 20 Oct 2005
Posts: 305
Location: UK
|
| Posted: Mon Feb 11, 2008 3:33 am Post subject: |
|
|
Thanks guys
I'll take some measurements of the linkage later so it should help anyone wanting to have a go. It's works perfectly at the moment, though I haven't done a pull with it yet. When I press down hard on the lifting bar, it does touch the wooden frame even though it is about an inch away when resting. The platen is not fixed down yet so I can raise it if necesary. I still have some 6mm foam tape to stick around the edge of the platen where the frames will seat, so I think it will help a bit. |
|
| Back to top |
|
|
ANH trooper
Master
Joined: 20 Oct 2005
Posts: 305
Location: UK
|
| Posted: Sun Feb 17, 2008 4:30 pm Post subject: |
|
|
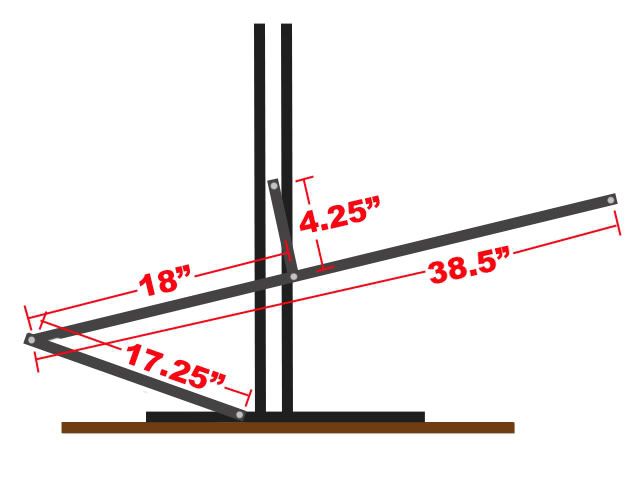
Here's the measurements of my lifting mechanism as promised. |
|
| Back to top |
|
|
jegner
Site Admin
Joined: 30 May 2003
Posts: 2144
Location: Texas, USA
|
| Posted: Sun Feb 17, 2008 4:36 pm Post subject: |
|
|
WOW!
Thanks Paul for the info!
Jim |
|
| Back to top |
|
|
AlterEgos
Expert

Joined: 30 May 2006
Posts: 115
Location: Centreville, VA
|
| Posted: Mon Feb 18, 2008 12:01 am Post subject: |
|
|
Man, where were you when I was trying to build my machine as a vertical one?!! I wound up sawing it in half and doing the flip-flop version. 
As Freddy Prince Sr. would say... "Loooooooking good!"
_________________
-John |
|
| Back to top |
|
|
ANH trooper
Master
Joined: 20 Oct 2005
Posts: 305
Location: UK
|
| Posted: Mon Feb 18, 2008 8:11 am Post subject: |
|
|
Well, I got oven all wired up the other day and guess what?...IT WORKS
Today, I finshed the plumbing, tested it and guess what?...IT WORKS
So now, both the oven and the vacuum tanks are all working. The tanks are not holding the vacuum as well as I would like. I have tightened all the fittings which all have PTFE tape so I don't think there is much else I can do? It drops an inch every 10 seconds or so....any ideas for a remedy?
The pump is great. It pulls 29" in 90 seconds, then starts gurgling. After a few evacuations of the gas tanks it really stinks up there in my loft so I am taking a break now while.
I'm going to seal all the way around the oven base with high temperature sealant so as much heat as possible is kept in there and transfered to the plastic.
I tested the vacuum tanks before I connected them up to the platen (left valve-1 disconnected) and when I opened valve-2, there was a significant gush of air coming from the open valve-1 which sounded really good. Now when I have it all connected, the sound was very weak and not very inspiring. I am just hoping that the vacuum pump will take over well enough to pull down hard. I might have to redrill the holes bigger for better air flow. Maybe I am just worring a bit.....
I will test it tonight with some plastic and see how it performs. Oh, and I'll take some pics as well. |
|
| Back to top |
|
|
ANH trooper
Master
Joined: 20 Oct 2005
Posts: 305
Location: UK
|
| Posted: Mon Feb 18, 2008 5:51 pm Post subject: |
|
|
I did three test pulls today and none are perfect. The first one I messed up as I didn't heat it long enough and screwed up with the valves. Second was better, but the vacuum didn't pull hard enough for some reason. The last one, I let the plastic sag about three inches and this one pulled better still, but not tight enough again.
On my old machine, I had to let the plastic (HIPS) sag a good four inches and I would get super tight pulls using my shop vac. I also had a single hole which I am seriously considering going back to. I am going to try sealing the platen with PVA to reduce the pourous nature of the MDF, and increase the size of the holes on the platen surface. Once I have done this and allowed more sag on the plastic, I hope I will get super tight pulls. If not, it's back to the single hole platen and I will have to make up special plates that will allow me to form multiple parts with specific vacuum holes (similar to what I was using before).
Not a total disaster, but I was hoping for better results  |
|
| Back to top |
|
|
ANH trooper
Master
Joined: 20 Oct 2005
Posts: 305
Location: UK
|
| Posted: Thu Feb 21, 2008 3:32 am Post subject: |
|
|
YAY I got a successful pull
I heated the plastic longer and it did a good job. I'm still not satisfied yet though. The plastic took about 5 minutes to sag 3 inches, which is twice as long as it used to with my old set up. I have my coils approximately 4 inches above the plastic. I'm going to drop it an inch today and see if that's any better. What do you guys with the overhead oven have your distance for the coils set at above the plastic?
Here's a thought....As I have my TJ oven wired in 2 segments for my 240V supply, what would happen if I wired it in 4 segments? Would the oven be twice as hot?
On my last oven which was made up of 16 individual halogen heating elements, each drawing 400 Watts, I never had any problems heating my plastic fast. These were below the plastic and heated it very well. I guess my supply could handled more wattage if I were to tweak my oven. I also have plenty of nichome left if I needed to make new coils so any suggestions on making the oven hotter is much appreciated!
I am switching the pegboard type platen over today, in favour of a single hole design. After seeing Crashmanns pics yesterday, it brough back good memories of how my plastic used to suck down, and that was with my shop vac
I am going to hook up my shop vac now as well. I'm convinced my tanks are not big enough so until I get a nice water heater or something similar, I'm going with the 2-stage high volume and high vacuum set-up.
I'll post some new pics of the machine and my results later. |
|
| Back to top |
|
|
|

