 |
www.TK560.com
Vacuum Forming, Movie Prop, Sci-fi and GIjOE Forum
|

|


|
| View previous topic :: View next topic |
| Author |
Message |
TroyO
Novice
Joined: 07 Nov 2005
Posts: 65
|
 Posted: Mon Nov 07, 2005 1:37 pm Post subject: One million questions.. ;-) Posted: Mon Nov 07, 2005 1:37 pm Post subject: One million questions.. ;-) |
 |
|
OK, maybe not a million, but several.
I picked up 2 heating elements, each should draw 14 amps, and my plan is to run my oven from (2) 15 A 120V circuits.
http://cgi.ebay.com/Heating-Element-Kiln-115-Volt-1600-Watt_W0QQitemZ6576897522QQcategoryZ988QQssPageNameZWDVWQQrdZ1QQcmdZViewItem
Now for the specific questions.
1) I wish to make a 32x24 table for max flexibility, do you think with the extra total amps running it will be enough heat? (3200 Watts total)
2) I notice you are multi-tapping into the heating elements on your design, but if I do that with my coil I think they would draw over 14 amps. It should be OK simply running these two coils (electrically isolated from each other) from two circuits by simply connecting each end to the circuit, right? (No mid-run hot taps)
3) I'd like to do an over/under design.. has anyone had good and/or bad luck trying that? Are there any particular pitfalls to avoid? My only big design consideration is to use 2 layers of Hardi-backer with aluminium foil sandwiched between for the top of the oven. (I figure with heat rising the top may need to be thicker, and the aluminium may help reflect some heat back down?)
I think I have some decent ideas how to pull this stuff off and if anything works out particularly well I will detail it in a post for anyone interested. (Or if it ends up really NOT working out well... sometimes knowing what won't work is more valuable than what will.  ) ) |
|
| Back to top |
|
 |
TroyO
Novice
Joined: 07 Nov 2005
Posts: 65
|
| Posted: Mon Nov 07, 2005 2:49 pm Post subject: |
|
|
Opps... forgot one question...
4) Has anyone found a cheaper item to use than the ceramic standoffs? |
|
| Back to top |
|
|
jegner
Site Admin

Joined: 30 May 2003
Posts: 2144
Location: Texas, USA
|
| Posted: Tue Nov 08, 2005 2:27 pm Post subject: |
|
|
Good questions. I'm not sure I can answer them, but here are some thoughts:
If you are buying an off the shelf 14Amp, 110V heater, then all you need to do is make a 'holder' for them. All that tapping and such is not needed. Now, if you are wanting to scratch build the oven, by using the coiled nichrome wire, you are looking at a similar option like the one I made.
As for an over/under option, my first vac-table was an over/under. Works great, but gravity seems to play a part of the design, and so does convection heating.
As for the standoffs, there are some real cheap options, but I'm not sure you really need them. My original plan was to use some fire-brick, and cut little squares to act as the standoffs. Too much work sawing those bricks by hand. So, I looked at electric fence ceramic standoffs. These would work, but are rather large, even the smaller ones.
For safety reasons I used the ones as close to the ones from the book, and those were from www.infrared-heaters.com .
JIM |
|
| Back to top |
|
|
TroyO
Novice
Joined: 07 Nov 2005
Posts: 65
|
| Posted: Wed Nov 09, 2005 1:02 pm Post subject: |
|
|
It's not a heater, it's essentially 2 nichrome coils that are about 28 inches unstretched. They were originally intended as elements such as are used in a kiln, in raw form. I got them off ebay before I found all the great info on your site (And found out I could have gotten essentially the same thing from infrared heaters.) It will be a similar design to yours in that it will be a stretched nichrome coil, but as these ones were designed to be a 14 amp draw from end to end I think tapping at extra points would lower resistance and increase the draw.
I guess the questions boils down to why the multi-tapping was done? Does it spread the heat more evenly through the coil? Cut the effective resistance so as to get max heat output? Some other reason I'm not thinking of?
Then again, it's not like it would be a big deal to buy a coil from infrared heaters and try again... worst case I'm out the $30-some for the coil and a few sheets of hardi-backer.
I went ahead and bought the ceramic standoffs (And a few of the pass-through doughnut insulators too) from them, so I'm ready to give it a try this weekend. If it works with two elements and power circuits I'll provide details as to what I did/learned from it even if it's a total failure. I don't think it will be hazardous as the two circuits will essentialy be independant electrically.
Maybe no one else has this situation, but in my case I have 3 15A circuits available in my garage and while I could upgrade the run from the house (45A) and/or run a 20A circuit just for the vac form table it just makes more sense to me to plug into 2 of the 15A circuits for the heater. (And use the last for lights/vacuum source)
In any case, perhaps someone else will be able to use the info later. I've been thoroughly grateful for everything I've learned here so I'll be happy to add to the collective info pool. |
|
| Back to top |
|
|
jegner
Site Admin
Joined: 30 May 2003
Posts: 2144
Location: Texas, USA
|
| Posted: Wed Nov 09, 2005 1:31 pm Post subject: |
|
|
Hello!
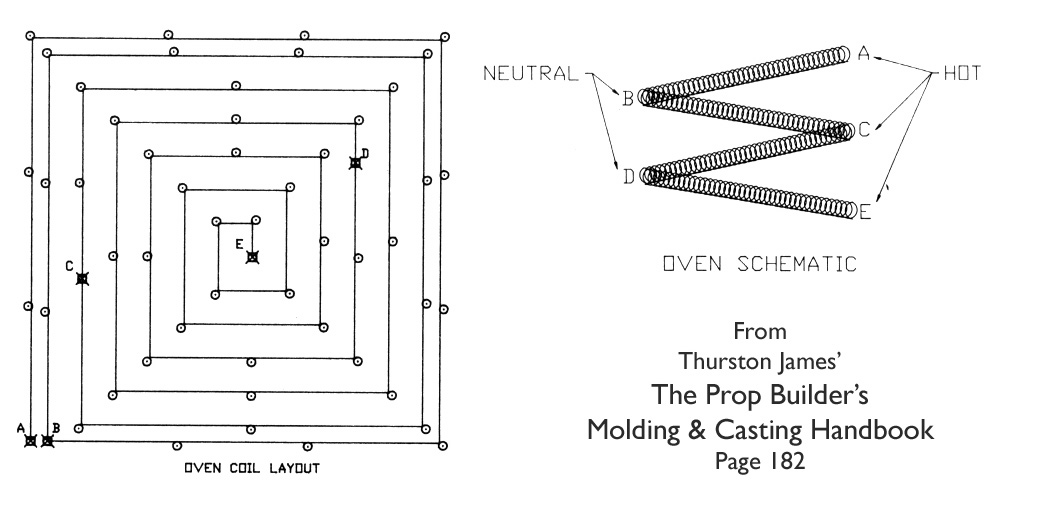
Ah, kiln coils. thats a different story. Much higher heat. You are needing to make an oven that will heat the plastic to an EVEN 300F degree temp. The different tapping points, [no need to physically separate the segments] is intended to evenly control the amount of 'juice' flowing in each segment. The kiln wire is intended to much higher heat. From my ceramic days, bisque firing electric kilns regularly reached 1700F Degrees. The thickness of the wire, and length of segment resistance on the wire all play into the amount of heat the wire will generate. If you don't already have a copy of the book, get it. "The Prop Builder's Molding & Casting Handbook" by Thurston James has most of the technical details you need to make a working oven.
The center of the plastic will receive almost twice the heat that the perimeter gets. Here is a link to the layout I used for my oven, notice how the 4 segments are exactly the same length, and the the outer edge is 1/2 the over all total length of the wire. Each segment evenly distributes the electric flow into the coils, evenly heating them.
I would be afraid of using the kiln wire. Not knowing the resistance of the wire, and it being much thicker wire will have an impact of controling the heat in the same manner as what is discussed in the book.
Heck, make a ceramic kiln with those coils. |
|
| Back to top |
|
|
TroyO
Novice
Joined: 07 Nov 2005
Posts: 65
|
| Posted: Wed Nov 09, 2005 3:13 pm Post subject: |
|
|
Ahaa.. I think I see the difference... while 3200 watts overall is close to the same overall heat, (The one shown here is 2280 watts.. but it's also 24x24) it will be in a shorter stretched length of wire. (In a sense, the density of the heat will be higher... more power per linear inch of wire.)
To perhaps offset the effect of the wrong wire I'll stretch it extra long and try to pattern it out so the majority of the heat is on the perimiter (Actually... if I use one whole coil around the perimiter and the other for all of the center I can have some control over the heat on the edge... two switches so I can turn the center off if it's getting too much)
In any case, I can't easily return these so I might as well give it a try since the refractory materials etc. cost more than my interest in a kiln right now, LOL. I think, as a relative measure of heat ouput the difference is in the density of heat and insulation when these are used in a kiln... if you can imagine a kiln turned on and the lid left open it wouldn't be anywhere close to 1700 degrees.
Hmmm... I can also increase the distance between the elements and the plastic position... allowing the heat to "blend" better before it gets to the plastic. I still don't think it will be overly dangerous to attempt (Worse case a blown fuse and some really toasty plastic. but I think I'll definitley have to take some extra time rethinking the layout to make sure it's as even as possible with what I have to work with.
To "follow the math" as it were...
The standard oven as outlined on this site:
24"x24"=576 square inches
19Ax120V=2280 watts
2280 Watts/576 Square inches = 3.96 Watts per square inch
The one I am (hopfully) going to build:
24"x32" =768 square inches
(2X14A)X120V=3360 Watts
3360 Watts/768 Square Inches = 4.37 Watts per square inch
So, while this will be a little hotter it shouldn't be THAT much hotter overall, (Around 10%?) as long as I can stretch that wire out enough so I can keep the heat even.
ohhh geeze... that's way too much thinking! My head hurts!   |
|
| Back to top |
|
|
TroyO
Novice
Joined: 07 Nov 2005
Posts: 65
|
| Posted: Wed Nov 09, 2005 3:15 pm Post subject: |
|
|
| Geeze... another thought.... with a kiln, you could sculpt your vac-form molds out of clay, bake the molds and you'd have a sturdy easy-scuplting method for making them. I wonder what the shrinkage rate on pottery is? |
|
| Back to top |
|
|
jegner
Site Admin
Joined: 30 May 2003
Posts: 2144
Location: Texas, USA
|
| Posted: Wed Nov 09, 2005 3:23 pm Post subject: |
|
|
| IIRC the shrinkage is around 10-20% depending on the clay used. But yes, a kiln would be a great way to sculpt the molds from cheap clay, bisque fire it, and volia! rigid clay molds. |
|
| Back to top |
|
|
TroyO
Novice
Joined: 07 Nov 2005
Posts: 65
|
| Posted: Thu Nov 10, 2005 12:02 pm Post subject: |
|
|
Bah... Infrared heaters didn't ship out till yesterday so I wasted the extra paying for 2 day delivery to get it today. I guess I paid extra for fast shipping so they'd know to be sure and sit on the order for 36 hours.
Sooo... looks like my ceramic spacers will show up to my empty office tomorrow. (Although.... hmmm... I could come in around 3 and hope the UPS guy at least tries to deliver.)
In any case... 4 day weekend to start working on this thing. if nothing else and I get everything but the oven done I figure I'll be ahead of the game. |
|
| Back to top |
|
|
jegner
Site Admin
Joined: 30 May 2003
Posts: 2144
Location: Texas, USA
|
| Posted: Fri Nov 11, 2005 3:51 pm Post subject: |
|
|
| bummer. Oh, well. more time to work on the forming platen, and holding frames and vacuum system, I guess. |
|
| Back to top |
|
|
crashmann
Guru

Joined: 27 Sep 2005
Posts: 501
|
| Posted: Sun Nov 13, 2005 10:57 pm Post subject: |
|
|
Hey Troy0,
I agree with Jim that the heating element was split into four segments to ensure even distribution of the heating energy, and to allow you to use shorter, more mangeable lengths of wire. I've built a table using the same dimensions 24" x 32" Check out the Difference in Ohms Readings... thread for details about my oven. I actually use a single 20 amp circuit, and I can heat .125 HIPS in about 7 minutes, so two separate 15 amp circuits should be fine!
Hook up an ohmeter to your nichrome wire (stretch it out just enough so the coils don't touch each other). Then plug the resistance into the formula:
Voltage / Resistance = Amps
120V ac / measured ohms = Amps
Using the numbers from the auction:
115V ac / 8.2 ohms = 14.024 Amps
Their claims for current draw agreee with the formula, however, I suspect this calculation is for DC voltage. I found using AC voltage for the power source results in lower current flow (amps).
Try setting up one wire (with 8.2 ohms or more of resistance), and see how it runs. You should see heat waves rising above the coils, and hover your hand to gauge the temperature. If you've got a fancy infra-red thermometer, take a reading. If it seems too cool, disconnect the power, and move one of the contacts to shorten the nichrome wire (you don't have to actually cut it), then try again. Remember, shortening the wire reduces resistance, and increases current flow, which results in greater heat output. If you're tripping the 15 amp breaker after 5 minutes, then you've gone too far. Now you know what length will work with your household wiring, and you can begin the official mounting 
Regarding an overhead design, I saw one on the RPF that looked really cool. I believe the person had super metalworking skills, so his rig was practically industrial strength. However, as the plastic is heating, the center is drooping away from the heat, so that may impact the performance. Also, it's drooping the wrong way (the plastic is drooping down, and the bucks are facing upwards). You may have webbing issues as you're trying to form. With a flip flop design, the plastic is already drooping in the correct direction, so when it comes down on the bucks, it's already going the right way.
A huge benefit with the overhead design is that if you leave the plastic melting for too long, it doesn't ruin your heating element!
MELTDOWN!!!

But don't let me discourage you! I really wanted to do an over / under design myself (it's much more compact than a flip flop style), so please let us know how it turns out!
Good luck!
Charlie
TI-386
Last edited by crashmann on Tue Mar 28, 2006 10:36 pm; edited 1 time in total |
|
| Back to top |
|
|
TroyO
Novice
Joined: 07 Nov 2005
Posts: 65
|
| Posted: Tue Nov 15, 2005 2:06 pm Post subject: As it turns out.... |
|
|
I got precisley CRAP done on the thing this weekend. Bleh! Real life intrudes...
I did get the upper frame constructed. I used simple plumbing parts and it certainly seems strong enough. (1/2" and 3/4" black pipe, T's, elbows etc. I would have just used 1/2 or 3/4 through the whole thing, but Home Depot didn't have enough of any one kind for everything.) That still counts as crap since it took all of about 10 minutes. LOL.
Hmmm... ya know... I was going to make a wooden base, but now I am kinda thinking I'll make the base out of pipe too... just something I hadn't thought of till now. A couple more T's and lengths of pipe and the whole basic frame is done. Make the forming platten base bigger and drill some holes for the pipe to slide through and bam... solid metal frame/Vac table for less than around $80.
As far as the center heating/drooping... usually the battle is to get the edges hot enough without blowing out the center, so that effect may actually compensate for more even overall temps?
Anyway... this is still in progress, not too much accomplished physically but the more I think it through I keep coming up with stuff to try.
Kudo's on the wiring in the ceramic spacers, that was actually what I was going to do, good to know I wasn't just on the crack pipe (Figuratively) |
|
| Back to top |
|
|
crashmann
Guru
Joined: 27 Sep 2005
Posts: 501
|
| Posted: Tue Nov 15, 2005 11:08 pm Post subject: |
|
|
Cool, you're actually making progress! Using a phrase from the 80's "Tubular dude!"
It took me 5 months to truly get my vac table to a point where it was operational. I've still got some work to finish on it, but like you said, that "real life" stuff tends to get in the way.
Now if I could win that $300 million lottery, I could quit the day job, buy an industrial strength vacuum forming table (check out the videos!!!), and warehouse to setup the shop...
Charlie
TI-386 |
|
| Back to top |
|
|
TroyO
Novice
Joined: 07 Nov 2005
Posts: 65
|
| Posted: Mon Nov 21, 2005 12:42 pm Post subject: Update |
|
|
OK, I actually got something done this weekend.
Black-pipe frame: Done
Forming platen: Done
Plastic holding frame: Half done
Oven: Not touched.
The black pipe frame is working out well. It seems plenty sturdy and although it probably would have cost less to make it from wood it went together pretty quick and easy. I'd say total cost around $80.
The forming platen worked beautifully. I'll detail how I did the frame and the platten, I've been taking pics of anything that I figured would help others out.
Other items of interest... in an attempt to ease the changing of plastic (being the lazy bastard I am) I decided to a go a bit high tech on the clamping jig, and plan to use 4 "verticle toggle hold down clamps" to hold the frame in place. It should let me clamp in and release the plastic sheets pretty easily, although it will have to be adjusted if I change plastic size. (They make self-adjusting ones, but they were like $40 each... these were used and $5 each)
 |
|
| Back to top |
|
|
ANH trooper
Master

Joined: 20 Oct 2005
Posts: 305
Location: UK
|
| Posted: Mon Nov 28, 2005 2:45 pm Post subject: |
|
|
Looking forward to those pics buddy,I am wanting to start making a machine just like your!
I have one already,similar to T.James' but using gas instead of electric to heat the plastic.It's very basic but does the job.It takes up too much room though and I need the space...believe me.
-Paul. |
|
| Back to top |
|
|
|
|
You cannot post new topics in this forum
You cannot reply to topics in this forum
You cannot edit your posts in this forum
You cannot delete your posts in this forum
You cannot vote in polls in this forum
|
Powered by phpBB © 2001, 2005 phpBB Group
|


