|
Home
Communicators
Phasers
Tricorders
Helmets
Blasters
Stormtrooper Armor
Rebel Fleet Trooper
Lightsabers
Astro-Mech Droids
How-to Guides
Vacuform Table
Cylon
Centurion
Viper Pilot Helmet
M41-a Pulse Rifle
Motion Tracker
B5 PPG
Retro
Box Designs
Repair/Restoration
Replica Parts
40th Anniversary
Replica
Weapons/Gear
Reenactment Units
ME262 Project
Civilian
Marksmanship Program
|
M1
Garand Rifle
M1903 Springfield
Rifle
M1 Carbine
Discussion
Board
Lauren Photo Albums
David's
Photo Album
Egner II Design
Fan Film Project
Blog - Online Journal
Please
note, that the images, logos, and respected artworks, are property
of the original copyright owners. TK560 has no affiliation with any
of the intellectual property owners. This is a fan site dealing with
movie and television replica props, original GIjOE action figures,
World War II memorabilia, and marksmanship/ firearms interests. Most
of the images used on this site are photographed by the site owners.
Official logos are used to identify specific products/ manufacturers.
|
Make
your own Stormtrooper Armor?
Yes,
you can build your own bone white armor, if you have the right tools,
have a lot of spare time and know a few secrets! Here's how I did
it.
|
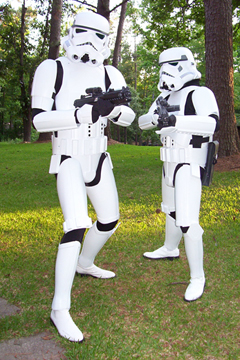
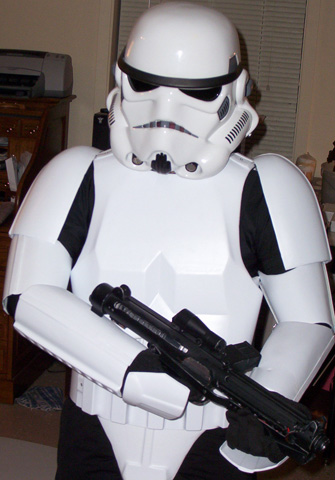
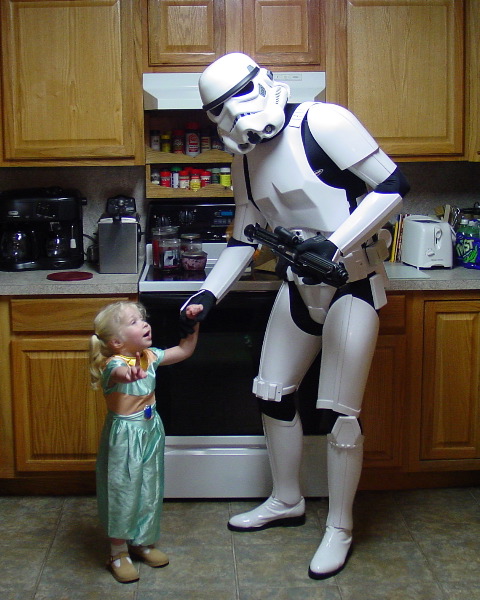
Latest suits finished. TK560 [me] on the left and TK652 on
the right.

Latest set of armor pulls from TK560's 2 year plus project
to create a stormtrooper armor from scratch.
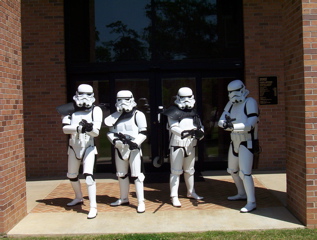
Some
of the film crew in their trooper gear.April 2006

And
with the helmets off.
|
Back
in August 2002 I started on a project; to create my own Star
Wars Imperial Stormtrooper costume from scratch. Now, nearly
three years later, and countless hours research, trial and
error reverse-engineering and hard work, I finally have reached
a point where I have a complete set of armor molds done. I'm
still working on the helmet molds, but for now the body armor
is done.
So,
what does it take to make a stormtrooper costume? Well, the
process is a complex one but not beyond what a fan can do
in his spare time, and a few square feet in the garage. The
first step is the vacuum forming
machine. I must have made 4 different machines before
I got one large enough to pull this project. The second step
is the mold making. Different techniques have been used by
other fans to make their trooper armor, but for me, I took
advice from a fellow RPF board memeber, Phil
G. aka Blaxmyth, and used MDF and Bondo to make the molds.
The final step is to pull the plastic, trim out the parts,
fit, paint and weather.
This
page details some of my efforts. A documentary
short film is available on this process, on the companion
site www.imperial-armor.com.
Until that site is finished, most of my information [on how
to make your own trooper armor] is kept here.
Here is
a link
for making replica hovi-mix mic screens
Here is
a peek at the PVC
pipe O2/Thermal detonator
Here is
a peek at the PVC pipe
Blaster
Here is
the link
for the template and how-to for the sandtrooper sniper
knee diamond.
Here is
a link to TKBIG's information on
how he did his armor.
Brow/neck
trim sites:
http://www.iboats.com/Flex_Trim_Black_3_16_X_25
not movie accurate, but nice neck trim material and will give
your helmet a rigid neck
.
http://www.classiccar-trim.com
Lots of options for both neck and brow trim.
http://www.mcmaster.com
(Product #8507K41) for the brow.
http://www.sealsdirect.co.uk/bbCMS/shopping.asp?intDepartmentId=3#22
Product #US161 or US52 for the brow and SWR150 for the neck.
These are screen accurate.
| Disclaimer:
I
get emails all the time from people asking me to sell
them armor kits. These are for a fan film, and
not for sale. I'm not doing this project to
make money, even though I need money to pay bills and
buy diapers for the kids! Here is my thinking on this:
-
First, the armor is not that accurate for most die-hard
costumers wanting a screen accurate suit. [I'd say
its good enought the fans/public that recognize
them as Star Wars Stormtroopers, but thats it].
-
My molds will only last a few pulls, before needing
repairs. I need to make about a 20 or so for a fan
film. After this project will be complete,
I do not plan to make any more. Email
me for more details.
- I
have always had a bad feeling about using someone
elses ideas to make money from. I've
been asked why go to all the trouble and expense
to make the trooper molds, and a vacuum forming
machine, and not offer to sell the parts. The answer
is simple, this is my hobby, and I do this for my
own enjoyment. I plan to produce a "second"
suit to be modified as a "Sandtrooper".
After all, this is not about selling stuff, its
about enjoying a fun hobby. If I got into trying
to make a buck off this, that gets into legal issues
with Lucasfilms. Something I don't want to do!
- For
me, its about gaining knowledge, and a personal
challenge. Can I do this? Is vac-u-forming really
that hard? What else can I make?
- What
will happen to the molds once I'm done using them?
That I don't know yet. Most likely that will sit
in the attic, collect dust and the grandkids can
chunk them when I gone. I don't plan to sell the
molds. I'm not sure how I'd feel if I sold the molds
and later found out someone was selling "MY"
suits on ebay!
- What
happens with the fan film suits once shooting wraps?
I plan to give the suits to the actors in the film
as 'payment' for being in the film and doing all
the hard work. After all, the actors put days worth
of work into pulling, trimming and fitting their
costumes. What the actors decide to do with the
suits will be up to them, but once the suits are
out of my hands, I have no control over what becomes
of them.
Really,
the way I'm making these parts, its going to be a low-cost
costume solution, cheap enough for the fan film production,
but not intended for the die-hard costume buff. Sort
of my version of what I saw in the movies, and scaled
to fit my lanky 6' 2" frame. The GT/FX suit is
a little short. Also, since these are made from HIPs
they work better for a dirty Sandtrooper, and not a
clean and shiny Death Star Door Guard unless you want
to paint the armor a glossy white, and add the proper
knee plate! For the fan film, these will be mudtroopers
with some underwater action, and some really beat-up
looks to the weathering.
For
the nit-pickers, please try to remember, that these
parts are fan-made in my tool shed, on a home-made vacuum
form machine, one at a time, made by hand by me. They
are rough around the edges, and need a lot of trim work
before I ever get a suit I could wear! Each mold has
hours of work in them, and there are 23 molds! If I
were to calculate the time and effort I've put into
this project, not just the cost of the plastic, I can't
even begin to calculate the cost for each suit.
Can't
make your own suit and need to buy one? So far, Lucas
has never liscensed a decent version of the suit or
helmet, and thats too bad. The fan produced suits, however
are very nice. Email
me if you want to know anything else.
Enough
of the boring stuff, lets move on to the fun part! |
|
Getting Started:
The next section
is a collection of links for things you can easily and cheaply get
to complete your own trooper suit. Besides the hard part, the armor
"shells", you will also need gloves,
boots, and a body suit. No trooper
is complete without his E-11 blaster, complete
with holster. Sandtroopers also have shoulder pauldrons, backpacks,
and heavy blasters.
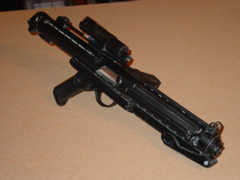
Here is
my latest scratch built blaster, made from PVC pipe, and a
piece of scrap wood. Some of the parts like the scope, grip,
counter, stock, muzzle tip, and endcaps were resin casts I
made from a real gun. Email
me if you need these parts,as I have a few spares.
|
- Here
is a link
to some pretty good trooper boots. These are styled after
the 1970's disco ankle boots and are what you want. Get
them big.
- Here
is a link
for the undersuit. There are several options, but I like
this suit the best. [thanks TK-409
for the link!] A local alternate is the "under-armor"
type Lycra-Spandex athletic under garmets. Wal-mart sells
a generic version at their stores. Dance wear unitards will
also work, just be sure they are opaque!
- Here
is a cheap option for the voice-amp.
[again, thanks TK-409!]
An alternate is a Halloween voice changer that can be found
at party supply stores.
- Here
is a link
to a DIY neck seal. If the link is broken,
here is the PDF
version. [1.3MB] This adds a real nice touch to finish off
the basic suit. Thanks Nordic
Garrison! Also, TK-409
sells a great neck seal along with other cool trooper gear.
Check out his site!
- Here
is a link
to a the famous PVC Blaster Builders Club
for all your scratch made blaster needs. What stormtrooper
armor costume would be complete without a blaster? There
are also Sterling dummy
guns available and resin castings as well as stunt guns
made from rubber. For me, the PVC
versions are easy to make, look good and are cheap!
Hasbro has again, re released their "Kenner E-11 blaster".
Its a child's toy, and is about 2/3rds scale. A lot of the
501st cary them cause they are cheap. About $20 al Walmart.
- A DIY
"O2 Canister/Thermal Detonator" made of 2 inch
OD PVC pipe, or electrical conduit pipe, 7.5 inches long;
some cut down PVC endcaps, aluminum tape, and a scratch
made control panels.
- I have
some spare resin blaster parts, and a few extra small armor
parts. Click here
to learn more.
|
|
Step
One: The vacuum forming machine
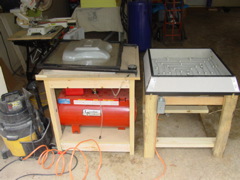
The final version of my home-made vacuum forming machine.
Click on the image for more info. |
Click
here to see
the fabrication of my fourth version vacuum forming rig.
Also, here
are some of the prototype machines I made. Don't even think
about this project until you have committed to making or
buying a vacuum forming machine that is large enough for
the chest mold. A forming platen on no less than 21.5 x
21.5 inches square is needed, trust me. You can buy commercial
vacuum form machines and spend thousands of dollars and
get great results, or, you can spend less than $200 and
build your own Thurston James-type machine. I wanted to
replicate the Thurston James design, but simplify it with
a low-tech vacuum source. The hardest part is the oven construction
and thats hard only because of the exotic wire and ceramic
posts. The rest of the machine can be made from materials
found at the local hardware/home improvment store.
Here
is a link to
the video, a documentary-type tutorial on vacuum forming.
|
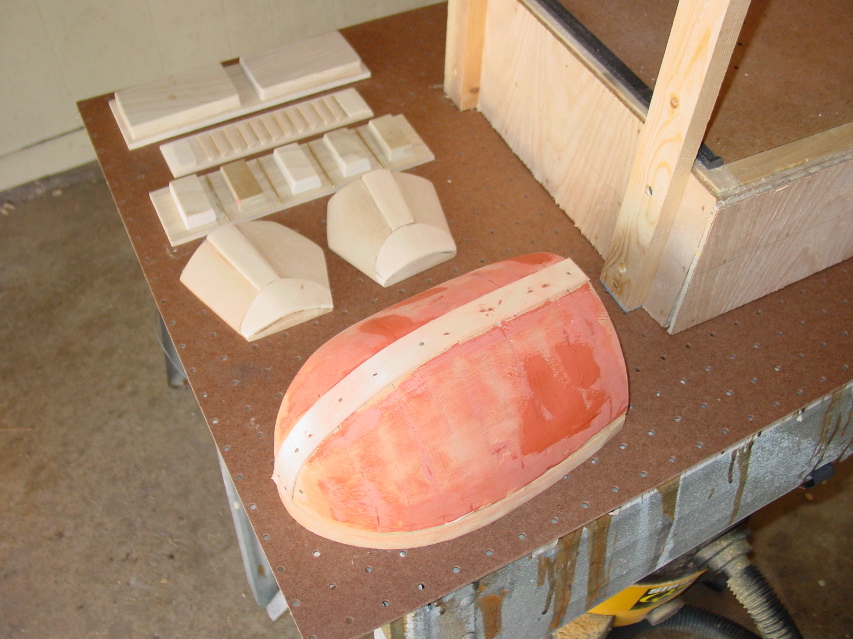
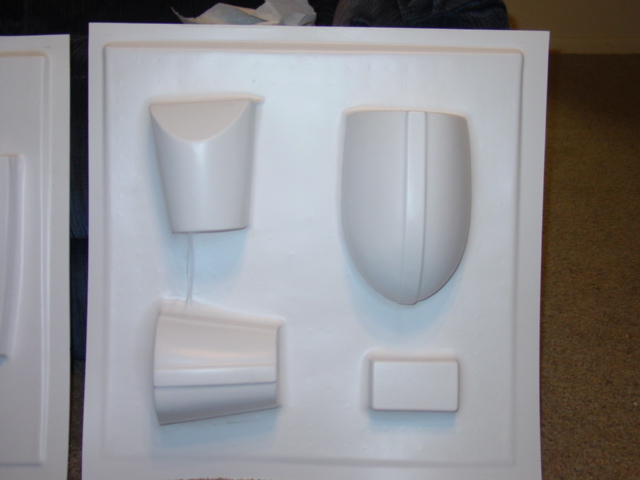
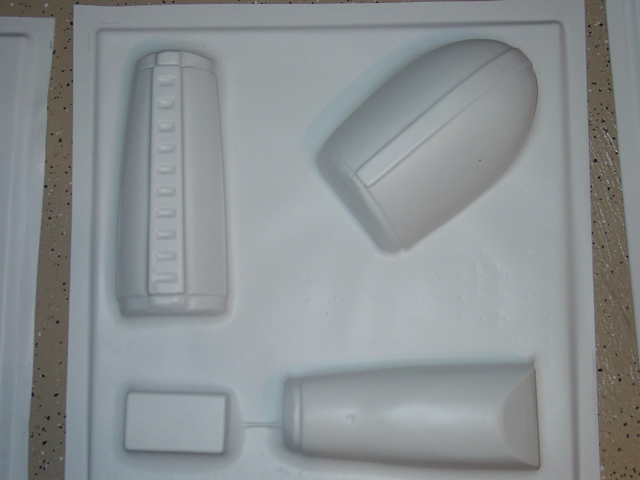
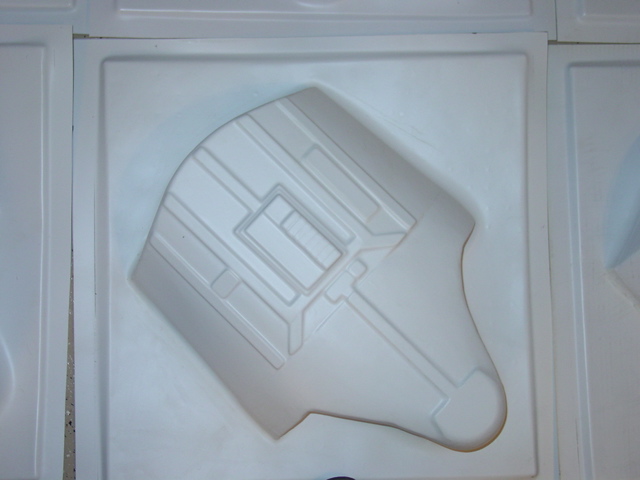
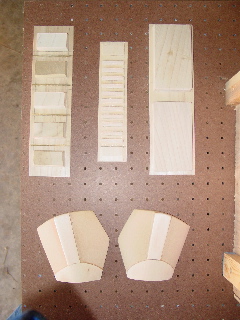
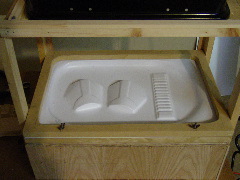
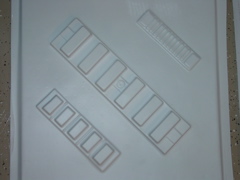
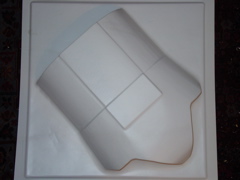
Step 2: Bucks,
Molds, "Moulds" or Plugs
Here
are some of the first molds I ever tried to make. Made of MDF/Bondo
and basswood hobby boards. Raw or painted, and made from any material
you can think of, molds are the foundation for the armor. Add
risers and tapers, and you have a mold that can be vacuum formed.
The following are in chronological order. Start out with the most
simple mold, the hip drop box, then the collar strip, and the
knee power pack. The hand molds are the next easiest. Make these
molds and you are on your way! Watch the video
on mold making.
 |
 |
 |
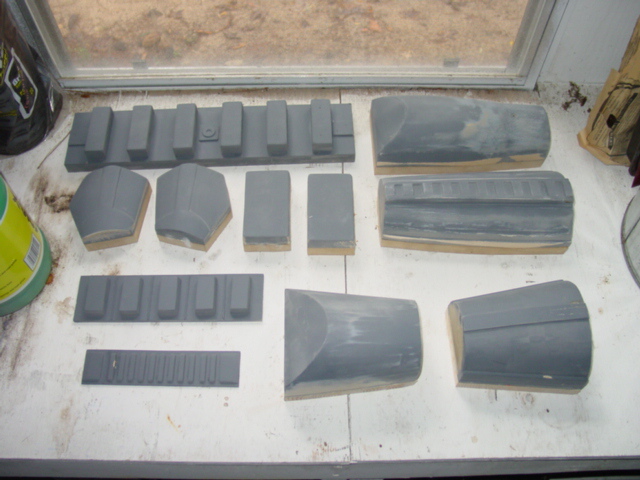
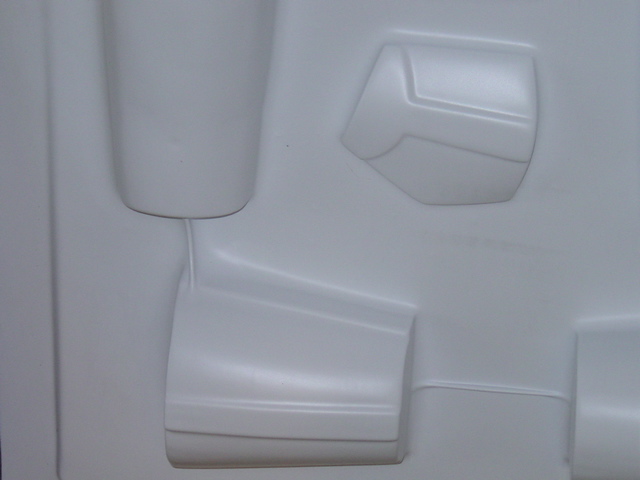
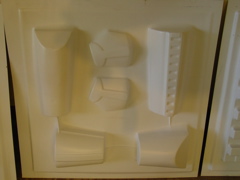
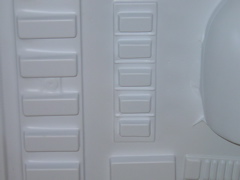
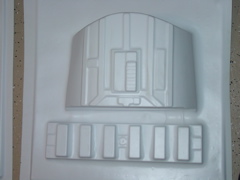
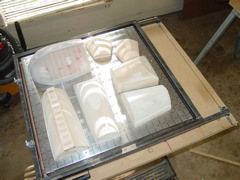
| Some
of the small molds. Note the collar straps will have to be
reworked. The flat straps don't bend well. |
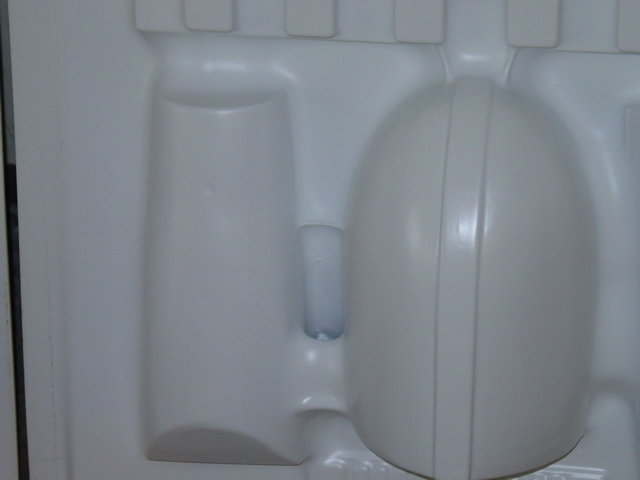
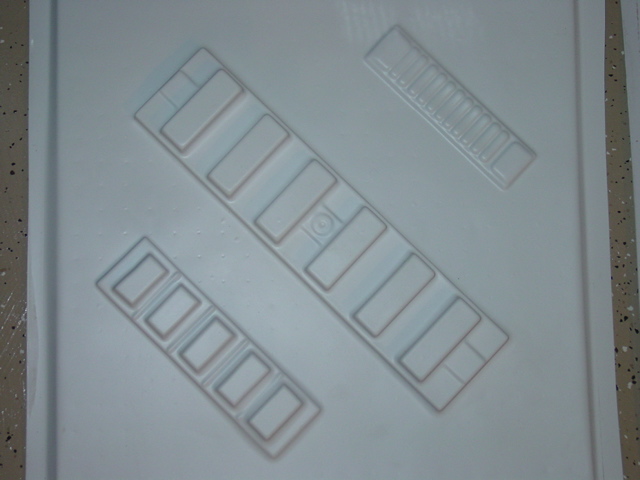
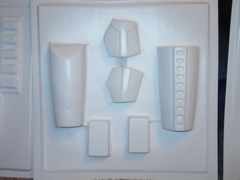
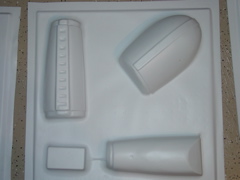
Here
is a shot of the "hand" molds. Note, each part needs
to be elevated above the vac-table surface in order to have
the correct contours once it has been trimmed out. |
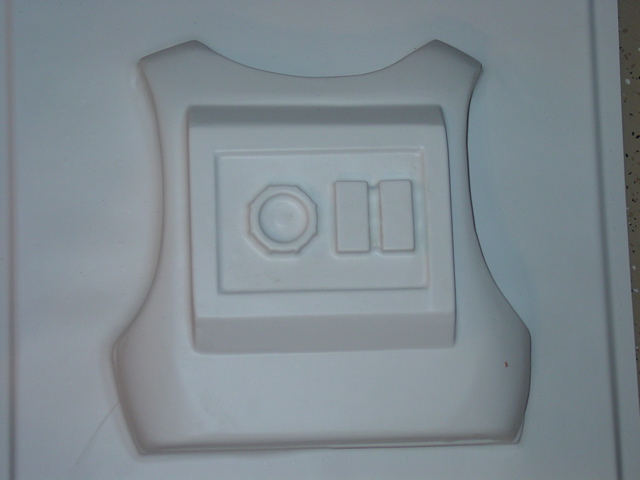
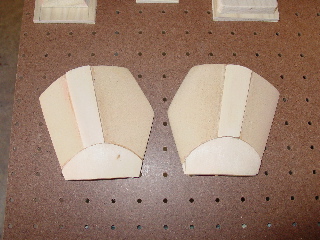
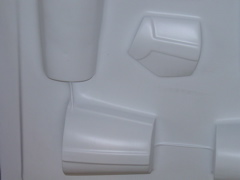
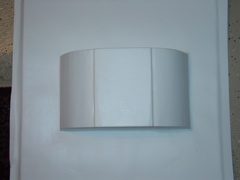
And a
view of the shoulder bell still being worked on. The correct
contour is a little tricky. Its done now! |
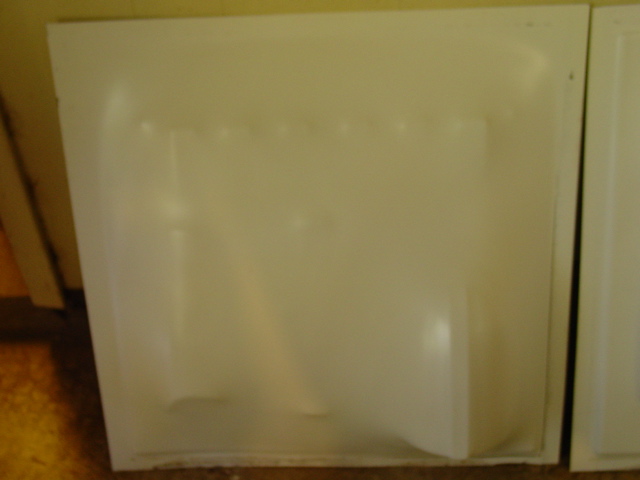
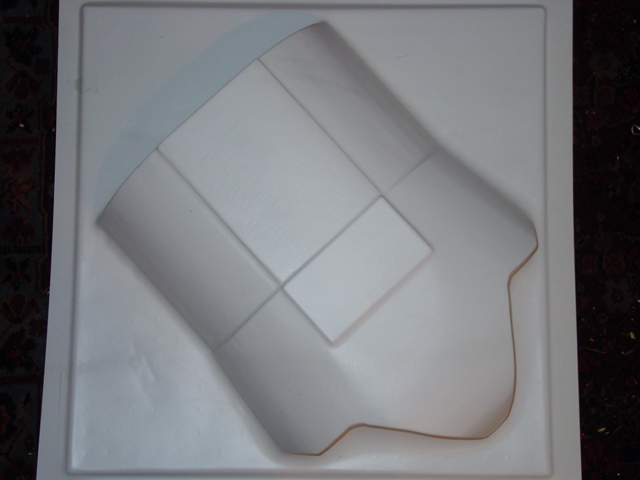
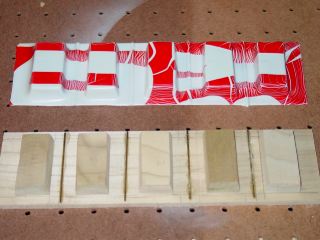
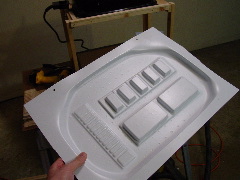
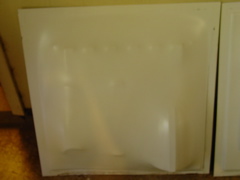
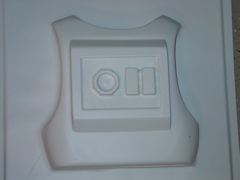
| Step
3: Making the vacuum form "pull" |
| The
very first test pull: using the prototype Mark II Vac-machine |
 |
 |
 |
| In
my initial trials, I used what polystyrene I had on hand,
an old "Garage Sale" sign. While functional as
a test subject, I really needed to find a good styrene source.
I eventually found "US
Plastics Corp." and ordered the .060 styrene in
a 40" x 72" sheet. Cost is $14.39 plus shipping.
Not too bad. I am optimistic that this will work out well.
HIPs is just a short name for High Impact Styrene. #43334.
a 12" x 18" sale sign will run $5.00. The paint
on the sale signs seem to cause some weird distortions too. |
Here
is the "US
Plastics Corp." .060 styrene in a 40" x 72"
sheet. Cost is $14.39 plus shipping. Not too bad. I measured
the frame, cut it with a knife and slipped it into my frame.
Two holes were drilled and thumbscrews were slipped in. The
plastic is held securely during the heating and vacuum process.
Here you can see the hand sections and the collar strips being
formed. Notice that around the corners the plastic did not
get hot enough. Also, I need to add risers with cut marks
to indicate where to trim the parts. |
Here
is another view of the second set of molds being vac-ed. I
re-oriented the heater, and got better results with this pull.
I still need to figure out some risers with cut marks on the
"drop boxes" as the "bottoms are too curvy. |
 |
|
|
| Here
is the final test pull, removed from the frame. You can see,
this is about the best I can expect from the current heating
set-up. Not bad, I'd say 80-85% coverage. The 3 hp Shop-vac
seems to pull a vacuum just fine. I do have some extended
heating issues with the cheap-o Sunbeam grill [it cuts off
at a medium temp] Adding a second unit should fix the problem.
Also adding magnetic catches to hold the frame during heating
should make the transition smoother. I really need a larger
machine! |
REVIEW:
I have
since changed plastic suppliers and now use http:/www.professionalplastics.com
as my supplier. They sell the Sheet High Impact Styrene
[sHIS] for $23.41 a .080thick 4x 8 foot sheet. |
Pretty
soon I realized that my little vac-machine was going to be
too tiny to pull the larger armor parts. Some other sites
call to use your kitchen oven as the heater source. If your
wife will allow this, it makes a cheap option. My wife said
no, so I had to make the oven! After months of research and
build time, trial and error, I finally got the oven working.
The key to a successful vacuum forming machine is the oven. |
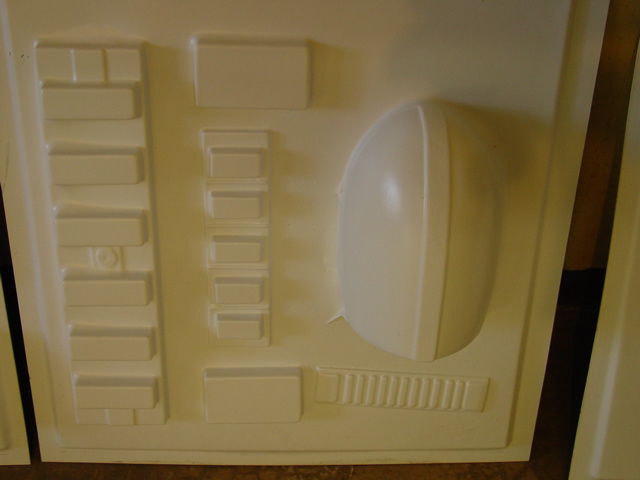
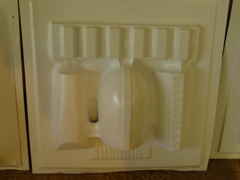
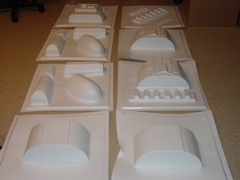
Step
4: Reworking and using the bigger machine |
| The
larger molds and the need for a larger
machine |
 |
 |
 |
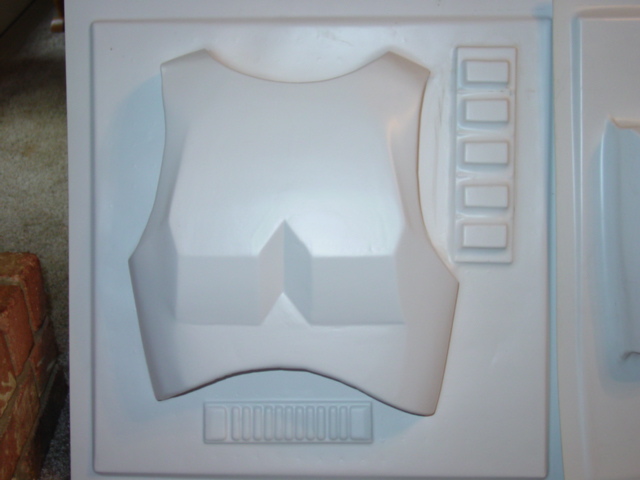
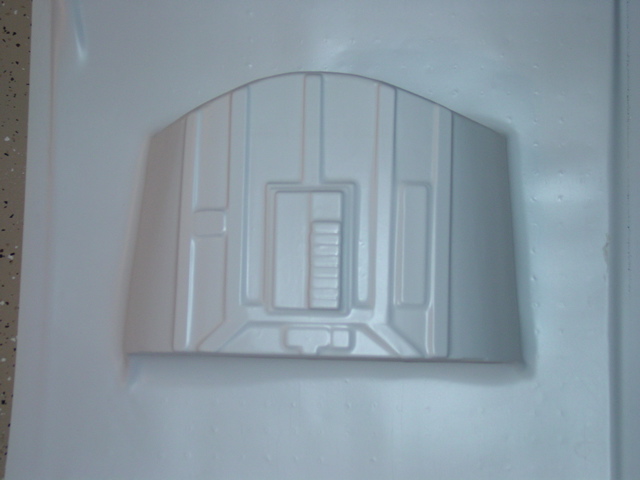
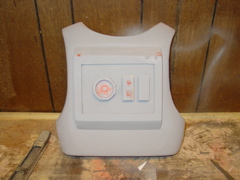
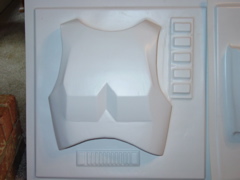
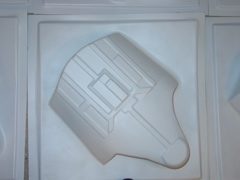
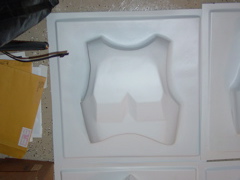
| I'm
pretty happy with the chest mold. It was a challenge to get
the proper shape to the pecks, and I think it worked pout
pretty well. This mold was used before I top coated it with
the spot filler primer. It looks ugly, but it pulls fine. |
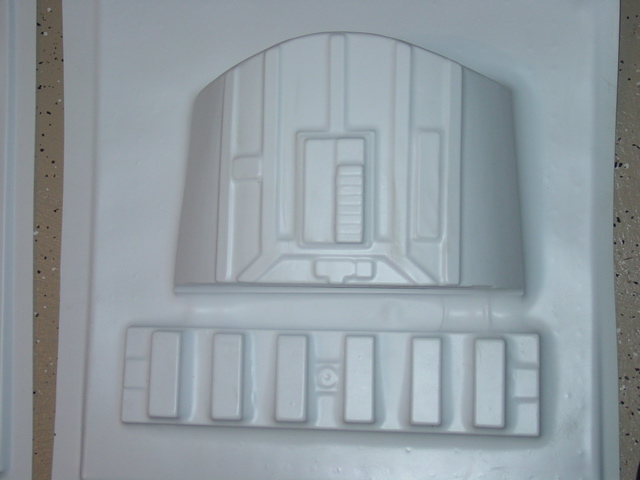
As I
make a mold, I learn something new. Bondo is a wonder material!
It helps contour and shape the rough blocks that I make, transforming
them from MDF to vac-molds! A sealer coat also helps hide
imperfections. MDF has a tendancy to fuzz a little on the
surface. It needs a coat of spot putt to smooth things out.
This is the upper back, and it need some fine tuning, but
its mostly there. |
I'm working
on the scale drawing of the thighs. Once the upper body is
finished, I can see the light at the end of the mold making
tunnel. Once the upper body is made, all that is left to do
are the: inner and outer calves, the inner and outer right
thigh and inner and outer left thigh. Some sort of fabricated
thermal detonator and its off to the helmet molds! |
 |
REVIEW:
As you
can tell, these molds are larger than what could have been
pulled on the prototype machine. That chest mold alone needs
a pretty big working surface. If you plan to pull the abdomen
and codpiece as one part, you will be glad you made the
machine as a 24"x24" rig. |
|
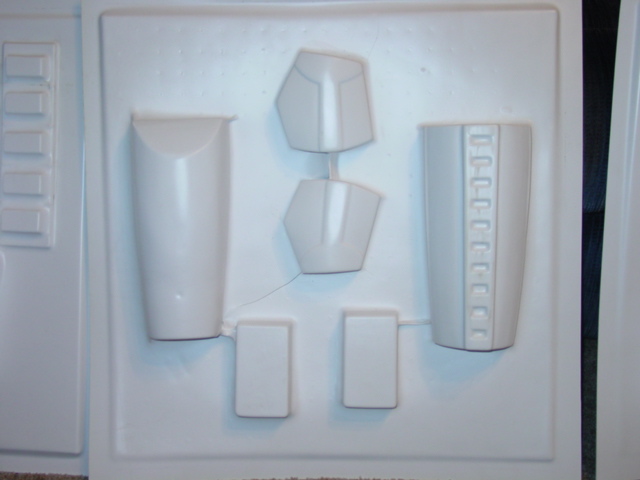
The
collars need to be reworked with an arch built in. The flat
straps just do not bend well. Also, the knee boxes and belt
seem to pull poorly using the thicker .080 material. I need
to use .060 on these parts. Above are some of the molds.
|
|
|
| Test
pulls using the larger machine - Trial and error |
 |
 |
 |
| Here
are the pulls from the Thurston James-type
machine. After getting some .080 thick HIS sheet and cutting
it down to 24x24 inch squares, I mounted it on the frame,
and began trying to melt it. The oven was not hot
enough, and the corners did not get warm
so the pull was poor. No vacuum seal. |
I continued
heating the oven, and installing the lid, I was able to get
a better pull. This one had an issue; there was such a deep
draw between two pieces, the styrene had a hole
pop in between the forearm and the shoulder. This
caused a loss of vacuum and loss of detail. |
So, I
decided to try a wider spacing approach. This seemed to work,
and revealed the webbing issues, and the
need for risers. Careful attention to arrangement
of the molds on the forming platen will minimize the webbing
issue. |
 |
 |
 |
| The oven
had been running for 20 mins. by the time I pulled this, and
I found that if I wear gloves, I can massage the hot plastic
to conform to the mold better. Note, the belt and the shoulder
bell are on risers. The drop boxes, and other small parts
are not. |
I had
one error, I overheated the pastic, and it melted onto the
coils. It was a lost cause. But after reloading the machine,
and using the latest mold, the upper back, I had a good pull.
It too needs a riser to reduce the flare that happens where
the mold sits on the forming surface. |
Here
is a detail shot of the popped plastic. I was really hoping
for a lot of parts that could be pulled at one time with this
machine. I will need to carefully cosider the mold placement
to best minimize these issues. |
 |
 |
 |
| Take
a look at some of the webbing. Note, that a better arrangement
of the molds will reduce the webbing issues. |
Another
detail shot of the last test pull. Pretty decent detail. These
parts are on risers and will trim out nicely. Some parts will
look better uisng 0.60 material instead of the .080 seen here. |
A
few more pulls were made over the weekend. I finished the
upper chest and now all the "armor shirt" parts
are done. Time to work on the abdomen and lower back sections.
|
 |
 |
REVIEW:
A lot
was learned from the first few test pulls. Placement and
the proper oven temperature are keys to a successful pull.
Don't rush the heat cycle on the plastic. Also, the shop-vac
I used is old and brand-new filter really helps. |
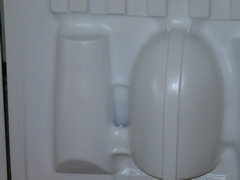
| Each
mold that has a hard deep end to it, like the biceps and the
shoulder bell, are going to need to be reworked with tapers
to aid in the release of the mold from the pulled plastic. |
I am
hopefull, if the tapers work, that I will be able to make
some plaster casts from a good pull of the shoulder bell,
biceps and forearms. That way I can pull a complete set in
one pull instead of having to pull the same mold twice. [and
save me from making another mold from scratch!] |
|
 |
 |
 |
| Here
is the first pull of the abdomen. I need to rework the edges,
to get a tighter pull, but its getting there, some channels
for the air to travel down. This should give a tighter pull
on the surface. |
Second
pull of the abdomen, and I added the belt. The belt did not
pull very well, but the abdomen will be just fine. I'm still
having a lockdown issue with some of the molds. Starkid1990
suggested adding some pulls and I think I will have to do
that. |
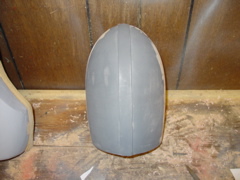
The lower
back. This is an easy mold to make if you have power hand
planer and a belt sander! Thats a sandwich of 6 sheets of
15/16" MDF gluded together and ground down to the right
shape. |
 |
 |
 |
| This
is the reworked arm molds. Notice there are tapers and risers
on these that extend beyond the ends of the molds. The tapers
help smooth the edges, and make demolding easier. Note the
webbing between the drop box and the forearm. [not an issue
for the useable portion] |
Here
is a close-up of the tapers. These are not attached, but when
you demold them, simply slip out the taper, and the mold pops
right off. Also, it acts as a cuting guide! |
IA slight
rework on the upper back armor. I'm still working on the details,
I'm not entirely happy with this one. The ring thing needs
to be redone, and the armpits seem too big. It also sticks
real bad. |
 |
 |
Review:
Its
getting there! Each time I use the machine I seem to learn
something new. Time to start on the molds that are bleow
the waistline. |
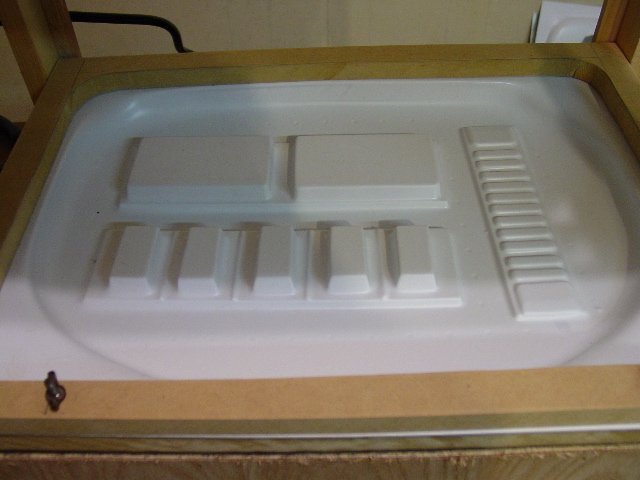
| The
last pull for the day is the "flat" parts. Finally,
I got the belt to cooperate. Nice tight pull, no webbing and
the mold release pretty easily. I plan to redo the mold for
the collar straps, and make them arched instead of flat. |
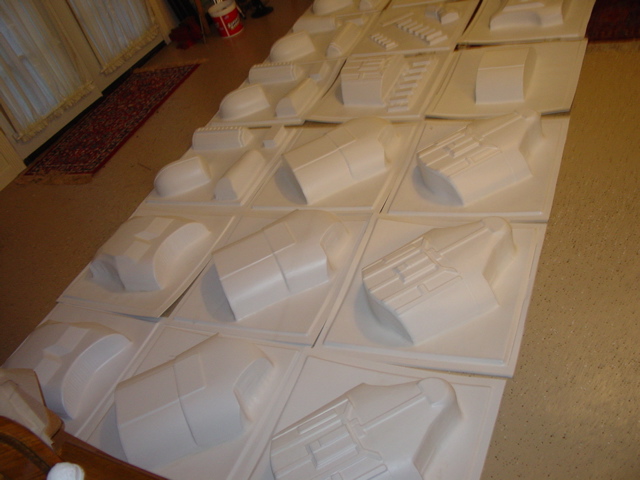
After
an hour and a half's worth of vac-u-forming, and only one
miss-fire, this is the results. Call it a trooper factory! |
|
 |
|
 |
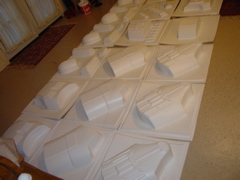
UPDATE
2-13-05:
I had an assistant help pull the next set of armor. Thanks
Lance! Here are the results. Get an assistant, it really helps. |
Another
view of the vacuum formed parts. I now have 17 or 23 molds
done. Working on the calves this week. |
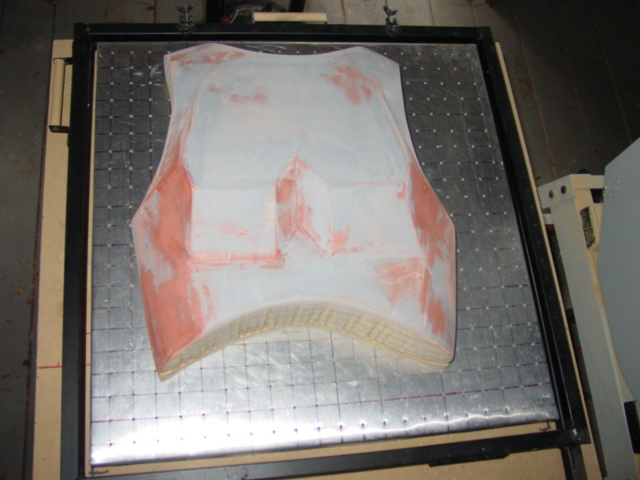
Here
is the abdomen and codpiece molds pulled as one mold. I was
unsure if my vac-machine could pull this lage of a mold, but
it can! There is a seam line where the two molds are butted
together. |
 |
 |
Review:
I'm
glad the machine will hold the abdomen & codpiece as
one pull. I did not realize the lower back and butt armor
is even larger than the abdomen/codpiece! It barely fit
on the machine. Less than an inch to spare all the way around.
This means that it will cut down on the number of pulls,
and the number of sheets of HIPS I need to make the full
set of armor. Right now, that looks like a bout 3.25 sheets.
Cost in materials for a trooper armor set, around $90. WOW!
The
thigh molds and legs are done now. by removing the molds
from the formed plastic quickly, while the plastic is still
warm really helps release the molds. |
| Here
is the lower back and butt armor. This is about as big as
I can pull! Any longer and the mold would hang over the side.There
is a seam line where the two molds are butted together. |
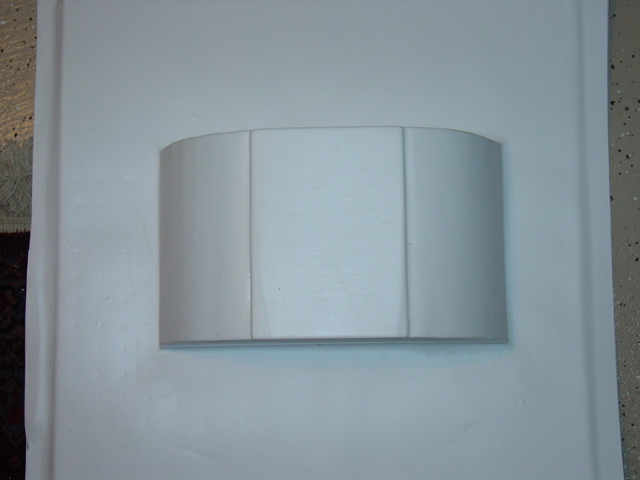
I
re-pulled the chest armor after making some minor changes
to it. I think a little more sanding and I can call this mold
done. |
|
Step
5: Practice makes perfect
With each
pull I learn something. Who would have known, that the MDF does
not have to be sealed to give a decent result?Latex paint or watered
-down Elmers glue can seal the MDF. Trimming the part off the
mold while the plastic is still warm is a good part removal technique?
Most parts need Risers and Tapers? The list goes on.
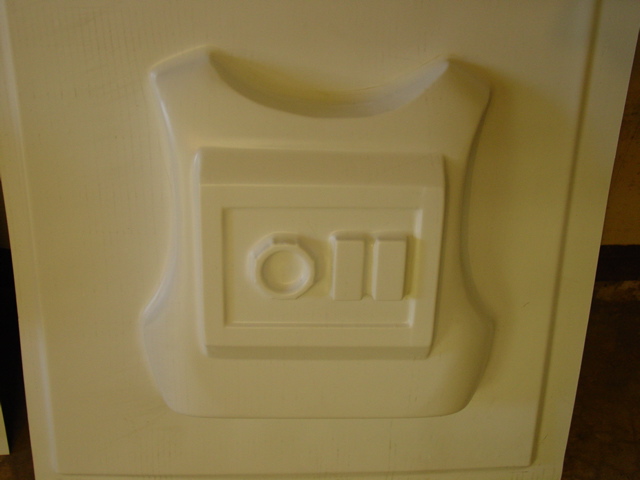
Step
7: Trimming the parts from the raw pull
Rough trimming
using the bandsaw is the way to go! Really cuts down on the time
it takes to finish out the armor. Once this is done, the detail
trimmings a combination of "score and snap" using a
sharp utility knife, and sanding by hand or with Dremel sanding
drum. I'm working on a video of the detail trimming and fitting.
Step
8: Assembly
Stay tuned
for details. I'm working on a video of this.
Step
9: Weathering
Stay tuned
for details. I'm working on a video of this.
Step
10: Fitting a complete suit
 |
 |
 |
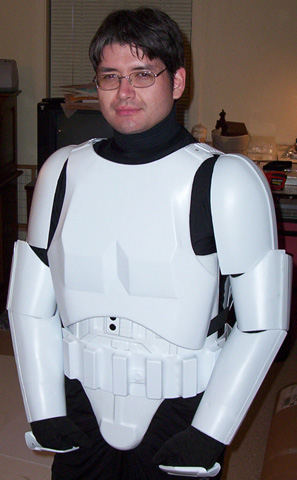
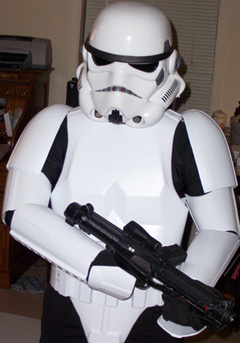
| Here
is a shot of the first trooper assembly. So far you get the
idea, its a trooper. The helmet and the blaster are from my
old suit, shown here as an example. We still have these parts
to make: thigh molds, calves, and the O2/thermal detonator,
helmet, and blasters. |
Here
is a shot of Herbert
without the helmet or blaster. A little more tweaking and
I think it will work. Is Herb too short for a stormtrooper?
Hmm... I don't think so! |
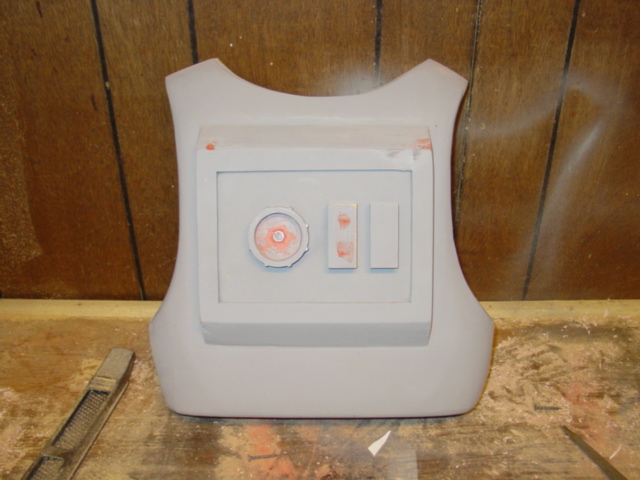
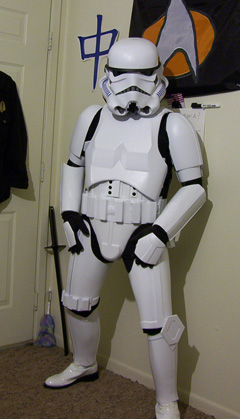
Pretty
much the final version of Herb's #1 suit . Note the chest
has had been modified a bit to be more form fitting. Also,
note, the 'sniper' knee diamond. Time to get that suit dirty! |
Final
thoughts
I
like working with the MDF/Bondo/poplar/basswood as a mold material.
The MDF/Bondo, for me, is easy to work with, and cost is pretty
low, and its an easy 'lumber yard' material to get. So far I have
used up 3 sheet of 4x8 foot 3/4" MDF. The moulds made to
date:
- Left
hand
- right
Hand
- collar
[these are going to be upgraded with the proper arched versions]
- shoulder
bell
- bicep
inner
- bicep
outer
- right
knee "power pack"
- hip
drop boxes [first molds made]
- inner
forearm
- outer
forearm
- utility
belt
- chest
plate
-
upper back
- abdomen
- lower
back
- codpiece
"groin"
-
buttocks "seat"
- inside
calf
- outside
calf
- right
Inside thigh
- right
outside thigh
- left
inside thigh
- left
outside thigh
- thermal
detonator encap
- thermal
detonator control pad * Note the body is made from a PVC pipe,
2 inches in dia. and 7.5 inches long painted gray.
Note,
all body armor molds are done. [March 2005] Some minor tweaking
to get the molds to release better from the pulled plastic, but
YEA, all the body molds are finished.
In the works:
- Helmet
dome: MDF mold almost complete, still working on the trapazoids,
and a method to mate up with the back section.
- Helmet
back: MDF block made and initial sanding started. Man, getting
that bulbed contour is tricky.
- Helmet
face: MDF block started, but waiting to finish dome and back
section.
- Helmet
left ear: MDF block done
- Helmet
right ear: MDF block done
Since
I have a GT/FX armor set, and I know of some of its inaccurate
elemets, I have decided to "base" this project with
those modifications in mind, but using the GT/FX as a scale guide.
Each mold is made from a reference photograph, scale drawings
and a visual reference of the GT/FX armor. Each molds starts out
as a scale drawing. Next, I make a template from a sheet of chip-board.
This makes the template rigid and easy to transfer to the MDF.
Next, one inch flat piece of MDF are bandsawed the shape of the
template. Several layers [3-6 layers ] of the MDF are then glued
together, clamped down and allowed to dry for several days. At
this pint I have a blank block that is a rough outline of the
armor shape I want. I use a number of wood working tools to sand,
plane, grind or chizel down the block of MDF into the rough shape
of the armor. Next comes the bondo to smooth out edges and seams
and to fill in any missing areas. Top if off with a good coat
of "spot filler" paint, and ta-da! Molds. Getting the
right contour is hard. I've rewored the shoulder bell several
times and I'm still not happy with it! The last step is to cut
out a 1-inch thick riser. This is an elevated platform the same
shape as the base of the mold. Its function is to float the mold
about the forming surface to allow the mold to base to be higher
than the forming surface.
I'm
cheating a bit to reduce the number of molds that I have to make.
First, there is only one shoulder bell. Second, the forarms are
the same, not a left and right part. Finally the calves are like
the forarms, no a left and right sides. If I have to go and make
these molds thats ok, but for now, this is all I intend to do.
I may try to cast a plaster [Hydro-cal or Ultra-cal 30] cast of
the molds before they start to break. That way, I can make more
than one pull of some of the mold at a time.
I'm
still hard at work shaping the MDF molds for the trooper helmet.
I know the originals were a dome molded to the back, the face
mold, and the left and right ears. Thats what I'd like to make,
but most trooper buckets I've have access to for reference have
seperate domes and back sections.
The
helmet is kicking my butt! Getting just the dome to look right
has taken me what seems like FOREVER.
|
| Vacuum
Forming Machines |
 |
The
Mark IV [Thuston James Replica]
While
the prototype machine seen in the first few images was easy to make,
the size was too small to be any good for parts large than the smallest
trooper gear. I need a larger vacuform machine. Here is view of
my latest Thurston James Vacuform table
replica. This is a 24"x24" table, undergoing test pulls
now, This will be the last word in vacuform tables, and the final
table I plan to construct. Previous attempts have been "proof
of concept" designs. Now that I know this will work, its time
to get started on a "real" vacuform projects. Lets see,
Halo armor, X-wing pilot gear, ALiENs gear, Star Trek props, storage
bins and boxes, toys... the list goes on and on! |
|
Another
view of the new Thurston James replica with the forming cart finished.
Click here for more details. Test pulls
have been made. The new machine works great! Some mods to the cart
system, and a better vacuum, but all in all, it works great! Now that
the machine is working, I need to get my molds ready. Back to the
workshop! |
| |
|

Daughter
Lauren and TK560, Halloween 2003.

Me,
TK560, Halloween, 2002.
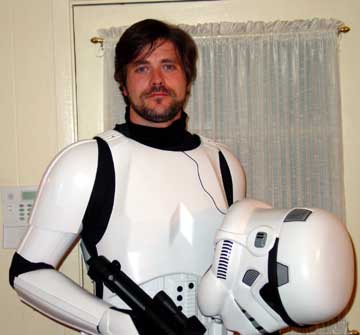
Man,
this thing is hot! |
TK-560's GT/FX
Suit
Having
an armor set as a reference really helps, even if that suit is not
a 100% accurate one.
A few
years ago, my wife bought me a Don Post vintage Stormtrooper
helmet as a birthday present. You might remember these, the amber
lense version. Well, that started me, as the Star Wars
fans might say, "down the path to the dark side." I loved
that helmet, not only because my wife gave it to me, [she knew what
a big Star Wars fan I was] but because it was instantly
recognized by everyone who saw it. I knew it was an instant classic!
I also
knew that sooner or later, I had to get a whole set of Trooper
armor. I wanted to make it myself, but I had never seen a set in
person. I needed some kind of reference to build my set from. I
contacted some of my prop making connections and before long I had
received my armor set. Just in time for Halloween 2002. Needless
to say, each time I wore this costume I was a big hit at all the
parties. I joined the
Fighting 501st soon there after, and became
the vile trooper known only by his ID number: TK560.
As you can see from the lower photo, the armor set has some errors
that need to be corrected. The helmet, also known as a "bucket"
is about 10-15% too large. [the Don Post is about 15% too
small]. In the top photo I have upgraded the helmet to a more correct
ANH style. The rest of the armor is straignt forward enough to build,
with basic modeling, a large vac-u-form system and a boat-load of
sheet styrene.
The
helmets both have cooling fans, and a voice amplification system.
Most of the parts have been glued, snap-fit or rivited for "trooping".
The body suit has been upgraded from a pair of black long underwear,
to a Lycra/Spandex body suit made for SCUBA diving called a dive
skin. The gloves are a Walmart special. Lets just say that this
thing is hot, real HOT, to wear in East Texas. The boots have been
upgraded from a pair of "Justin Ropers", that I painted,
cut and taped them to fit under the lower shin pieces to correct
1970's style low cut "disco" boots.
I love
the challenge of scratch building, and the first ever scratch built
prop I did was the "evil empire" E-11
Blaster. Much better looking than using a toy blaster,
and not as expensive as a real deactivated L2-A3 Sterling machine
gun!
When
I'm not wearing this rig, I made a mannequin that my daughter calls
'Mr. Man'. He stands guard over my studio and greets visitors. I'll
post a tutorial on how to make a $30 mannequin one of these days.
When
I got my GT/FX suit and then upgraded to a MovieFX
helmet, I wanted to have both the Stormtrooper AND a Sandtrooper.
I did not have the budget to buy another suit, so I decided to make
one, from scratch. This required me to build a vacuform
machine and the molds necessary to make another suit.
My buddies found out what I'm doing, and begged me to make them
a suit too! One thing led to another, and the idea of a fan
film emerged. During the research stage of this massive project, I've
been working on a script for an elaborate stormtrooper action packed
fan film that requires about 12-20 troopers, a swamp, and a whole
lot of pyrotechnics.
|
Last
update, June 13, 2007 |